In a nutshell
Imagine a large office building. The security desk decides who gets in and where they can go. The founder holds a master key that opens every door — but they lock it in a safe and almost never carry it. Regular staff carry permanent badges. Visitors and contractors get a temporary badge they check out at the desk, use for a few hours, and hand back — it expires on its own so a lost visitor badge is nearly worthless the next morning. On every door there is a printed rule sheet saying which badges may open it, and the guard follows one rulebook: a single “DO NOT ADMIT” note on anyone’s file overrides every “may enter” badge they hold.
AWS Identity and Access Management (IAM) is exactly that security desk for your cloud. The master key is the root user. Permanent badges are IAM users. Temporary badges are roles you assume through STS. The door rule sheets and staff files are policies (JSON documents), and the guard’s rulebook is the evaluation logic — the fixed algorithm AWS runs on every single API call to return one answer: Allow or Deny. Learn those five ideas and IAM stops being scary; it becomes a small, predictable machine.
Level: Beginner → Intermediate · Time: ~48 min
Before you start, you need an AWS account and a rough idea of what an AWS service is (a server on EC2, a file store on S3). No security background is assumed — every term is defined the first time it appears.
By the end you will be able to, in plain terms:
- Read any IAM policy JSON and say out loud what it allows, denies, and under what conditions.
- Predict whether a given request will be allowed before you run it, using the deny-beats-allow-beats-default rule.
- Choose correctly between an IAM user and a role, and wire up a real cross-account hand-off with
sts:AssumeRole.
Everything below builds on those. Skim the analogy, then read straight through — each section adds one piece to the machine.
Every action in AWS — launching a server, reading a file from storage, deleting a database — is an API request, and Identity and Access Management (IAM) is the gatekeeper that decides whether that request is allowed. Get IAM right and the rest of AWS is just services behind a door you control. Get it wrong and you either cannot do your job (everything says Access Denied) or, far worse, you have handed an attacker the keys to the estate. IAM is the single most important service to understand because it sits in front of all the others.
The good news is that IAM is built from a small number of pieces that fit together in a predictable way: principals that make requests, credentials that prove who they are, policies that say what they may do, and an evaluation algorithm that combines all the policies and returns a single Allow or Deny. This lesson teaches each piece from the ground up, then ties them together with worked policy JSON and the exact decision logic AWS runs on every request. IAM is also a global service — it is not tied to a Region — and it is free to use; you only pay for the resources your identities go on to consume.
By the end you will be able to read and write a policy, explain why a request was denied, choose between an IAM user and a role, and apply the least-privilege and root-account practices that every exam and every interviewer expects.
Learning objectives
By the end of this lesson you will be able to:
- Identify the IAM principals — the root user, IAM users, groups, and roles — and explain when to use each.
- Manage credentials correctly: console passwords, access keys, and multi-factor authentication (MFA).
- Read and write an IAM policy document, naming every element (
Version,Statement,Sid,Effect,Action,Resource,Condition,Principal). - Distinguish identity-based from resource-based policies, and place SCPs, permission boundaries, and session policies in the right layer.
- Apply the policy evaluation logic — explicit deny beats allow beats implicit deny — to predict the outcome of any request.
- Use roles and
sts:AssumeRolefor workloads and cross-account access, and explain instance profiles and IAM Identity Center (SSO). - State the least-privilege and root-account best practices that keep an account safe.
Prerequisites & where this fits
You need an AWS account and a basic grasp of what an AWS service is (compute such as EC2, storage such as Amazon S3). No prior security knowledge is assumed — every term is defined as it appears. This is the second lesson in the AWS Zero-to-Hero course, following AWS Cloud Fundamentals; it is the foundation that every later lesson on networking, compute, storage, and architecture quietly depends on, because each of those services is reached through an IAM-gated API. After this, the course moves on to networking with AWS VPC Networking Fundamentals.
Authentication vs authorisation: the two questions
IAM answers two separate questions on every request, and confusing them is the source of most early mistakes.
| Question | Plain English | IAM mechanism |
|---|---|---|
| Authentication | “Who are you, and can you prove it?” | Credentials: password + MFA (console), or access keys / temporary tokens (API/CLI) |
| Authorisation | “Now that I know who you are, what are you allowed to do?” | Policies attached to identities and resources, run through the evaluation logic |
A request first proves identity (authentication), then IAM evaluates policies to decide permission (authorisation). A perfectly valid set of credentials with no permissions can do nothing; a powerful policy with invalid credentials never even gets evaluated. Keep these two doors separate in your mind for the rest of the lesson.
Principals: who can make a request
A principal is the entity that makes a request to AWS. There are four kinds, and choosing the right one is the first real IAM decision you make.
| Principal | What it is | Credentials | Lifespan | Use it for |
|---|---|---|---|---|
| Root user | The account owner, created with the email address; has unrestricted access to everything including billing | Email + password (+ MFA) | Permanent | Almost nothing — only a handful of tasks that require root |
| IAM user | A named identity for a specific person or legacy application | Password (console) and/or access keys (API) | Permanent until deleted | Break-glass admin, or systems that genuinely cannot use roles |
| IAM group | A container of IAM users for attaching policies once; not a principal itself | None — groups cannot log in | Permanent | Granting the same permissions to many users (e.g. “Developers”) |
| IAM role | An identity with permissions but no long-term credentials, designed to be assumed temporarily | Temporary security tokens from AWS STS | The role is permanent; each session is short-lived | Workloads (EC2, Lambda), cross-account access, federated/SSO users — the preferred principal |
Two points new users miss. First, a group is not a principal — you cannot “log in as a group” and a group cannot appear in a policy’s Principal field; it is purely an administrative convenience for attaching policies to many users at once. Second, the modern best practice is to prefer roles over users: roles hand out short-lived credentials automatically and there are no access keys lying around to leak. Human access in a well-run organisation comes through IAM Identity Center (covered below), and workload access comes through roles — leaving very few reasons to create IAM users at all.
Roles come in more flavours than “just a role”
The table above treats “role” as one thing, but in real accounts you will meet three distinct role shapes. They are all still roles — identities with no long-term credentials, assumed for temporary tokens — but who creates them and who is allowed to assume them differs, and beginners are forever puzzled by roles that “appeared on their own”.
| Role flavour | Who creates it | Who assumes it | Can you edit its permissions? | Everyday example |
|---|---|---|---|---|
| Service role | You do (or a service creates it with your consent) | An AWS service, acting on your behalf | Yes — it is your role | A Lambda execution role; an EC2 instance role; a CodeBuild build role |
| Service-linked role | The service predefines and manages it | Only that one service | No — permissions are locked by the service | AWSServiceRoleForAutoScaling, AWSServiceRoleForECS |
| Federated (assumed by a human/IdP) | You define the role + trust | An external identity proven by your identity provider | Yes | An engineer signing in through Okta/Entra ID or IAM Identity Center |
A service role is a role whose trust policy names an AWS service principal (for example lambda.amazonaws.com) instead of a user. When Lambda runs your function, it assumes that role and your code inherits its permissions — which is why you never put access keys in a Lambda. A service-linked role is the same idea but pre-baked: the service owns the permissions, you cannot loosen them, and deleting the service usually deletes the role. Both exist so that AWS services can call other AWS services on your behalf without you hand-wiring credentials.
Federated identities are the fourth kind of principal, and the one that matters most at scale. A federated principal has no IAM user at all; instead an external identity provider (IdP) — your corporate directory over SAML 2.0, a social/OIDC provider, or IAM Identity Center — vouches for the person, and STS exchanges that proof for temporary role credentials via AssumeRoleWithSAML or AssumeRoleWithWebIdentity. The mental model: authentication happens outside AWS, authorisation (a role) happens inside AWS. This is how a 5,000-person company gives everyone AWS access without creating 5,000 IAM users.
That completes the principal picture: root (the master key), IAM users (permanent badges), groups (a filing tray for users, never a principal), and roles in their several flavours (temporary badges for workloads, services, and federated humans). Everything a principal does next depends on proving which principal it is — credentials — which is where we turn.
Credentials: how a principal proves identity
Authorisation is meaningless until the caller has authenticated. IAM principals use different credential types depending on how they access AWS.
| Credential | Used for | Notes & risks |
|---|---|---|
| Console password | Signing in to the AWS Management Console (web) | Human use only; enforce a strong password policy and MFA |
| Access key (Access Key ID + Secret Access Key) | Programmatic access via the CLI, SDKs, or API | Long-lived — the biggest leak risk in AWS; avoid where a role will do |
| MFA (multi-factor authentication) | A second factor on top of password or keys | Virtual authenticator app, hardware key, or FIDO2 passkey; turn it on everywhere |
| Temporary security credentials | Issued by AWS STS when a role is assumed or a user federates | Short-lived (minutes to hours), auto-expiring — the safest option |
The mental model to internalise: long-lived access keys are a liability; temporary credentials are the goal. A leaked access key works until someone notices and revokes it; a leaked temporary token expires on its own, often within the hour. This single fact is why roles are preferred and why so much of IAM design is about replacing static keys with assumed roles.
Reading a credential at a glance, and where the CLI finds one
Two small facts make credentials far less mysterious. First, you can often tell a credential’s type from its prefix. An access key ID that starts with AKIA is a long-lived IAM user key — the kind that leaks and lives forever. One that starts with ASIA is a temporary STS key that ships alongside a session token and expires. When you see ASIA… in a log you are looking at a role session (good); when you see AKIA… committed to a repo you are looking at an incident (bad).
Second, when you run the CLI or an SDK and don’t pass keys explicitly, AWS walks a credential provider chain and uses the first source it finds — roughly in this order:
- Command-line flags (
--profile, explicit keys) - Environment variables (
AWS_ACCESS_KEY_ID,AWS_SECRET_ACCESS_KEY,AWS_SESSION_TOKEN) - An assumed role or web-identity role configured in
~/.aws/config - IAM Identity Center (SSO) cached credentials
- The shared credentials file
~/.aws/credentials - Container credentials (ECS task role)
- The EC2 instance profile via the Instance Metadata Service (IMDS)
The lesson for beginners: if a command uses the “wrong” identity, you almost always have a higher item in this chain overriding the one you meant — a stray AWS_ACCESS_KEY_ID in your shell, most often. aws sts get-caller-identity prints exactly which principal you are right now and is the fastest way to end the confusion.
Rotating and retiring keys
If you must keep a long-lived access key, rotate it with the two-key trick: an IAM user may hold two access keys at once, so you (1) create a second key, (2) roll it out everywhere, (3) confirm the old key is idle using its last-used timestamp (aws iam get-access-key-last-used), then (4) deactivate and finally delete the old one. Never delete the old key before the new one is proven — that is how you lock a production job out at 2 a.m.
On multi-factor authentication, not all factors are equal. A virtual TOTP app or hardware TOTP token is good; a FIDO2 / passkey (a security key or platform authenticator) is phishing-resistant because the cryptographic challenge is bound to the real AWS sign-in origin, so a lookalike site cannot relay it. For anything with administrative power, prefer FIDO2. Either way, MFA is not only for the console — you can require it for API calls through the aws:MultiFactorAuthPresent condition key, which we use later on sts:AssumeRole.
The policy document: anatomy of a permission
A policy is a JSON document that lists permissions. AWS reads these documents to decide every request, so being fluent in their structure is non-negotiable. Here is a complete, annotated policy that allows reading objects from one specific S3 bucket — but only over HTTPS:
{
  "Version": "2012-10-17",
  "Statement": [
    {
      "Sid": "AllowReadProjectBucket",
      "Effect": "Allow",
      "Action": [
        "s3:GetObject",
        "s3:ListBucket"
      ],
      "Resource": [
        "arn:aws:s3:::kloudvin-project-data",
        "arn:aws:s3:::kloudvin-project-data/*"
      ],
      "Condition": {
        "Bool": {
          "aws:SecureTransport": "true"
        }
      }
    }
  ]
}
Every element does a specific job:
| Element | Required? | What it specifies |
|---|---|---|
Version |
Yes | The policy language version; always use "2012-10-17" (the current one — not the document’s date) |
Statement |
Yes | One or more permission blocks; this is where the work happens |
Sid (statement ID) |
Optional | A human label for the statement; useful in reviews and logs |
Effect |
Yes | Either "Allow" or "Deny" — the heart of the statement |
Action |
Yes* | The API operations, in service:Operation form (e.g. s3:GetObject); wildcards like s3:* are allowed |
Resource |
Yes* | The Amazon Resource Names (ARNs) the actions apply to; "*" means all resources |
Principal |
Resource-based only | Who the statement applies to — used in resource-based policies, not identity-based ones |
Condition |
Optional | Extra tests (encryption, source IP, tags, MFA present) that must be true for the statement to apply |
*In an identity-based policy you specify Action and Resource; in a resource-based policy you also specify Principal. A statement can use NotAction/NotResource/NotPrincipal as inverse forms, but lead with the positive forms while learning.
A few rules that prevent the classic beginner errors:
- The default is deny. If no statement explicitly allows an action, it is denied. You grant access by adding Allow statements; you never need an Allow “to start with”.
- ARNs are exact. Note that the bucket and its objects are two different resources:
arn:aws:s3:::kloudvin-project-data(the bucket, forListBucket) andarn:aws:s3:::kloudvin-project-data/*(the objects inside it, forGetObject). Forgetting the/*is one of the most common reasons an S3 policy “doesn’t work”. - Conditions narrow, never widen. The
aws:SecureTransportcondition above means the Allow only applies to HTTPS requests; it cannot grant anything extra.
Wildcards, Not… elements, and policy variables
The worked policy above used explicit action and resource lists, which is what you want in production. But three more constructs appear constantly in real policies, and each is a classic trap.
Wildcards let one line stand for many. s3:Get* matches every S3 action beginning “Get”; s3:* matches all of S3; a lone "*" in Action matches every action in every service (administrator-level, use with care). The ? character matches exactly one character. Wildcards are convenient and dangerous in equal measure — "Action": "*" with "Resource": "*" is the “god policy”, and the whole discipline of least privilege is about not reaching for it.
NotAction and NotResource are inverse selectors, and they do not mean “deny”. NotAction means “this statement applies to every action except these”. Read this carefully:
{
  "Effect": "Allow",
  "NotAction": "iam:*",
  "Resource": "*"
}
That statement allows every action except IAM ones — it is enormously permissive, not a restriction. The safe, common use of NotAction is with Deny, to carve an exception into a blanket block (“deny everything on this resource except the read actions”). If you ever find yourself reasoning “NotAction Allow will keep people out”, stop: only an explicit Deny keeps people out. NotResource and NotPrincipal behave the same way — inverse matching, never an implied deny.
Policy variables let one policy serve many principals. ${aws:username} is substituted with the caller’s user name at evaluation time, so a single policy can give every user a private “folder” without you writing one policy per person:
{
  "Effect": "Allow",
  "Action": ["s3:GetObject", "s3:PutObject"],
  "Resource": "arn:aws:s3:::kloudvin-home/${aws:username}/*"
}
Alice can only touch …/alice/*, Bob only …/bob/* — from one shared policy. The same trick with tag variables (${aws:PrincipalTag/team}) is the foundation of ABAC, which we reach in Going deeper.
Managed vs inline policies
Finally, where the JSON lives is its own decision, and it changes how a policy is reused and audited.
| Policy form | What it is | Reuse | Best for |
|---|---|---|---|
| AWS-managed policy | Prebuilt and maintained by AWS (e.g. ReadOnlyAccess, AmazonS3ReadOnlyAccess) |
Attach to many identities; AWS updates it | Common, broad needs and quick starts |
| Customer-managed policy | A standalone policy you author and version | Attach to many identities; you control it | Your reusable, least-privilege building blocks |
| Inline policy | JSON embedded inside a single user, group, or role | One-to-one, cannot be reused | A permission that must live and die with exactly one identity |
Prefer customer-managed policies for anything you will reuse: they are versioned, attachable in one place, and show up cleanly in reviews. Reserve inline policies for the rare case where a permission should be inseparable from one identity (so it can never be accidentally attached elsewhere). A single AWS-managed policy is capped at 6,144 characters, which — combined with attachment limits — is a gentle nudge towards several small, purpose-built policies rather than one sprawling monster.
Identity-based vs resource-based policies
Policies attach in two places, and knowing which is which explains a great deal of IAM behaviour.
| Identity-based policy | Resource-based policy | |
|---|---|---|
| Attached to | A user, group, or role (the principal) | A resource (an S3 bucket, SQS queue, KMS key, Lambda function) |
| Answers | “What can this identity do?” | “Who may touch this resource, and how?” |
Has a Principal element? |
No (the identity is implied) | Yes — it names who is allowed |
| Cross-account? | Grants only within the same account | Can grant access to principals in other accounts |
| Example | A policy on the Developers role allowing dynamodb:* |
An S3 bucket policy allowing account B to read the bucket |
The two work together. Within a single account, a principal is allowed if either an identity-based policy or a resource-based policy grants the action (and nothing denies it). Across accounts, you generally need both sides to agree: the resource policy in account B must allow the principal, and the identity policy in account A must allow the call. Resource-based policies are also the mechanism that makes cross-account access possible at all, because only they carry a Principal field that can name an external account.
The full family: six policy types (and the odd one out, ACLs)
Identity-based and resource-based are the two you write daily, but AWS actually recognises six policy types. It helps to see them on one page now, because the evaluation logic later has to reconcile all of them:
| # | Policy type | Grants or limits? | Attached to |
|---|---|---|---|
| 1 | Identity-based | Grants | A user, group, or role |
| 2 | Resource-based | Grants (and can grant cross-account) | A resource (bucket, queue, key, function) |
| 3 | Permissions boundary | Limits (ceiling on a principal) | One user or role |
| 4 | Service Control Policy (SCP) | Limits (ceiling on an account/OU) | Via AWS Organizations |
| 5 | Session policy | Limits (ceiling on one session) | Passed at assume-role time |
| 6 | Access Control List (ACL) | Grants (legacy, cross-account) | A resource, but not JSON |
Types 3–5 are the guardrails covered in the next section. Type 6, the ACL, is the odd one out and worth pinning down so it never surprises you. An ACL is a legacy access mechanism — used mainly by Amazon S3 (and a couple of others) — that predates IAM policies. It is not JSON and has no Condition support; it grants coarse read/write to canonical user IDs or a few predefined groups (such as “everyone”). ACLs are the historical reason some S3 buckets became world-readable by accident.
The modern guidance is blunt: avoid ACLs. For new S3 buckets AWS now sets Object Ownership = “Bucket owner enforced”, which disables ACLs entirely and makes the bucket policy the single source of truth. Unless you are maintaining something very old, treat ACLs as read-only history: know they exist, know they can grant access outside your JSON policies, and disable them where you can. Everything else in this lesson — the anatomy, the evaluation ladder — is about the five IAM policy types, not ACLs.
The other policy types: SCPs, boundaries, and session policies
Beyond the two everyday types, three more policy types act as guardrails — they restrict, they never grant on their own. You will not write these on day one, but you must know where they sit, because they are why a request can be denied even when your identity policy clearly allows it.
| Policy type | Where it applies | Grants or limits? | Purpose |
|---|---|---|---|
| Service Control Policy (SCP) | An entire account or Organizational Unit, via AWS Organizations | Limits only — a ceiling on the whole account | Org-wide guardrails (e.g. “no one may disable CloudTrail”, “only these Regions”) |
| Permissions boundary | A single IAM user or role | Limits only — a ceiling on that principal | Safe delegation: let teams create roles that can never exceed the boundary |
| Session policy | A single assumed-role session | Limits only — narrows that session | Hand out a temporary identity that is smaller than the role itself |
The unifying idea: SCPs cap an account, boundaries cap a principal, session policies cap a session — none of them grant anything. Effective permissions are the intersection of what is granted (identity/resource policy) with every ceiling that applies. If your identity policy allows s3:* but an SCP only permits s3:GetObject, you get s3:GetObject. This is the number-one cause of the baffling “but my policy says Allow!” support ticket.
The policy evaluation logic
This is the section that separates people who use IAM from people who understand it. When a request arrives, AWS gathers every applicable policy — identity-based, resource-based, SCPs, boundaries, session policies — and runs one deterministic algorithm to produce a single decision. The core rule is short enough to memorise:
An explicit
Denyalways wins. Otherwise, you need an explicitAllow. With no Allow, the default is an implicit deny.
Said as a precedence ladder, highest priority first:
- Explicit deny — if any policy of any type has an
"Effect": "Deny"that matches the request, the answer is Deny. Nothing can override this. - Explicit allow — if no deny matched, AWS looks for an
"Effect": "Allow"that matches. The required Allow must come from the right place (identity policy for an IAM principal; the SCP/boundary/session ceilings must also permit it where they apply). - Implicit deny — if nothing explicitly allowed the request, it is denied by default. This is the safety net that makes “deny by default” real.
So the order of strength is explicit deny > explicit allow > implicit (default) deny. Walking it through with the worked policy above:
- A request to
s3:GetObjectonkloudvin-project-data/report.pdfover HTTPS → no deny, an Allow matches, conditions satisfied → Allowed. - The same request over plain HTTP → the Allow’s
aws:SecureTransportcondition is false, so the Allow does not apply → no other Allow exists → implicit deny. - The same request when an SCP forbids all S3 in this account → the SCP ceiling is closed, so even a matching identity Allow cannot get through → Denied.
To see explicit deny in action, here is a guardrail statement you might attach as a boundary or SCP. Even if a principal also has an s3:* Allow, this denies any S3 request that is not encrypted in transit:
{
  "Version": "2012-10-17",
  "Statement": [
    {
      "Sid": "DenyInsecureS3Transport",
      "Effect": "Deny",
      "Action": "s3:*",
      "Resource": "*",
      "Condition": {
        "Bool": {
          "aws:SecureTransport": "false"
        }
      }
    }
  ]
}
Because explicit deny sits at the top of the ladder, this single statement overrides any number of permissive Allows — which is exactly why guardrails are written as denies. The practical reading: build permissions with Allows, build guardrails with Denies, and remember that a Deny anywhere is final. The diagram below traces the full request path through these layers.
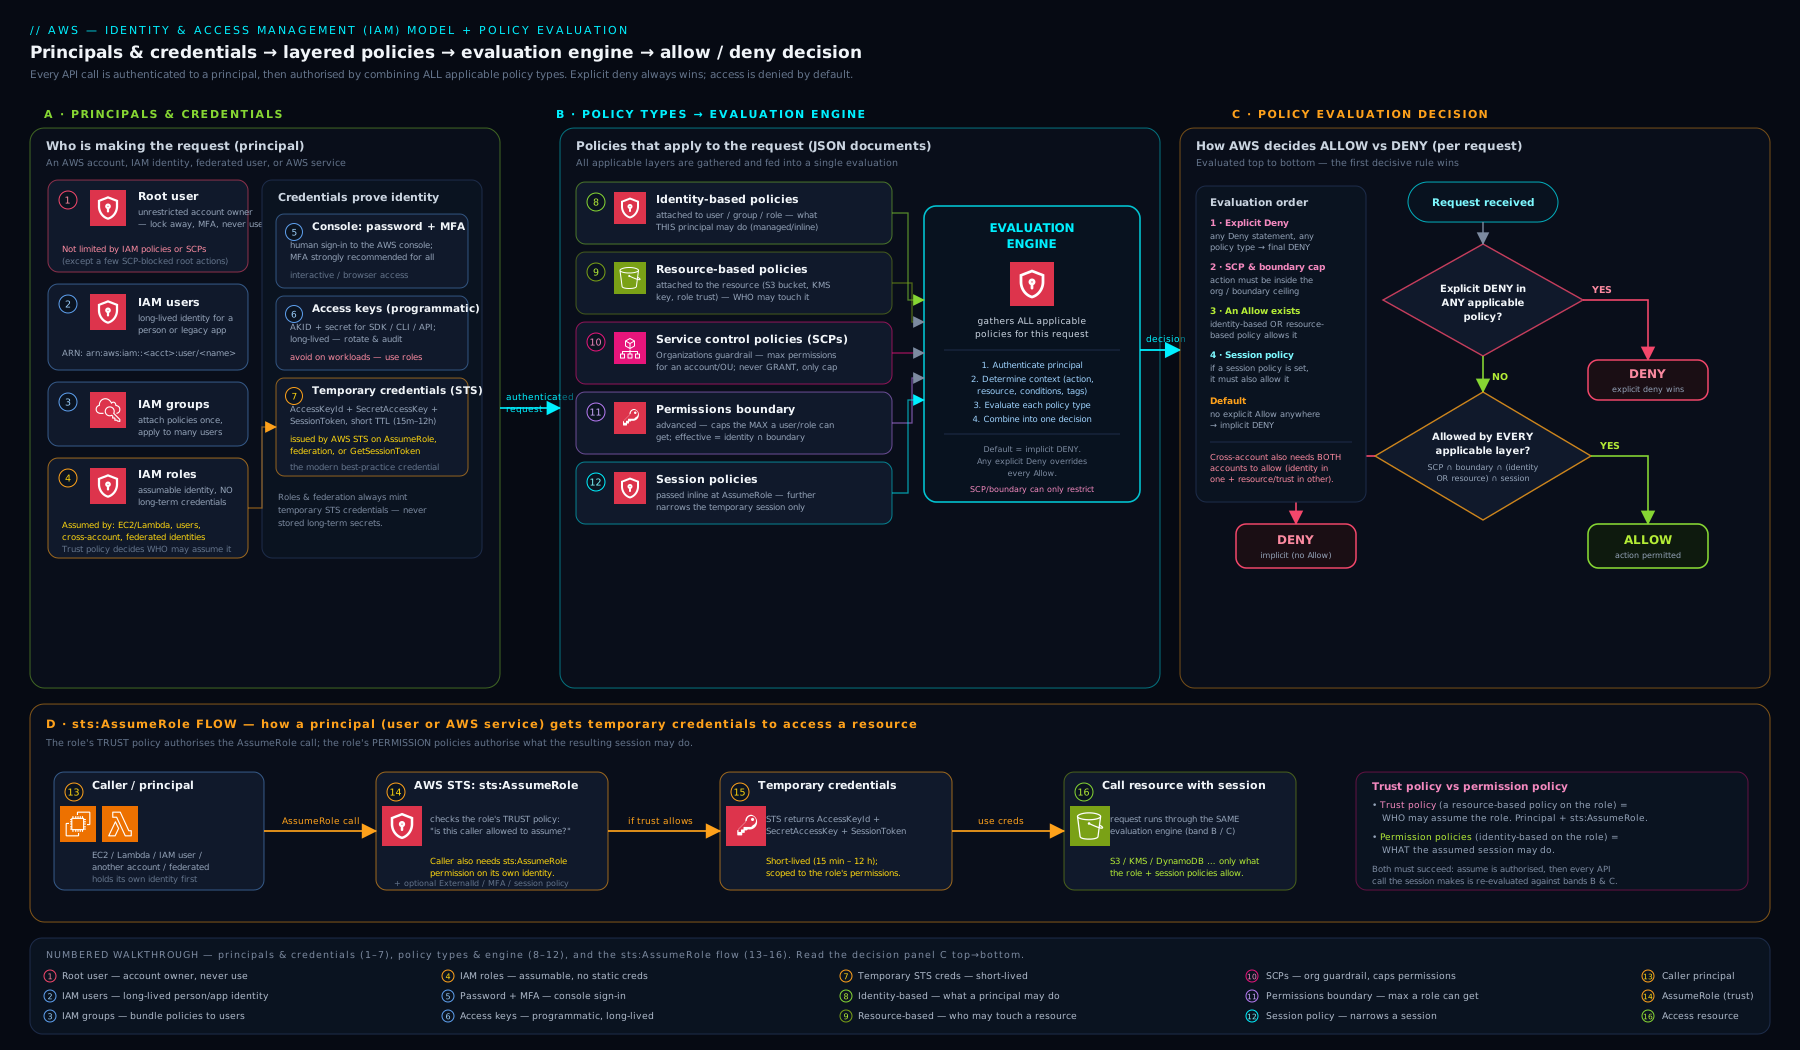
The diagram shows a request flowing from a principal, gathering all applicable policy types, and passing through the deny-check, then the allow-check, then the implicit-deny default — the same ladder described above.
The full ladder, and a worked multi-layer trace
The three-rung version — deny, then allow, then default-deny — is enough to reason about a single policy. But a real request is judged against all the policy types at once, and they are checked in a defined order. Within one account, AWS effectively asks these questions in sequence, and a “no” at any gate ends it:
- Is there an explicit
Denyin any policy (identity, resource, boundary, SCP, session)? → If yes, Deny. Full stop. - Do the SCPs allow it? (An SCP is an account ceiling; if the org policy doesn’t permit the action, it’s Deny even with an identity Allow.)
- Does a resource-based policy allow it? → If yes, Allow (for most services a resource Allow is sufficient on its own within the same account).
- Does an identity-based policy allow it — and is that allow within the permissions boundary and within any session policy? → If yes, Allow.
- Otherwise → implicit Deny (the default).
Notice two things beginners miss. First, within the same account a resource-based policy Allow can be enough by itself — the identity policy need not also allow it (S3, SQS, SNS, and most services work this way; KMS is the notable exception, where the key policy must explicitly allow). Second, the boundary and session policy are intersections — they can only subtract. Here is a trace of one request against five layers:
Request: role
data-readercallss3:GetObjectonarn:aws:s3:::finance-reports/2026/q1.pdf, over HTTPS, same account.
| Layer | Says | Effect on the decision |
|---|---|---|
| Explicit deny anywhere? | No Deny matches | Continue |
| SCP on the account | Allows s3:* |
Ceiling open |
| Resource policy on the bucket | (none set) | No help, but no harm |
Identity policy on data-reader |
Allows s3:GetObject on finance-reports/* |
An Allow exists |
| Permissions boundary on the role | Allows s3:Get* |
Allow is inside the boundary |
| Final | — | Allowed |
Change one row and watch it flip: if the boundary allowed only s3:List*, the identity’s s3:GetObject Allow would fall outside the boundary intersection and the request would end in implicit deny — no error in any single policy, yet access is refused. That “everything looks allowed but isn’t” outcome is almost always a boundary or SCP doing its job.
Across an account boundary: two evaluations, both must pass
Cross-account access is where the flowchart forks. When a principal in Account A touches a resource in Account B, AWS runs the evaluation twice — once in each account — and the request must survive both:
- In Account A (the caller’s account): the principal’s identity policy must allow the action, and it must clear A’s SCPs and the principal’s boundary. This is “is my own account letting me make this call?”
- In Account B (the resource’s account): the resource-based policy must explicitly allow the external principal, and it must clear B’s SCPs and — newer — B’s Resource Control Policies (RCPs). This is “is the other account letting me in?”
Only if both independent evaluations say Allow does the request succeed; an explicit Deny in either account still trumps everything. This is why a cross-account setup that “should work” fails when someone edited only one side — the classic support ticket. The rule to memorise: same account, either side can grant; different accounts, both sides must grant (and a deny in any account, from any policy type, is final). The next section shows exactly how to wire that hand-off with a role.
Roles and sts:AssumeRole: temporary identity done right
A role is an identity you assume rather than log in as. It has permissions (via attached policies) but no password or access keys; instead, an authorised principal calls AWS Security Token Service (STS) to swap their own identity for the role’s temporary credentials. Every role has two halves:
- A permissions policy (identity-based) — what the role can do once assumed.
- A trust policy (a resource-based policy on the role) — who is allowed to assume it. This is the only place a
Principalappears on a role.
Here is a trust policy that lets a specific IAM user in the same account assume the role, but only with MFA present:
{
  "Version": "2012-10-17",
  "Statement": [
    {
      "Sid": "AllowAdminToAssumeWithMFA",
      "Effect": "Allow",
      "Principal": {
        "AWS": "arn:aws:iam::111122223333:user/alice"
      },
      "Action": "sts:AssumeRole",
      "Condition": {
        "Bool": {
          "aws:MultiFactorAuthPresent": "true"
        }
      }
    }
  ]
}
When Alice calls aws sts assume-role, STS checks this trust policy, confirms MFA, and returns temporary credentials scoped to the role’s permissions for a limited time. Three closely related uses build on exactly this mechanism:
| Use case | How the role is assumed | Why it beats access keys |
|---|---|---|
| Workloads on EC2 | An instance profile (a wrapper that attaches a role to an EC2 instance) — the instance fetches temporary credentials automatically | No keys stored on the server; credentials rotate themselves |
| Serverless / containers | Lambda execution roles, ECS task roles — the service assumes the role on the function’s behalf | Same: short-lived, no embedded secrets |
| Cross-account access | The trust policy names another account; a principal there assumes the role | One auditable doorway between accounts instead of shared keys |
For cross-account roles you typically pair sts:AssumeRole with an External ID condition when a third party is involved, to prevent the “confused deputy” problem — but the foundation is always this trust-policy-plus-AssumeRole pattern. The takeaway: roles turn every workload and every cross-account hop into short-lived, auditable credentials, which is why they are the backbone of modern AWS security.
Worked example: a real cross-account hand-off
Let us build the pattern end to end. Account A (123456789012, the “dev” account) runs a deployment job that must write to an S3 bucket in Account B (210987654321, the “shared-services” account). Nobody shares access keys; A assumes a role in B. There are always exactly three pieces to wire, one in B and two spanning A and B.
1 — In Account B, create the role and its trust policy. The trust policy is a resource-based policy that names who may assume the role. Here it trusts Account A, but only when the caller presents the agreed External ID and has authenticated with MFA:
{
  "Version": "2012-10-17",
  "Statement": [
    {
      "Sid": "TrustDevAccountWithExternalId",
      "Effect": "Allow",
      "Principal": { "AWS": "arn:aws:iam::123456789012:root" },
      "Action": "sts:AssumeRole",
      "Condition": {
        "StringEquals": { "sts:ExternalId": "kloudvin-deploy-7f3a" },
        "Bool": { "aws:MultiFactorAuthPresent": "true" }
      }
    }
  ]
}
Naming :root of Account A means “any principal in A that also has sts:AssumeRole permission” — A stays in control of exactly which of its identities may use this door. The External ID defeats the confused-deputy problem: if a third party assumes roles for many customers, the secret External ID stops Account A being tricked into operating on someone else’s role.
2 — In Account B, attach the role’s permissions policy (what the session may do once assumed):
{
  "Version": "2012-10-17",
  "Statement": [{
    "Effect": "Allow",
    "Action": ["s3:PutObject", "s3:GetObject"],
    "Resource": "arn:aws:s3:::shared-artifacts-b/*"
  }]
}
3 — In Account A, allow the caller to assume that role. Without this, A’s own account refuses to make the call — remember, both accounts must agree:
{
  "Version": "2012-10-17",
  "Statement": [{
    "Effect": "Allow",
    "Action": "sts:AssumeRole",
    "Resource": "arn:aws:iam::210987654321:role/CrossAccountDeployRole"
  }]
}
Now the caller in A assumes the role and receives temporary credentials:
aws sts assume-role \
  --role-arn arn:aws:iam::210987654321:role/CrossAccountDeployRole \
  --role-session-name dev-deploy \
  --external-id kloudvin-deploy-7f3a
Representative output (secrets abbreviated — note the ASIA prefix and the expiry):
{
  "Credentials": {
    "AccessKeyId": "ASIAEXAMPLE1234567890",
    "SecretAccessKey": "wJalrXUtnFEMI/K7MDENG/EXAMPLEKEY",
    "SessionToken": "IQoJb3JpZ2luX2VjE...<snip>",
    "Expiration": "2026-09-01T14:35:00Z"
  },
  "AssumedRoleUser": {
    "Arn": "arn:aws:sts::210987654321:assumed-role/CrossAccountDeployRole/dev-deploy"
  }
}
In practice you rarely paste those by hand. You put the relationship in ~/.aws/config and let the CLI assume the role for you on every command:
[profile deploy-to-b]
role_arn = arn:aws:iam::210987654321:role/CrossAccountDeployRole
source_profile = dev
external_id = kloudvin-deploy-7f3a
mfa_serial = arn:aws:iam::123456789012:mfa/alice
Then aws s3 cp build.zip s3://shared-artifacts-b/ --profile deploy-to-b “just works”, refreshing short-lived tokens under the hood. Scaling tip: when many accounts in one AWS Organization need to trust each other, don’t list every account ARN in every trust policy — trust the org instead with a condition on aws:PrincipalOrgID ("StringEquals": { "aws:PrincipalOrgID": "o-abc123exampl" }), so onboarding a new account needs no policy edits. That one hand-off pattern — trust policy plus sts:AssumeRole, gated by conditions — is the atom from which almost all secure AWS access is built.
IAM Identity Center (SSO): how humans should sign in
For human access at any real scale, you do not create IAM users in each account. Instead you use IAM Identity Center (formerly AWS SSO): people sign in once with a central identity (your corporate directory or a built-in store), and Identity Center hands them a role in whichever account they need via permission sets (reusable bundles of permissions). The result is single sign-on across many accounts, central control of who has what, and — crucially — no long-lived per-account credentials for humans at all. Think of it as the managed, organisation-wide front door that turns “an IAM user in every account” into “one login, temporary roles everywhere”.
Going deeper
Everything so far is the foundation every AWS engineer needs. This section is for when you want to design access, not just read it — the internals, the scaling patterns, and the newer machinery that turns “least privilege” from a slogan into something you can actually verify.
Condition keys and operators: the fine print of every policy
Conditions are where policies stop being coarse and start being precise. A condition block is { Operator: { key: value } }, and it must be true for the statement to apply. The keys come in two families: global keys (prefix aws:, available everywhere) and service-specific keys (prefix like s3:, ec2:, dynamodb:). The ones you will reach for constantly:
| Condition key | Meaning | Typical use |
|---|---|---|
aws:SecureTransport |
Was the request over TLS? | Force HTTPS-only access |
aws:MultiFactorAuthPresent |
Did the caller authenticate with MFA? | Gate privileged actions / sts:AssumeRole |
aws:SourceIp |
The caller’s public IP | Restrict to an office/VPN CIDR |
aws:PrincipalOrgID |
The caller’s AWS Organizations ID | “Only identities in my org” |
aws:SourceArn / aws:SourceAccount |
Which resource/account triggered a service to call | Stop the confused deputy for S3→SNS, etc. |
aws:PrincipalTag/*, aws:ResourceTag/* |
Tags on the caller / the resource | Attribute-based access control (ABAC) |
aws:CalledVia / aws:ViaAWSService |
Was this call made through another AWS service? | Allow only when e.g. Athena calls S3 for you |
Each key is compared with an operator: StringEquals, StringLike (wildcards), Bool, IpAddress, ArnLike, DateGreaterThan, NumericLessThan, and the Null operator (test whether a key is present at all). Two subtleties bite people. Adding IfExists to an operator (e.g. StringEqualsIfExists) means “match if the key is present, otherwise treat as satisfied” — useful, but it quietly opens the statement when the key is absent, so use it deliberately. And for keys that can hold multiple values, you must wrap the test in a set operator: ForAllValues: (“every supplied value is in my list”) or ForAnyValue: (“at least one is”). Getting these two wrong is a common source of policies that are far more permissive than intended.
A worked confused-deputy guard on an SNS topic — “only let S3 in my account publish here” — reads:
{
  "Effect": "Allow",
  "Principal": { "Service": "s3.amazonaws.com" },
  "Action": "sns:Publish",
  "Resource": "arn:aws:sns:ap-south-1:123456789012:alerts",
  "Condition": {
    "ArnLike":     { "aws:SourceArn": "arn:aws:s3:::kloudvin-uploads" },
    "StringEquals":{ "aws:SourceAccount": "123456789012" }
  }
}
ABAC: permissions that scale by tag, not by policy
Role-based access control (RBAC) grows a new policy every time a new team or project appears. Attribute-based access control (ABAC) grows none — it matches the caller’s tags against the resource’s tags. One policy covers every team forever:
{
  "Effect": "Allow",
  "Action": ["ec2:StartInstances", "ec2:StopInstances"],
  "Resource": "*",
  "Condition": {
    "StringEquals": {
      "aws:ResourceTag/team": "${aws:PrincipalTag/team}"
    }
  }
}
Read it as: “you may start/stop an instance only if the instance’s team tag equals your own team tag.” Tag a new engineer team=payments and they can already manage exactly the payments servers — no policy change. ABAC is the pattern IAM Identity Center and large orgs lean on because it turns access management into tagging discipline. Its cost is exactly that: your tags must be trustworthy, so you enforce them (require aws:RequestTag on creation, deny untagged resources) and control who can change the team tag on a principal.
Permissions boundaries as safe delegation
A boundary’s real power is delegation. Suppose you want team leads to create their own roles without being able to grant themselves admin. You give a lead iam:CreateRole and iam:CreatePolicy, but add a condition that every role they create must carry a specific permissions boundary:
{
  "Effect": "Allow",
  "Action": ["iam:CreateRole", "iam:PutRolePolicy"],
  "Resource": "*",
  "Condition": {
    "StringEquals": {
      "iam:PermissionsBoundary": "arn:aws:iam::123456789012:policy/TeamMaxBoundary"
    }
  }
}
Now any role the lead creates is born capped by TeamMaxBoundary; its effective permissions are the intersection of whatever policy they attach and that boundary. They can delegate freely and never exceed the ceiling you set. This — not day-one usage — is what boundaries are for.
SCPs, RCPs, and the data perimeter
SCPs cap what principals in your accounts can do. Their newer sibling, Resource Control Policies (RCPs) — generally available since late 2024 — cap what can be done to your resources, from any principal, including external ones. Think of it as the resource-side ceiling to complement the principal-side ceiling:
- SCP answers “no identity in this OU may ever call
s3:DeleteBucket.” - RCP answers “no one, in any account, may read these buckets unless they belong to my org (
aws:PrincipalOrgID) and arrive over TLS.”
Together they build a data perimeter: a provable boundary that your identities can only reach your resources, and your resources can only be reached by your identities, over approved paths. RCPs launched supporting a focused set of services (S3, STS, SQS, Secrets Manager, KMS), so check current coverage before relying on one.
Verifying least privilege with IAM Access Analyzer
You cannot eyeball whether a real account follows least privilege — IAM Access Analyzer does it with math. It has four distinct jobs:
- External access findings — it uses automated reasoning (provable security) to report every resource whose policy grants access to a principal outside your account or org. This is how you discover the bucket someone shared with the world.
- Unused access findings — it flags roles, users, access keys, and even individual permissions that have gone unused for a chosen window, so you can prune toward least privilege on evidence, not guesswork.
- Policy generation — point it at your CloudTrail history and it drafts a tight policy containing only the actions the identity actually used. This is the fastest legitimate way to right-size an over-broad role.
- Policy validation & custom checks — over a hundred checks flag errors and overly permissive patterns as you author, and custom policy checks (
CheckNoNewAccess,CheckAccessNotGranted,CheckNoPublicAccess) can run in CI/CD to block a pull request that would widen access. Least privilege becomes a build-time gate, not a hope.
STS internals worth knowing
sts:AssumeRole returns credentials whose lifetime is bounded by the role’s MaxSessionDuration — default 1 hour, configurable up to 12 hours. Two gotchas: role chaining (assuming a role from an already-assumed role) is always capped at 1 hour regardless of the 12-hour setting; and a session policy passed at assume time can only narrow the session, never widen it beyond the role. Beyond the plain call, AssumeRoleWithSAML backs enterprise SSO, and AssumeRoleWithWebIdentity backs OIDC federation — the same mechanism behind IRSA (roles for EKS pods) and GitHub Actions keyless deploys, where a short-lived OIDC token is exchanged for AWS credentials with no stored secret at all. Prefer the regional STS endpoints (e.g. sts.ap-south-1.amazonaws.com) over the single global one for latency and resilience, and use sts:GetCallerIdentity (which needs no permissions) as your universal “who am I?” probe.
Limits and the handful of things only root can do
A few limits shape design: an AWS-managed or customer-managed policy is capped at 6,144 characters; you can attach at most 10 managed policies to one identity by default; inline policy size is limited per identity. When a policy won’t save, it is usually one of these. Finally, a short list of tasks only the root user can perform — which is why you keep it locked away: changing the account’s root email/name/password, closing the account, changing the AWS Support plan, restoring IAM permissions after an admin locks everyone out, enabling MFA delete on an S3 bucket, and registering as a seller in the Marketplace. Everything else should flow through IAM roles and IAM Identity Center — never root, and never a long-lived user where a role will do.
Hands-on lab
You will create a group, attach a read-only policy, add a user to it, sign in as that user to confirm the permissions, then test that the evaluation logic denies anything outside the grant. Everything here is within the AWS Free Tier — IAM itself is free.
Run these as an administrator (not the root user). Replace the account ID
111122223333with your own where it appears.
Step 1 — Create a group and attach an AWS-managed read-only policy.
aws iam create-group --group-name ReadOnlyTeam

aws iam attach-group-policy \
  --group-name ReadOnlyTeam \
  --policy-arn arn:aws:iam::aws:policy/ReadOnlyAccess
Step 2 — Create a user, add them to the group, and give them a console password.
aws iam create-user --user-name lab-reader

aws iam add-user-to-group \
  --user-name lab-reader \
  --group-name ReadOnlyTeam

aws iam create-login-profile \
  --user-name lab-reader \
  --password 'ChangeMe-Str0ng!Pass' \
  --password-reset-required
Step 3 — Validate the permission with the IAM policy simulator (no sign-in needed). This asks IAM the authorisation question directly:
aws iam simulate-principal-policy \
  --policy-source-arn arn:aws:iam::111122223333:user/lab-reader \
  --action-names s3:ListAllMyBuckets s3:CreateBucket
Expected output (abridged): the result for s3:ListAllMyBuckets shows "EvalDecision": "allowed", while s3:CreateBucket shows "EvalDecision": "implicitDeny". That contrast is the evaluation logic: the read action is allowed by ReadOnlyAccess, and the write action — never granted — falls through to the default implicit deny.
Step 4 — (Optional) Confirm interactively. Sign in to the console as lab-reader (your account sign-in URL, IAM user, the password above). You will be able to view services but any create/delete attempt returns an explicit Access Denied — the same implicit deny, surfaced in the UI.
Step 5 — Validation checklist.
aws iam get-group --group-name ReadOnlyTeamlistslab-readeras a member.- The simulator returns
allowedfor the read action andimplicitDenyfor the write action.
Cleanup (so nothing lingers):
aws iam delete-login-profile --user-name lab-reader
aws iam remove-user-from-group --user-name lab-reader --group-name ReadOnlyTeam
aws iam delete-user --user-name lab-reader
aws iam detach-group-policy \
  --group-name ReadOnlyTeam \
  --policy-arn arn:aws:iam::aws:policy/ReadOnlyAccess
aws iam delete-group --group-name ReadOnlyTeam
Cost note: IAM users, groups, roles, and policies are free. This lab incurs no charge — the only way to spend money would be to actually launch billable resources, which we do not. There is therefore nothing cost-related to clean up beyond removing the identities above for hygiene.
Common mistakes & troubleshooting
| Symptom | Likely cause | Fix |
|---|---|---|
Access Denied despite an Allow policy |
An explicit Deny elsewhere (SCP, boundary, or a Deny statement) is overriding it | Check for Deny statements and SCPs; remember deny always wins |
| S3 policy “does nothing” | Resource missing the /* object form, or using only the bucket ARN |
Include both arn:aws:s3:::bucket and arn:aws:s3:::bucket/* |
| Action allowed but request still fails | A Condition (e.g. aws:SecureTransport, source IP, MFA) is not satisfied |
Re-read the conditions; meet them or remove them while testing |
| “Cannot assume role” | The role’s trust policy doesn’t name your principal, or MFA/External ID is required | Edit the trust policy’s Principal; supply MFA/External ID as required |
| Cross-account call denied | Only one side is configured | Allow on both the resource policy (account B) and the identity policy (account A) |
| Group has no effect | Tried to use a group as a Principal, or user not actually added |
Attach policies to the group and confirm membership; groups aren’t principals |
| Permissions wider/narrower than expected | A permissions boundary is intersecting the identity policy | Inspect the boundary — effective access is the intersection |
Common beginner mistakes
These are misconceptions, not symptoms — the wrong mental models that make IAM feel unpredictable. The troubleshooting table above tells you how to fix a broken request; this list stops you forming the belief that broke it.
-
“A permissive Allow can override a Deny.” It cannot, ever. An explicit
Denyin any policy of any type wins outright. Right model: build permissions with Allows and guardrails with Denies, and treat a Deny anywhere as final. -
“I need an Allow to get started, then I add restrictions.” There is no starting Allow. The default state of everything in AWS is implicit deny; you add Allows to open specific doors. Right model: you are always building up from nothing, never trimming down from everything.
-
“
Versionis the date I wrote this policy.” No —"2012-10-17"is the fixed policy language version, not a timestamp. Changing it (say to today’s date) breaks features like policy variables. Right model: it is a schema version; always2012-10-17. -
“
NotActionwith Allow blocks the other actions.” It does the opposite —"Allow" + "NotAction": "iam:*"allows everything except IAM, a huge grant. Right model:Not…elements only change what a statement matches; only an explicitDenykeeps anyone out. -
“A group is a principal — I’ll assume the group / put it in
Principal.” Groups cannot sign in, cannot be assumed, and cannot appear in aPrincipalelement. Right model: a group is just a tray for attaching a policy to many users at once. -
“An SCP or permissions boundary will grant this team access.” Guardrails never grant; they only cap. If nothing grants an action, an SCP that “permits” it changes nothing. Right model: effective access = (what an identity/resource policy grants) ∩ (every ceiling that applies).
-
“One bucket ARN is enough for an S3 policy.” The bucket (
arn:aws:s3:::name) and its objects (arn:aws:s3:::name/*) are two different resources;GetObjectneeds the/*form,ListBucketneeds the bare bucket. Right model: bucket-level actions and object-level actions target different ARNs. -
“I’ll store an access key on the EC2 instance so my app can call AWS.” That plants a long-lived secret on a server that can be stolen. Right model: attach a role via an instance profile; the app fetches auto-rotating temporary credentials from instance metadata and there is no key to leak.
-
“Cross-account access just needs the resource policy.” It needs both sides: the resource policy in the target account and an identity policy permitting the call in the caller’s account. Right model: across accounts, both accounts must independently say Allow.
-
“MFA only protects the console login.” You can require MFA for API and privileged actions too, via the
aws:MultiFactorAuthPresentcondition — including onsts:AssumeRole. Right model: MFA is a condition you can enforce anywhere, not just a login checkbox.
Best practices
- Prefer roles over IAM users, and temporary credentials over access keys, everywhere you can.
- Grant least privilege: start from nothing and add only the specific actions and resources needed; avoid
"*"inActionandResourcefor anything but throwaway tests. - Use groups for humans and managed policies for common needs, so permissions are attached once and audited easily.
- Turn on MFA for every human identity, especially anything with administrative power.
- Rotate or, better, eliminate access keys; use IAM Identity Center for people and roles for workloads.
- Use IAM Access Analyzer to find unused access and over-broad grants, and the policy simulator before you ship a policy.
- Tag identities and use conditions (e.g. attribute-based access control) so policies scale without sprawling.
Security notes
- Lock down the root user. Use it only for the few tasks that require it, give it a long unique password and hardware MFA, and never create root access keys. Day-to-day work happens through IAM/Identity Center identities.
- Explicit deny is your strongest tool — write organisation-wide guardrails (no disabling logging, region restrictions, enforced encryption in transit) as Deny statements in SCPs, because they cannot be overridden by a careless Allow.
- Treat every long-lived access key as a future leak. Detect and remove them; assume any key that appears in source control, a laptop, or a log is already compromised and rotate immediately.
- Require MFA for sensitive actions via the
aws:MultiFactorAuthPresentcondition, including onsts:AssumeRolefor privileged roles. - Log everything with CloudTrail so every IAM decision is auditable — when troubleshooting “who did what”, CloudTrail is the source of truth.
Interview & exam questions
-
What is the IAM policy evaluation order? Explicit Deny wins over everything; otherwise an explicit Allow is required; with no Allow, the default is an implicit deny. Order of strength: explicit deny > explicit allow > implicit deny.
-
Difference between an IAM user and an IAM role? A user is a permanent identity with long-lived credentials (password/access keys); a role has no long-term credentials and is assumed temporarily via STS, yielding short-lived tokens. Roles are preferred for workloads, cross-account access, and federation.
-
Identity-based vs resource-based policy? Identity-based policies attach to a principal and say what it can do (no
Principalelement). Resource-based policies attach to a resource, include aPrincipal, and can grant cross-account access. Within an account either can grant; across accounts you typically need both. -
Do permission boundaries or SCPs grant permissions? No. Both are ceilings that only restrict. Effective permissions are the intersection of the grant (identity/resource policy) and every applicable boundary/SCP. Neither grants anything by itself.
-
What are the required elements of a policy statement?
Effect(Allow/Deny),Action, andResource(plusPrincipalfor resource-based policies).Version,Sid, andConditionround it out;Versionshould be2012-10-17. -
How does an EC2 instance get permissions without stored keys? Via an instance profile wrapping an IAM role; the instance retrieves temporary credentials automatically and they rotate on their own — no access keys on disk.
-
What is a trust policy and how does it relate to
sts:AssumeRole? A trust policy is the resource-based policy on a role that names who may assume it (thePrincipal) and allowssts:AssumeRole. STS checks it before issuing temporary credentials. -
Why is an explicit Deny used for guardrails instead of simply not granting? Because explicit Deny cannot be overridden by any Allow. “Not granting” relies on implicit deny, which a later Allow can satisfy; an explicit Deny is final regardless of other policies.
-
A user has an identity policy allowing
s3:*, but an SCP only permitss3:GetObject. What can they do? Onlys3:GetObject. The SCP is a ceiling and effective permissions are the intersection of the grant and the ceiling. -
What is a group, and can it be a principal? A group is a container of IAM users for attaching policies once; it is not a principal — it cannot sign in or appear in a policy’s
Principalfield. -
What does IAM Identity Center solve? Central single sign-on for humans across many accounts, handing out roles via permission sets so there are no long-lived per-account user credentials.
-
Two key root-account practices? Use the root user only for tasks that require it, and protect it with a strong password and hardware MFA; never create root access keys.
Quick check
- In the evaluation logic, which beats which: explicit Allow, explicit Deny, implicit deny?
- Which policy element appears in a resource-based policy but not an identity-based one?
- True or false: a permissions boundary can grant a principal new permissions.
- What credential type does STS issue when a role is assumed?
- Why must an S3 read policy usually list two ARNs for one bucket?
Answers
- Explicit Deny beats explicit Allow, which beats implicit deny (the default).
Principal— it names who the resource policy applies to.- False. Boundaries only restrict; effective access is the intersection of the identity policy and the boundary.
- Temporary security credentials — a short-lived access key, secret, and session token that auto-expire.
- Because the bucket (
arn:aws:s3:::bucket, forListBucket) and the objects (arn:aws:s3:::bucket/*, forGetObject) are separate resources.
Exercise
Design and test a least-privilege policy for a “build agent” that may only read objects from one S3 bucket and send messages to one SQS queue, all over HTTPS:
- Write a single identity-based policy with two Allow statements (S3 read with both ARNs;
sqs:SendMessageon the queue ARN) and anaws:SecureTransportcondition on each. - Add one explicit Deny statement that blocks the action if the request is not encrypted in transit, and explain why the Deny is redundant-but-defensive given the conditions.
- Use
aws iam simulate-principal-policy(or attach to a throwaway role and assume it) to confirm: the two allowed actions returnallowed, and any third action (e.g.s3:DeleteObject) returnsimplicitDeny. - Bonus: write the trust policy that lets only your CI account assume the role, gated on an External ID.
Practice challenges
Work these top to bottom — they climb from reading a policy to designing a verified cross-account perimeter. Try each before opening the solution.
1 (Beginner) — Predict the decision. A role has one identity policy: Allow s3:GetObject on arn:aws:s3:::reports/*. An SCP on the account allows s3:*. No other policy exists. What happens for (a) s3:GetObject on reports/q1.pdf, and (b) s3:PutObject on the same object?
<details> <summary>Show solution</summary>
(a) Allowed — an explicit Allow matches and the SCP ceiling permits it. (b) Implicit deny — nothing grants s3:PutObject, so the default denial applies.
Why: an action is allowed only when something explicitly allows it and nothing denies it; un-granted actions fall through to the default deny. </details>
2 (Beginner) — Fix the broken bucket policy. A teammate’s policy Allow s3:GetObject, s3:ListBucket on arn:aws:s3:::kloudvin-data returns Access Denied for both a file download and a bucket listing. What is wrong, and what is the corrected Resource?
<details> <summary>Show solution</summary>
GetObject acts on objects, which need the /* ARN; ListBucket acts on the bucket itself. Use two ARNs: ["arn:aws:s3:::kloudvin-data", "arn:aws:s3:::kloudvin-data/*"].
Why: the bucket and its objects are separate resources, so an S3 read policy almost always lists both ARNs. </details>
3 (Intermediate) — Least-privilege DynamoDB policy. Write an identity policy that lets an app read and write items in one table Orders (ARN arn:aws:dynamodb:ap-south-1:123456789012:table/Orders) but do nothing else, and only over TLS.
<details> <summary>Show solution</summary>
{
  "Version": "2012-10-17",
  "Statement": [{
    "Effect": "Allow",
    "Action": ["dynamodb:GetItem","dynamodb:PutItem","dynamodb:Query","dynamodb:UpdateItem"],
    "Resource": "arn:aws:dynamodb:ap-south-1:123456789012:table/Orders",
    "Condition": { "Bool": { "aws:SecureTransport": "true" } }
  }]
}
Why: naming only the required actions on exactly one table ARN, gated on TLS, is least privilege — no dynamodb:*, no Resource: "*".
</details>
4 (Intermediate) — Trust policy for a Lambda. Write the trust policy that lets AWS Lambda assume an execution role, and name the AWS-managed policy you would attach for basic CloudWatch Logs permissions.
<details> <summary>Show solution</summary>
{
  "Version": "2012-10-17",
  "Statement": [{
    "Effect": "Allow",
    "Principal": { "Service": "lambda.amazonaws.com" },
    "Action": "sts:AssumeRole"
  }]
}
Attach AWSLambdaBasicExecutionRole for logs:CreateLogGroup/CreateLogStream/PutLogEvents.
Why: a service role trusts a service principal (lambda.amazonaws.com); the managed policy supplies the minimum logging permissions every function needs.
</details>
5 (Advanced) — Cross-account, org-scoped. Account 123456789012 must let any account in AWS Organization o-abc123exampl assume a read-only role — without listing each account. Write the trust policy.
<details> <summary>Show solution</summary>
{
  "Version": "2012-10-17",
  "Statement": [{
    "Effect": "Allow",
    "Principal": { "AWS": "*" },
    "Action": "sts:AssumeRole",
    "Condition": { "StringEquals": { "aws:PrincipalOrgID": "o-abc123exampl" } }
  }]
}
Why: Principal: "*" scoped by aws:PrincipalOrgID trusts the whole org, so new accounts work with zero trust-policy edits — while non-org principals are still refused.
</details>
6 (Advanced) — Trace a five-layer request. A role in Account A calls s3:PutObject on a bucket in Account B. A’s identity policy allows s3:PutObject; A’s SCP allows s3:*; B’s bucket policy allows Account A’s role for s3:GetObject only; nothing denies. Allowed or denied, and why?
<details> <summary>Show solution</summary>
Denied (implicit). Account A’s side allows the call, but Account B’s resource policy grants only s3:GetObject to A — it never allows s3:PutObject for the external principal, so B’s evaluation ends in implicit deny.
Why: cross-account access requires both accounts to allow the specific action; B allowing a different action (GetObject) does not cover PutObject.
</details>
Certification mapping
| Exam | Objective area this supports |
|---|---|
| CLF-C02 (Cloud Practitioner) | Security and compliance — the shared-responsibility model, IAM users/groups/roles, MFA, and the principle of least privilege. |
| SAA-C03 (Solutions Architect – Associate) | Design secure architectures — choosing roles vs users, identity vs resource policies, cross-account access patterns, and applying the evaluation logic to design access. |
Glossary
-
IAM (Identity and Access Management) — the global, free AWS service that authenticates principals and authorises their requests.
-
Principal — any entity that makes a request: the root user, an IAM user, or a role (groups are containers, not principals).
-
Root user — the all-powerful account owner identity tied to the account’s email; to be used only when strictly required.
-
IAM user — a permanent identity for a person or legacy app, with long-lived credentials.
-
IAM group — a container of users for attaching policies once; cannot log in or be a
Principal. -
IAM role — an identity with permissions but no long-term credentials, assumed temporarily via STS.
-
Policy — a JSON document of permissions, evaluated by IAM to allow or deny requests.
-
Identity-based policy — a policy attached to a user, group, or role.
-
Resource-based policy — a policy attached to a resource, containing a
Principal; enables cross-account access. -
SCP (Service Control Policy) — an Organizations guardrail that caps permissions for an account or OU; never grants.
-
Permissions boundary — a ceiling on a single user or role; effective access is the intersection with the identity policy.
-
Session policy — a policy passed at assume-role time that narrows a single session.
-
Trust policy — the resource-based policy on a role that defines who may assume it.
-
STS (Security Token Service) — the service that issues temporary credentials when a role is assumed or a user federates.
-
Instance profile — the wrapper that attaches a role to an EC2 instance so it gets temporary credentials automatically.
-
MFA (multi-factor authentication) — a second authentication factor (app, hardware key, or passkey).
-
IAM Identity Center — AWS single sign-on for humans across accounts, granting roles via permission sets.
-
Explicit deny / implicit deny — a Deny statement that overrides all allows / the default denial when nothing grants the action.
-
Least privilege — granting only the specific actions and resources a task requires, and no more.
-
Service role — a role assumed by an AWS service on your behalf (e.g. a Lambda execution role); you own and can edit its permissions.
-
Service-linked role — a predefined role owned and managed by a specific service; you cannot edit its permissions, and it is tied to that service’s lifecycle.
-
Federated identity — an external identity (via SAML 2.0, OIDC, or IAM Identity Center) that receives temporary role credentials through STS without any IAM user.
-
Access key — a long-lived credential pair (ID + secret) for programmatic access; IDs starting
AKIAare long-term user keys,ASIAare temporary STS keys. -
Temporary security credentials — short-lived access key, secret, and session token issued by STS; they auto-expire, which is why they are the safest credential.
-
Condition key — a value a policy can test (e.g.
aws:SecureTransport,aws:SourceIp,aws:PrincipalOrgID,aws:MultiFactorAuthPresent) inside aConditionblock. -
Condition operator — how a condition key is compared (
StringEquals,StringLike,Bool,IpAddress,ArnLike,Null);IfExistsand theForAllValues/ForAnyValueset operators modify matching. -
Policy variable — a placeholder such as
${aws:username}or${aws:PrincipalTag/team}substituted at evaluation time so one policy serves many principals. -
NotAction / NotResource / NotPrincipal — inverse selectors that match everything except the listed items; they change matching only and never imply a deny.
-
ACL (Access Control List) — a legacy, non-JSON grant mechanism (mainly S3) to canonical user IDs or predefined groups; best disabled via S3 Object Ownership.
-
Managed vs inline policy — managed policies (AWS- or customer-authored) are standalone and reusable; inline policies are embedded in and inseparable from one identity.
-
RCP (Resource Control Policy) — an Organizations guardrail that caps resource-based access org-wide (the resource-side counterpart to an SCP); never grants.
-
ABAC / RBAC — attribute-based access control matches caller tags to resource tags so one policy scales to many teams; role-based control adds a policy per role.
-
External ID — a shared secret required in a cross-account trust policy to prevent the confused-deputy problem when a third party assumes roles for many customers.
-
Confused deputy — an attack where a trusted service or party is tricked into using its privileges on the wrong resource; mitigated by External ID and
aws:SourceArn/aws:SourceAccount. -
Permission set — an IAM Identity Center bundle of permissions provisioned as a role in assigned accounts.
-
IAM Access Analyzer — the service that finds external access, flags unused access, generates least-privilege policies from CloudTrail, and validates/checks policies (including in CI/CD).
-
aws:PrincipalOrgID— a condition key that scopes trust to every account in your AWS Organization without listing account IDs. -
Data perimeter — a provable boundary (built with SCPs, RCPs, and conditions) ensuring only your identities reach your resources over approved paths.
-
Role chaining — assuming a role from within an already-assumed role session; the resulting session is capped at one hour.
Next steps
Continue the course with AWS VPC Networking Fundamentals — once you control who can act, you control where traffic flows. Then go deeper on identity with:
- Engineering Least-Privilege IAM with Permission Boundaries — safe delegation and right-sizing at scale.
- Cross-Account Roles, External IDs & the Confused-Deputy Problem — production-grade cross-account access.
- IAM Identity Center: Permission Sets & ABAC across Accounts — how human access really works in a multi-account org.