A mid-size SaaS company fails a customer security review on a single line: “you cannot produce an authenticated vulnerability scan of your production estate on demand.” Their old setup was a quarterly unauthenticated network scan from one appliance that could not even see half the cloud accounts, let alone log into a host. The mandate from the new CISO is concrete: every Linux and Windows workload across three AWS accounts, two Azure subscriptions, and one GCP project must be under continuous, authenticated scanning within a sprint, with findings risk-scored, deduplicated against cloud asset inventory, and auto-ticketed to the owning team. This guide builds exactly that with Tenable Vulnerability Management (still universally called Tenable.io) — agent-based authenticated scanning for the hosts you control, cloud connectors for the inventory and the ephemeral fleet you cannot put an agent on, and a prioritisation model that patches what is exploitable rather than what merely scores a high CVSS.
Tenable.io is a SaaS vulnerability management platform. You do not run its brain; you feed it from sensors — Nessus scanners (network-reachable engines that scan targets over the wire), Nessus Agents (lightweight processes on each host that scan from the inside and upload results outbound), and cloud connectors (read-only API integrations that pull live asset inventory from AWS, Azure and GCP). Those three sensor types, plus the scan policies you point at them and the prioritisation and remediation workflow on top, are the whole system. This is an implementation guide, so the centrepiece is a copy-pasteable hands-on lab that stands up a trial container, links a real agent, builds an agent scan, and pulls VPR-sorted findings — but before the lab you will learn every moving part in enough depth to run this in production, not just pass the demo.
By the end you will stop guessing at coverage. You will know which sensor answers which question, why an agent scan needs no network credentials while a network scan needs a full credential vault, why VPR (Vulnerability Priority Rating) and CVSS disagree and which one to ticket on, and how a dynamic tag turns “every internet-facing prod host missing an agent” from a spreadsheet into a live, self-updating asset list that drives a scan, a report, and a ServiceNow queue on its own.
What problem this solves
Vulnerability management fails in three predictable ways, and Tenable.io’s architecture targets each. Coverage gaps: an unauthenticated network scan sees open ports and banners, not the patch level inside the host — it will call an SSH service “OpenSSH 8.x” and shrug, while a credentialed scan reads the actual package database and finds the eleven unpatched CVEs. Half your estate lives in cloud accounts a central appliance cannot even reach, and a third of it is ephemeral — autoscaled instances that boot and die inside a scan window. Prioritisation noise: a raw scan of a real estate returns tens of thousands of findings, most rated “Critical” by CVSS, and a team that tries to patch by CVSS burns weeks on a theoretical CVSS 10 with no known exploit while a CVSS 7 under active mass-exploitation sits open. No closed loop: findings that do not become owned, SLA-tracked tickets are findings nobody fixes; the scan report goes stale in a shared drive and the next audit finds the same CVEs.
What breaks without this: the failed customer review is the visible symptom, but the real cost is a production estate where nobody can answer “are we exposed to this CVE, on which hosts, and who owns the fix” in under a day. Ransomware and breach post-mortems almost always find the entry vulnerability was known and scored months earlier — it just never became a ticket with an owner and a clock.
Who hits this: any organisation with a mixed on-prem/multi-cloud estate under a compliance regime (SOC 2, PCI-DSS, ISO 27001, FedRAMP) that mandates authenticated scanning and demonstrable remediation SLAs. It bites hardest on teams with large autoscaled fleets (agents must self-enrol from the golden image or the instance is never scanned), teams running credentialed network scans against network gear and databases an agent cannot live on, and anyone whose “vulnerability program” is a quarterly PDF nobody actions.
To frame the field before the deep dive, here is every sensor type this guide covers, the question it answers, and where it fits:
| Sensor | What it is | Answers | Best for | Cannot do |
|---|---|---|---|---|
| Nessus Agent | Lightweight process on each host, scans from inside, uploads outbound | “What is unpatched inside this host I control?” | Servers, workstations, autoscaled VMs you own | Scan devices you can’t install on (network gear, DBs, appliances) |
| Nessus scanner (network) | Network-reachable engine scanning targets over the wire | “What is exposed / unpatched on this reachable target?” | Network devices, hypervisors, DBs, hosts without agents | Read inside a host without credentials; reach isolated subnets it can’t route to |
| Cloud connector (AWS/Azure/GCP) | Read-only API integration pulling asset inventory | “What should exist, per the cloud provider’s truth?” | Reconciling agents vs reality; tagging; ephemeral fleet awareness | Scan for CVEs — it inventories, it does not assess |
| Tenable Nessus (scanner) linked to Tenable.io | On-prem/cloud scanner engine you deploy and link | “What can I reach that the cloud scanners can’t?” | Internal subnets, air-gapped-ish segments, latency-sensitive scans | Anything an agent already covers better (from-inside detail) |
Learning objectives
By the end of this article you can:
- Explain the three Tenable.io sensor types (Nessus scanners, Nessus Agents, cloud connectors) and pick the right one for any target class.
- Deploy Nessus Agents at scale with a linking key and agent groups, including self-enrolment from a golden image for autoscaled fleets.
- Wire read-only cloud connectors for AWS (assume-role + external ID), Azure (Entra app + Reader) and GCP (service account + viewer) so asset inventory syncs on a schedule.
- Build both agent scans and credentialed network scans, choosing the right scan template, policy and credential type for each.
- Prioritise remediation with VPR instead of raw CVSS, and articulate exactly why and when they diverge.
- Drive dynamic tags and asset lists so scans, reports and ticket queues self-populate from live metadata.
- Run a remediation and reporting workflow — exports, recast/accept rules, exclusions, and ServiceNow ticketing — through the v3 REST API.
- Right-size the deployment: understand per-asset licensing, what drives cost, and where the free/low tiers sit.
Prerequisites & where this fits
You should be comfortable with cloud IAM (creating scoped read-only roles/service principals in at least one of AWS/Azure/GCP), basic Linux/Windows host administration (installing a package and a service), and reading JSON from a REST API with curl and jq. You do not need prior Tenable experience — this guide builds from the console up — but you should understand what a CVE and a CVSS score are.
You need:
- A Tenable Vulnerability Management (Tenable.io) container with an Administrator user. A free evaluation container works for the whole lab; production needs a licensed one sized to your asset count.
- Admin or delegated access to create read-only roles in the cloud accounts you will connect (AWS account(s), an Azure subscription + Entra tenant, a GCP project).
- A workstation or CI runner with
curl,jq, and theaws/az/gcloudCLIs, plusterraform>= 1.6 if you use the IaC path. - Outbound HTTPS (443) from every scanned host to
sensor.cloud.tenable.com(agent ingress) andcloud.tenable.com(the API). No inbound ports are opened — agents poll outbound. - A config-management path to push the agent: Ansible for the static fleet, plus a baked golden image / AMI so new instances arrive pre-enrolled.
This sits in the Cloud Security & Vulnerability Management track. It pairs with posture management — Roll Out Wiz CSPM Across a Multi-Account AWS Organization and Configure CrowdStrike Falcon Cloud Security (CSPM) on AWS find misconfigurations and exposure paths while Tenable supplies the authenticated in-host CVE detail; you correlate the two for real attack-path priority. It feeds the remediation loop in Automate ServiceNow Change Requests from CI/CD and the secrets discipline in Set Up External Secrets Operator with Vault. The scanning-vs-posture distinction is the same one drawn in the Well-Architected Security Pillar deep dive.
A quick map of who owns what, so you route work to the right team:
| Layer | What lives here | Who usually owns it | Failure it causes if wrong |
|---|---|---|---|
| Agent on host | Local scan, outbound upload | Platform / server team | Coverage gap (host has no agent reporting) |
| Linking key | Account-wide agent enrolment secret | Security / platform | Agents can’t join; or a leaked key linking rogue agents |
| Agent group | Scan-targeting unit | Security | Wrong hosts in a scan (dev host in a prod scan) |
| Cloud connector IAM | Read-only inventory access | Cloud team | No inventory sync; or over-broad role (audit finding) |
| Scan policy / credentials | What plugins run, how auth happens | Security | Uncredentialed scan = shallow findings |
| VPR / tags | Prioritisation + dynamic grouping | Security | Team patches the wrong things; stale lists |
| Export / ServiceNow | The closed remediation loop | Security + ITSM | Findings never become owned tickets |
Core concepts
Six mental models make every later step obvious.
Sensors feed a SaaS brain; you never run the brain. Tenable.io is the analytics, storage, scoring and workflow platform. Your job is to attach sensors and point scans at them. A scan is a job that binds a policy (which plugins run, how they authenticate, timing) to a target (an agent group, or a list of IPs/hostnames for a network scan) on a schedule. Results flow up, get de-duplicated onto assets, scored, tagged, and made queryable.
Agent scanning inverts the credential problem. A network scan reaches into a host over SSH/WinRM/SMB using credentials you supply — those credentials must be stored, rotated, and they traverse your network. A Nessus Agent already runs as a privileged local service, so the “authentication” is simply the host’s own context: no credentials cross the network, no scan engine holds host secrets, no inbound ports open. The agent is the answer to “how do I get credentialed depth without a credential vault and without opening my hosts to a scanner.” The trade-off: an agent can only scan the host it lives on — it cannot assess a network switch, a database appliance, or a printer, which is exactly where network scanners earn their place.
The linking key joins agents; the API key drives the console. These are two entirely different secrets that new users constantly conflate. The linking key is a single account-wide value an agent presents at enrolment to join your container (optionally into a named group). The API key pair (accessKey + secretKey) is per-user and authenticates REST calls. Using one where the other is expected fails — often with a silent 403. Both belong in a secrets manager, never in an image layer or a committed repo.
Cloud connectors inventory; they do not scan. A connector is read-only API access into a cloud account that pulls the list of assets (EC2 instances, Azure VMs, GCP Compute instances) plus their tags, state and metadata on a schedule. It answers “what should exist” so Tenable can reconcile it against “what is reporting an agent.” An instance that AWS lists but that has no agent is your coverage gap; an instance AWS reports terminated lets Tenable age out stale findings. The connector never runs a plugin or finds a CVE — pairing it with Tenable Cloud Security (Nessus agentless assessment / the CNAPP tier) is a separate, additive capability.
VPR is CVSS re-weighted by real-world threat. CVSS (Common Vulnerability Scoring System) is a static, theoretical severity from the vulnerability’s intrinsic properties. VPR (Vulnerability Priority Rating, 0.1–10) blends CVSS with dynamic threat intelligence — is there a public exploit, is it in active exploitation, is it trending in threat feeds, how old, how likely to be weaponised. A CVSS 9.8 with no exploit in the wild can carry a lower VPR than a CVSS 7.5 being mass-exploited today. You sort and ticket on VPR so the team fixes what is genuinely dangerous now, not what merely scores high on paper.
Assets are the de-dup anchor; tags are the dynamic grouping. Every finding attaches to an asset (a host, identified across scans by a stable fingerprint — UUID, MAC, cloud instance id). Tags are key/value labels; a static tag is applied by hand, a dynamic tag is a saved rule (“operating_system contains Windows AND aws:tag:env = prod”) that auto-applies to any asset matching it, now and in future. Tags are how you drive everything downstream: target a scan at a tag, filter a report by a tag, route a ServiceNow queue by a tag. Get the tags right and the rest of the program self-populates.
The vocabulary in one table
| Term | One-line definition | Where it lives | Why it matters |
|---|---|---|---|
| Container | Your isolated Tenable.io tenant | SaaS | The boundary all your data lives in |
| Sensor | A source of scan data | Agents / scanners / connectors | Determines coverage and depth |
| Nessus Agent | Local process scanning from inside | On each host | Credentialed depth, no network creds |
| Agent group | A named set of agents | Tenable.io | The unit you target with agent scans |
| Linking key | Account-wide agent-enrolment secret | Settings → Sensors | Joins agents; guard it |
| Scanner | Network scan engine (cloud or linked) | Cloud / your infra | Reaches targets an agent can’t |
| Cloud connector | Read-only cloud inventory feed | Settings → Connectors | Reconciliation, tagging, ephemeral awareness |
| Scan policy | Reusable set of plugin + auth + timing settings | Policies library | Defines how a scan runs |
| Template | Tenable-provided starting policy | Editor | The base you customise |
| Credential | Stored secret for network auth | Managed credentials | Depth for network scans |
| Plugin | One vulnerability/compliance check | Tenable feed | The detection unit |
| VPR | Threat-weighted priority score (0.1–10) | Per finding | What you actually patch by |
| CVSS | Static theoretical severity | Per finding | Compliance baseline; not your patch order |
| Asset | A de-duplicated host record | Assets store | The finding anchor |
| Tag | Key/value label (static or dynamic rule) | Assets | Dynamic grouping drives everything |
| Exclusion / exclusion window | Time/target a scan must skip | Scan settings | Change freezes, sensitive hosts |
| Recast / accept | Rules that re-severity or hide a finding | Findings | Managing false positives & accepted risk |
Sensors in depth: which one answers which question
The single most important architectural decision is which sensor scans which target. Get it wrong and you either miss depth (uncredentialed network scan where an agent belonged) or miss coverage entirely (no sensor at all can reach the target).
Nessus Agents — depth without network access
An agent is a small service (nessusagent on Linux, a Windows service) that links to your container, receives scan policy from the cloud, runs plugins locally against the host it lives on, and uploads results outbound over 443. It is the right sensor for every server, workstation and cloud VM you own and can install software on. Because it runs as root/SYSTEM it reads the package database, registry, installed software and config directly — the same depth a credentialed network scan gets, without you storing or transmitting any host credentials.
Agents check in on their own clock within a scan window you set, so a fleet of thousands does not stampede a single engine — there is no engine, the work is distributed onto each host. The cost is that agents cannot scan anything but their own host, and they need a rollout mechanism (config management for static hosts, self-enrolment from the golden image for ephemeral ones).
| Agent property | Detail | Why it matters |
|---|---|---|
| Install footprint | ~one package, idle until its window | Negligible host overhead |
| Auth model | Local host context (runs privileged) | No network creds stored/transmitted |
| Network | Outbound 443 only, polls out | No inbound ports; NAT/firewall-friendly |
| Targeting unit | Agent group | Scope scans per environment |
| Scan timing | scan_time_window (minutes) |
Spreads check-ins; no engine to size |
| Coverage limit | Only its own host | Can’t scan network gear, DBs, appliances |
| Enrolment | Linking key (+ optional group at link) | Self-enrol from golden image for autoscale |
| Data flow | Results uploaded to Tenable.io | No credentialed data leaves your host to a scanner |
Nessus scanners — reach and network-level detail
A Nessus scanner is a network-reachable engine that scans targets over the wire. Tenable.io ships cloud scanners (Tenable’s own, for internet-facing targets) and lets you deploy your own linked Nessus scanner inside a VPC/subnet to reach internal targets. Network scans do the things agents cannot: host discovery (what is even alive on this subnet), scanning devices you cannot install an agent on (switches, routers, firewalls, storage arrays, databases, hypervisors, IoT), and credentialed network scans where you supply SSH/WinRM/SNMP/database credentials for depth on hosts without agents.
| Scanner type | Where it runs | Reaches | Typical use |
|---|---|---|---|
| Tenable cloud scanner | Tenable’s infrastructure | Public internet-facing targets | External perimeter scans, discovery of public IPs |
| Linked Nessus scanner | Your VPC/on-prem, linked to Tenable.io | Internal subnets it can route to | Internal network devices, DBs, agentless hosts |
| Scanner group | Logical grouping of linked scanners | Distributes/loads-balances scans | Large internal estates, multi-region |
| Nessus Agent (for contrast) | On the host | Only itself | From-inside host CVE depth |
Cloud connectors — the inventory truth
A connector is not a scanner. It is a read-only API integration that, on a schedule, pulls the list of assets from a cloud provider (instances, their tags, AMI/image, lifecycle state, network placement) and merges that into the Tenable asset store. This is what lets Tenable answer “you have 412 EC2 instances in prod, 398 are reporting an agent, here are the 14 that are not” and “these 30 instances AWS reports terminated — age out their findings.” Connectors run per account/subscription/project and authenticate with the cloud’s native read-only primitive.
| Provider | Identity primitive | Least-priv role | What syncs |
|---|---|---|---|
| AWS | IAM role, assumed by Tenable with an external ID | SecurityAudit (managed) |
EC2 instances, tags, AMI, state, VPC/subnet |
| Azure | Entra app registration + client secret | Reader on subscription |
VMs, tags, resource group, region, state |
| GCP | Service account + JSON key | roles/viewer |
Compute instances, labels, zone, state |
The decision, distilled — pick the sensor from the target class:
| Target class | Right sensor | Why | Fallback |
|---|---|---|---|
| Linux/Windows server you own | Nessus Agent | Credentialed depth, no network creds | Credentialed network scan if agent can’t be installed |
| Autoscaled/ephemeral VM you own | Nessus Agent (self-enrol from image) | Boots pre-linked, scans in-window | Connector at least inventories it as a gap |
| Network switch / router / firewall | Network scan (SNMP creds) | Can’t install an agent | — |
| Database / storage appliance | Credentialed network scan | Agent can’t live there | — |
| Public IP / external perimeter | Tenable cloud scanner | Reaches from the outside | — |
| Isolated internal subnet | Linked Nessus scanner in that subnet | Cloud scanner can’t route there | Agents on the hosts if installable |
| “What should exist” reconciliation | Cloud connector | Provider’s inventory truth | — |
Agent groups, linking keys and enrolment at scale
Agents register into agent groups, which are the unit a scan targets. Create one group per environment so a production scan never accidentally sweeps a dev host and vice versa. Groups are cheap; make as many as your scan-scoping needs.
The linking key is a single account-wide secret. Any host with the key can join your container, so treat it like a shared credential: source it from a secrets manager on each host, never a plaintext var in your Ansible repo or a layer in a public AMI. You can join a group at link time with --groups, which makes a host scan-eligible immediately without a second API call.
Agent lifecycle states you will see in the console, and what each means:
| State | Meaning | Action if unexpected |
|---|---|---|
on / connected |
Linked and checking in | Healthy — none |
off |
Linked but not currently checked in | Check host up / egress 443 |
init |
Linking in progress | Wait; if stuck, check key + egress |
unlinked |
Removed from the container | Re-link if the host should be covered |
Stale last_connect |
Connected but not seen recently | Egress filtered? Agent service down? Coverage hole |
Enrolment paths by fleet type — match the path to how the host is born:
| Fleet type | Enrolment path | Mechanism | Gotcha |
|---|---|---|---|
| Static VMs | Config management | Ansible/Chef pushes package + agent link |
Long-lived; re-check after re-image |
| Golden image / AMI | Bake-in + self-link | Package baked; agent link from cloud-init user-data |
Don’t bake the linked state (clones share UUID) — link on first boot |
| Autoscaled group | Self-enrol on boot | user-data runs agent link --groups=<env> |
Must link before the scan window or it’s never scanned |
| Windows fleet | MSI + nessuscli.exe agent link |
GPO / config management | Same key; Windows service name differs |
| Containers/PaaS | Usually not agented | Use connector inventory + platform-native scanning | Agent is for hosts, not every workload |
A critical subtlety for images: bake the agent package into the golden image, but run the agent link command on first boot (from user-data / a systemd oneshot), not at bake time. If you link during the bake, every clone inherits the same agent identity and they collide in the console. Linking on first boot gives each instance its own identity and its own findings.
Scan types, templates and policies
A scan binds a policy to a target on a schedule. Tenable ships templates (pre-built policies) you clone and customise. The first fork is agent vs network; the second is what the scan is for (discovery, full assessment, compliance).
Agent vs network scans
| Dimension | Agent scan | Network scan |
|---|---|---|
| Runs where | On each host | From a scanner engine toward targets |
| Auth | Host’s local context (no creds) | Supplied credentials (SSH/WinRM/SNMP/DB) for depth |
| Target | Agent group(s) | IP ranges / hostnames / tags |
| Depth | Full from-inside (packages, registry, config) | Full if credentialed; shallow if not |
| Timing | scan_time_window; hosts run on own clock |
Scheduled run against reachable targets |
| Load | Distributed to hosts; no engine to size | Concentrated on the scanner; size it |
| Best for | Hosts you own | Devices you can’t agent; discovery; perimeter |
The templates you will actually use
Tenable provides many templates; these are the ones that matter for this build. Names are the Tenable UI names (the API name field is the lowercased/underscored form shown).
| Template | API name | What it does | When to use |
|---|---|---|---|
| Advanced Agent Scan | agent_advanced |
Full-control agent scan, all settings exposed | Production agent scans you tune |
| Basic Agent Scan | agent_basic |
Simplified agent scan | Quick start / small fleets |
| Advanced Network Scan | advanced |
Full-control network scan | Credentialed network scans you tune |
| Basic Network Scan | basic |
Standard network vuln scan | General network assessment |
| Host Discovery | discovery |
Live-host + port discovery only | Map a subnet before assessing it |
| Policy Compliance Auditing | compliance |
Runs compliance audit files (CIS/DISA) | Config-hardening / audit evidence |
| Web Application Tests | webapp |
Scans web apps for app-layer issues | App scanning (separate from host CVEs) |
| Malware Scan | malware |
Hunts known-bad files/hashes | IOC sweeps |
Scan settings that matter (agent scans)
| Setting | What it controls | Typical value | Gotcha |
|---|---|---|---|
agent_group_id |
Which agent group(s) to scan | Your prod group id | Wrong group = wrong hosts scanned |
scan_time_window |
Minutes agents have to check in and run | 90–180 | Too tight → slow/asleep hosts miss the scan |
launch / rrules |
Schedule (DAILY/WEEKLY + RRULE) | DAILY / FREQ=DAILY;INTERVAL=1 |
Set timezone too, or it runs at the wrong local hour |
enabled |
Whether the schedule is active | true |
A created-but-disabled scan never runs |
starttime |
First scheduled run | YYYYMMDDThhmmss |
Must be future; matches timezone |
Scan settings that matter (network scans)
| Setting | What it controls | Typical value | Gotcha |
|---|---|---|---|
text_targets |
IPs/ranges/hostnames to scan | 10.0.0.0/24 |
Overlapping ranges waste engine time |
scanner_id |
Which scanner/scanner-group runs it | Your linked scanner | Cloud scanner can’t reach internal IPs |
| Credentials | SSH/WinRM/SNMP/DB secrets for depth | From managed credentials | Uncredentialed = shallow findings |
| Port scan range | Which ports to probe | default or explicit |
Full 1–65535 is slow; scope it |
max_checks_per_host / throttling |
Scan intensity | Template defaults | Too aggressive can stress fragile devices |
Credentialed scanning: why it changes everything
The difference between an uncredentialed and a credentialed scan is the difference between guessing from the outside and reading from the inside. Uncredentialed, a network scan sees open ports and service banners and infers vulnerabilities probabilistically — it produces a lot of “potential” findings and misses everything not exposed on the network. Credentialed, it logs in and reads the truth: exact package versions, missing patches, registry settings, config file contents. Findings jump in both volume (you now see local vulns) and accuracy (far fewer false positives).
Agents sidestep this entirely — they are credentialed by virtue of running locally. Credentialed network scans matter for the hosts you cannot agent (databases, appliances, network gear) and for discovery of hosts before agents are deployed.
Credential types Tenable.io supports for network scans, and the least-privilege pattern for each:
| Credential type | Target class | Least-priv approach | Storage |
|---|---|---|---|
| SSH (key or password) | Linux/Unix hosts | Dedicated scan user, sudo to read pkg db; not full root | Managed credentials / Vault |
| Windows (WinRM/SMB) | Windows hosts | Dedicated account, local admin on target scope only | Managed credentials / gMSA |
| SNMP (v3 preferred) | Network devices | Read-only SNMPv3 with auth+priv | Managed credentials |
| Database (Oracle/MSSQL/etc.) | DB engines | Read-only audit role | Managed credentials |
| API/cloud | Cloud services | Scoped read-only | Managed credentials |
Use managed credentials (stored once, referenced by scans) rather than pasting secrets into each scan — one rotation point, and secrets never live in a scan definition you might export. Prefer key-based SSH and SNMPv3 with auth+priv over passwords and community strings.
Cloud connectors: read-only inventory sync in practice
Connectors are the reconciliation and tagging backbone. Each connects one cloud account with a read-only identity and syncs inventory on a schedule (hourly is common). Here is what each provider needs and the exact least-privilege setup.
AWS connector — assume-role with external ID
Tenable assumes a role in your account (never long-lived keys). The role trusts Tenable’s connector account and is gated by a per-connector external ID so a leaked role ARN is useless without it. Attach the AWS-managed SecurityAudit policy — read-only, sufficient for inventory.
data "aws_iam_policy_document" "tenable_trust" {
  statement {
    actions = ["sts:AssumeRole"]
    principals {
      type        = "AWS"
      identifiers = ["arn:aws:iam::012615275169:root"] # Tenable's connector account
    }
    condition {
      test     = "StringEquals"
      variable = "sts:ExternalId"
      values   = [var.tenable_external_id]  # generated in the Tenable UI, per connector
    }
  }
}

resource "aws_iam_role" "tenable_connector" {
  name               = "tenable-io-connector"
  assume_role_policy = data.aws_iam_policy_document.tenable_trust.json
}

resource "aws_iam_role_policy_attachment" "ro" {
  role       = aws_iam_role.tenable_connector.name
  policy_arn = "arn:aws:iam::aws:policy/SecurityAudit" # read-only inventory access
}
Register the connector via the API, passing the role ARN and the external ID Tenable generated:
tio POST /settings/connectors -d '{
  "connector": {
    "type": "aws",
    "name": "aws-prod-account",
    "schedule": {"units": "hours", "value": "4"},
    "params": {
      "role_arn": "arn:aws:iam::111122223333:role/tenable-io-connector",
      "external_id": "'"${TENABLE_EXTERNAL_ID}"'",
      "regions": ["us-east-1", "eu-west-1"],
      "import_ec2": true
    }
  }
}'
Repeat per account. Within each cycle Tenable populates inventory with every EC2 instance plus its tags, AMI and state — which is how it spots an instance that exists in AWS but has no agent reporting (your coverage gap) and suppresses findings on instances AWS reports terminated.
Azure connector — Entra app + Reader
Azure uses an Entra app registration with a client secret and the Reader role on the subscription:
APP_ID=$(az ad app create --display-name "tenable-io-connector" --query appId -o tsv)
az ad sp create --id "$APP_ID"
SECRET=$(az ad app credential reset --id "$APP_ID" --query password -o tsv)
SUB_ID=$(az account show --query id -o tsv)
TENANT_ID=$(az account show --query tenantId -o tsv)
az role assignment create --assignee "$APP_ID" --role "Reader" \
  --scope "/subscriptions/${SUB_ID}"

tio POST /settings/connectors -d '{
  "connector": {"type":"azure","name":"azure-prod-sub",
    "schedule":{"units":"hours","value":"4"},
    "params":{"subscription_id":"'"${SUB_ID}"'","tenant_id":"'"${TENANT_ID}"'",
      "client_id":"'"${APP_ID}"'","client_secret":"'"${SECRET}"'"}}}'
GCP connector — service account + viewer
GCP uses a service account with roles/viewer, authenticating with the JSON key:
gcloud iam service-accounts create tenable-io-connector \
  --display-name="Tenable.io connector"
PROJECT_ID=$(gcloud config get-value project)
gcloud projects add-iam-policy-binding "$PROJECT_ID" \
  --member="serviceAccount:tenable-io-connector@${PROJECT_ID}.iam.gserviceaccount.com" \
  --role="roles/viewer"
gcloud iam service-accounts keys create /tmp/tenable-gcp.json \
  --iam-account="tenable-io-connector@${PROJECT_ID}.iam.gserviceaccount.com"

KEY_B64=$(base64 -w0 /tmp/tenable-gcp.json)
tio POST /settings/connectors -d '{
  "connector":{"type":"gcp","name":"gcp-prod-project",
    "schedule":{"units":"hours","value":"4"},
    "params":{"service_account_key":"'"${KEY_B64}"'","project_id":"'"${PROJECT_ID}"'"}}}'
shred -u /tmp/tenable-gcp.json   # do not leave the key on disk
Store the Azure secret and the GCP key JSON in a secrets manager, not shell history — rotate both on your policy cadence. Connector health you should monitor:
| Connector signal | Where | Healthy value | If not |
|---|---|---|---|
| Last sync time | GET /settings/connectors |
Within the schedule interval | Check IAM validity / secret expiry |
last_sync_status |
Same | success |
Read the error; usually perms or expired secret |
| Asset count vs cloud | Reconcile monthly | Matches provider console | Investigate drift (region missed?) |
| Aged-out assets | Assets with terminated state | Findings suppressed | Confirm connector sees termination |
VPR vs CVSS: prioritising what is actually exploitable
This is where a vulnerability management program diverges from a vulnerability scanning one. A real scan of a real estate returns tens of thousands of findings; most carry a high CVSS because CVSS measures theoretical worst-case severity. Patching by CVSS means chasing every CVSS 10 regardless of whether anyone can or does exploit it — a treadmill that never gets ahead of actual risk.
VPR re-ranks by current, real-world threat. It ingests threat intelligence and machine learning over exploit availability, exploitation activity, exploit maturity, chatter in threat feeds, and age, then blends that with CVSS to produce a 0.1–10 score that answers “how dangerous is this right now.” The practical rule: sort and ticket on VPR, keep CVSS as the compliance baseline.
| Dimension | CVSS | VPR |
|---|---|---|
| Nature | Static, theoretical | Dynamic, threat-aware |
| Inputs | Intrinsic vuln properties (attack vector, complexity, impact) | CVSS + exploit availability, active exploitation, threat-feed activity, age, ML |
| Changes over time? | No (fixed at publication) | Yes (re-scored as threat evolves) |
| Answers | “How bad could this be?” | “How dangerous is this now?” |
| Range | 0.0–10.0 | 0.1–10.0 |
| Use it for | Compliance baseline, coverage | Patch prioritisation / ticketing |
| Failure if used alone | Wastes effort on non-exploited highs | (Pair with CVSS for compliance evidence) |
VPR severity bands and the SLA you might attach:
| VPR band | Severity | Example SLA (illustrative) |
|---|---|---|
| 9.0–10.0 | Critical | Patch in 7 days |
| 7.0–8.9 | High | Patch in 14 days |
| 4.0–6.9 | Medium | Patch in 30 days |
| 0.1–3.9 | Low | Patch in 90 days / risk-accept |
The canonical example: a CVSS 9.8 remote code execution with no public exploit and no observed exploitation may carry a VPR of 6.x, while a CVSS 7.5 with a weaponised exploit under active mass-exploitation carries a VPR of 9.x. Ticket the second first. Query the top of your estate by VPR:
tio POST /workbenches/vulnerabilities -d '{
  "filters":[{"filter":"severity","quality":"gte","value":"high"}],
  "sort":[{"order":"desc","property":"vpr_score"}]
}' | jq -r '.vulnerabilities[:15][]
  | [(.vpr_score|tostring), .plugin_name, (.count|tostring)] | @tsv'
Tags and dynamic asset lists
Tags are the automation substrate. A static tag you apply by hand (“crown-jewels”); a dynamic tag is a saved rule that auto-applies to any asset matching it — apply it once, and every future asset that fits gets tagged with no further action. You then target scans, filter reports, and route tickets by tag.
Common dynamic-tag rules and what they enable:
| Tag (key:value) | Rule | Enables |
|---|---|---|
env:prod |
aws:tag:Environment = production OR azure:tag:env = prod |
Prod-only scans, reports, SLAs |
os:windows |
operating_system contains Windows |
OS-specific scan policies/patching |
exposure:internet-facing |
aws:public_ip is not empty |
Prioritise perimeter; tighter SLA |
owner:team-payments |
aws:tag:owner = payments |
Route ServiceNow tickets by owner |
coverage:no-agent |
has_agent = false |
Live coverage-gap list to close |
compliance:pci |
aws:tag:scope = pci |
Compliance scan scope + evidence |
Create a dynamic tag via the API (a category + value + a filter rule):
tio POST /tags/values -d '{
  "category_name": "env",
  "value": "prod",
  "filters": {
    "asset": {
      "and": [
        {"field":"aws_ec2_instance_state_name","operator":"eq","value":"running"},
        {"field":"cloud_tags","operator":"set-has","value":"Environment:production"}
      ]
    }
  }
}'
Now a scan can target env:prod instead of a hand-maintained group, a report can filter to exposure:internet-facing, and a ServiceNow rule can route by owner:* — all self-updating as the connector syncs new instances.
Remediation workflow, reporting and exclusions
Findings become work only when they are exported, prioritised, owned and tracked, and when noise is managed with recast/accept rules and exclusions.
The export pipeline
The vulnerability export is the source feed for ticketing and SIEM. Filter it to what matters (high VPR, prod), then poll to completion and download chunks:
EXPORT_UUID=$(tio POST /vulns/export -d '{
  "filters":{"severity":["high","critical"],"vpr_score":{"gte":7.0}},
  "num_assets":500
}' | jq -r '.export_uuid')

# poll until FINISHED, then download chunks
tio GET /vulns/export/${EXPORT_UUID}/status | jq '.status'
tio GET /vulns/export/${EXPORT_UUID}/chunks/1 > /tmp/tio-high-vpr.json
Managing noise: recast, accept, exclude
| Mechanism | What it does | When to use | Caution |
|---|---|---|---|
| Recast rule | Changes a finding’s severity | A finding is real but lower risk in your context | Document why; review periodically |
| Accept rule | Hides a finding (accepted risk) | Confirmed false positive or business-accepted risk | Time-box and re-review; don’t accept away real risk |
| Exclusion window | Scan skips a target/time | Change freezes, fragile hosts, maintenance | An excluded host is unscanned — track it |
| Asset age-out | Retire assets not seen in N days | Ephemeral fleet churn | Set to match your instance lifecycle |
Exclusions matter for both accuracy and safety: a scan during a change freeze can trip alarms, and some fragile devices misbehave under scanning. Set an exclusion window rather than pausing the whole scan.
Reporting
Tenable.io reports/dashboards answer the audit and the exec. Practical report cuts:
| Report | Filter | Audience |
|---|---|---|
| Executive risk summary | By VPR band, trend over time | CISO / leadership |
| Remediation SLA compliance | Findings vs SLA age | Ops / audit |
| Coverage gap | has_agent=false, by account |
Platform team |
| Per-owner backlog | Grouped by owner:* tag |
Owning teams |
| Compliance evidence | Compliance-scan pass/fail | Auditors |
Architecture at a glance
Three planes meet in Tenable.io, and the diagram traces how data moves through them. Read it as three feeds converging on the SaaS platform, then one flow out to remediation.
The agent plane is every host you own running a Nessus Agent that authenticates locally and uploads results outbound over 443 — no scan engine reaches into your network, no credentials traverse it. Agents belong to agent groups (prod, dev) that scans target. The connector plane is read-only API access into AWS (assume-role + external ID), Azure (Entra app + Reader) and GCP (service account + viewer) that pulls live asset inventory — instances, tags, lifecycle state — so Tenable can reconcile what should exist against what is reporting, flag the no-agent coverage gaps, and age out terminated hosts. For targets no agent can live on, the scanner plane — Tenable cloud scanners for the perimeter, a linked Nessus scanner inside a subnet for internal gear — runs credentialed network scans. All three feed the Tenable.io platform, which de-duplicates findings onto assets, scores them with VPR (not just CVSS), and lets dynamic tags slice the estate live. The remediation plane flows outward: a filtered export of high-VPR findings drives a ServiceNow ticket per finding routed by the asset’s owner tag, cross-correlated with CSPM/EDR posture data, so the SLA clock and closure record — the paper trail the failed customer review demanded — live in your ITSM.
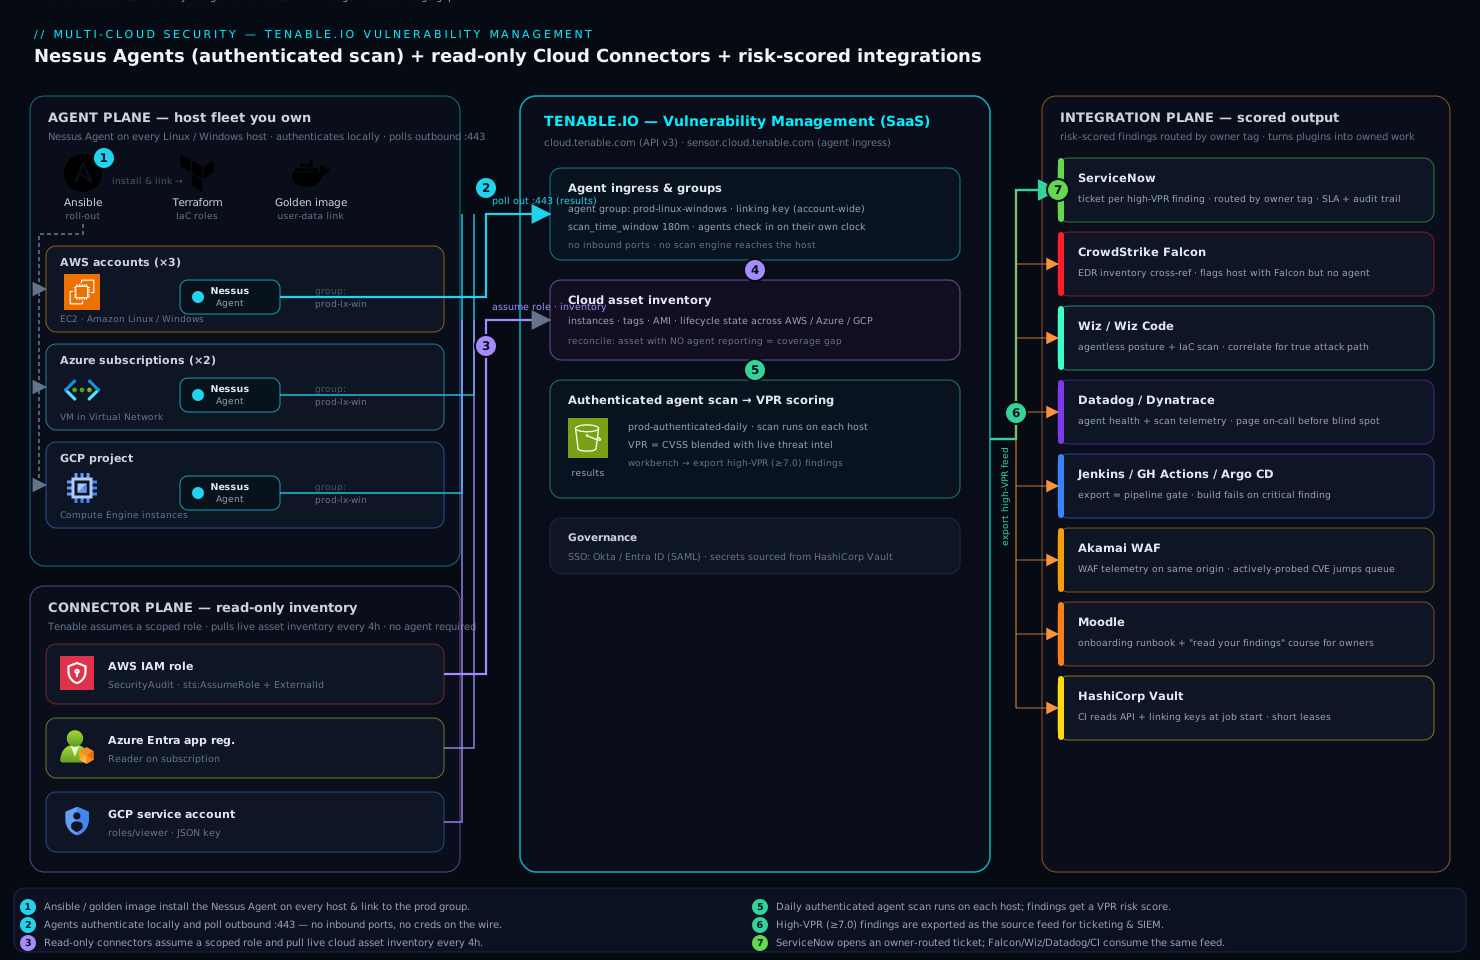
The mental model to carry from the diagram: three feeds in, one loop out. Agents give depth on hosts you own, connectors give the inventory truth to find gaps, scanners cover what agents cannot reach, VPR decides order, tags decide routing, and the export closes the loop into owned, time-bound tickets.
Real-world scenario
Northwind Ledger, a fintech SaaS (~180 engineers), failed a Series-B customer’s security review on the exact line in this article’s opening: no on-demand authenticated scan of production. Their estate: 3 AWS accounts (~410 EC2 instances, half in an autoscaling group), 2 Azure subscriptions (~120 VMs), 1 GCP project (~40 Compute instances for data pipelines), plus ~25 network devices (firewalls, switches) and 6 database appliances an agent cannot touch. The existing program was a quarterly unauthenticated Nessus scan from one appliance in a single VPC that reached maybe 40% of the estate and found mostly banner-grade “potential” findings. The CISO gave the platform team one sprint.
The rollout ran in the order this guide teaches. Day 1–2: mint API keys, create prod, dev and data agent groups, pull the linking key into Vault. Day 2–4: Ansible pushed the agent to the ~380 static VMs and linked them into prod; for the autoscaling group they baked the agent package into the AMI and added an agent link --groups=prod step to user-data so new instances self-enrolled within a minute of boot. Within a day the console showed ~500 agents on. Day 3–5: wired the AWS (×3), Azure (×2) and GCP connectors with read-only roles; the first sync revealed the truth that mattered — 31 EC2 instances reporting no agent, all in a legacy account nobody had put in the Ansible inventory, plus 14 the connector showed AWS had already terminated (stale findings, aged out).
The coverage gap became a dynamic tag coverage:no-agent, which drove both a ServiceNow queue to the owning team and a daily-shrinking metric on the CISO dashboard. For the network devices and databases, they deployed a linked Nessus scanner inside the shared-services VPC and built a credentialed network scan (SNMPv3 for the switches, read-only DB accounts for the appliances) — the only sensor that could reach them. Day 5: an agent_advanced daily scan against prod with a 120-minute window seeded results; a workbench query sorted by VPR surfaced the real fires.
The prioritisation payoff was immediate and countable. The raw scan returned ~9,400 findings, of which ~1,100 were CVSS “Critical.” Sorting by VPR ≥ 7.0 collapsed the actionable set to ~140 findings — the ones with real exploit activity — and the very top of that list was a CVSS 7.5 web-framework flaw under active mass-exploitation that the old CVSS-ordered process would have buried under hundreds of theoretical CVSS 10s. Those 140 became ServiceNow tickets routed by the owner:* tag with a 14-day SLA. Six weeks later the customer re-ran the review; Northwind produced an on-demand authenticated scan report, a coverage number (99.2% of licensed assets agented), and an SLA-compliance chart. They passed. Tenable is licensed per asset, so the spend tracked their ~700 licensed assets — and because scan frequency is free, moving from quarterly to daily authenticated scanning added nothing to the bill; the only cost discipline was excluding short-lived CI hosts from licensing and aging out terminated instances to keep the count honest.
The rollout as a timeline, because the order is the lesson:
| Day | Action | Result | Why this order |
|---|---|---|---|
| 1–2 | API keys, agent groups, linking key → Vault | Foundation ready | Everything downstream needs these |
| 2–4 | Ansible + AMI self-enrol → agents link | ~500 agents on |
Depth on hosts you own, first |
| 3–5 | AWS/Azure/GCP connectors | 31 gaps + 14 stale found | Inventory truth reveals coverage |
| 5 | Linked scanner + credentialed net scan | DBs/switches covered | The only sensor that reaches them |
| 5 | agent_advanced daily scan on prod |
9,400 findings seeded | Now there’s data to prioritise |
| 5–6 | Sort by VPR ≥ 7 | 9,400 → 140 actionable | Fix exploitable, not theoretical |
| 6+ | Export → ServiceNow by owner tag | 140 owned, SLA-tracked | Close the loop; audit trail |
Advantages and disadvantages
The agent-plus-connector model is powerful but has real trade-offs — weigh them honestly:
| Advantages | Disadvantages |
|---|---|
| Agents give credentialed depth with no network creds stored or transmitted | Agents only scan their own host — network gear, DBs, appliances still need network scans + credentials |
| No inbound ports; agents poll outbound — firewall/NAT-friendly | You must roll out and maintain agents; ephemeral hosts must self-enrol or they’re never scanned |
| Distributed load — no scan engine to size; thousands of hosts don’t stampede | You give up central scan scheduling control; a host asleep past its window is missed |
| Connectors reconcile agents vs reality — coverage gaps and stale assets are visible | Connectors inventory only — they find no CVEs; full agentless assessment is a separate (CNAPP) capability + cost |
| VPR cuts a 9,400-finding estate to ~140 actionable — patch what’s exploitable | VPR is Tenable-proprietary; auditors may still demand CVSS-based evidence (keep both) |
| Dynamic tags make scans/reports/tickets self-populating | Tag rules are only as good as your cloud tagging hygiene — bad owner tags misroute tickets |
| Per-asset licensing means scan frequency is free — daily costs the same as weekly | License tracks asset count; ghost/terminated assets inflate the bill if you don’t age them out |
| Native ServiceNow/SIEM integrations close the remediation loop | The closed loop only works if owning teams act on tickets — tooling doesn’t fix culture |
The model is right when you have a mixed estate you mostly own (agents shine) plus edge cases you cannot agent (network scanners cover them) and a compliance mandate for authenticated scanning and SLAs. It is over-engineered for a tiny all-PaaS shop with no VMs (there, cloud-native scanning + a CSPM tool may suffice). It bites hardest on teams with poor cloud tagging (dynamic tags misfire), large ephemeral fleets that never self-enrol (perpetual coverage gaps), and anyone who lets the asset count drift with terminated ghosts (license waste).
Hands-on lab
This lab stands up the core loop on a free Tenable.io evaluation container and one throwaway VM: mint keys, create an agent group, link a real Nessus Agent, build and run an agent scan, and pull VPR-sorted findings. It is intentionally small and fully teardown-able. You need a Linux VM you can install a package on (a cloud VM or a local Ubuntu/RHEL box) and shell access to it.
Step 1 — Mint API keys and set up the CLI workspace. In the Tenable.io console: Settings → My Account → API Keys → Generate. You get an accessKey and secretKey shown once. Export them and define a thin wrapper so the rest is copy-paste:
export TIO_ACCESS_KEY="a1b2c3..."
export TIO_SECRET_KEY="d4e5f6..."
export TIO_BASE="https://cloud.tenable.com"

tio() {
  local method="$1" path="$2"; shift 2
  curl -sS -X "$method" "${TIO_BASE}${path}" \
    -H "X-ApiKeys: accessKey=${TIO_ACCESS_KEY}; secretKey=${TIO_SECRET_KEY}" \
    -H "Accept: application/json" -H "Content-Type: application/json" "$@"
}

# smoke test — should return your container's session
tio GET /session | jq '{name: .name, container: .container_name}'
Expected: a JSON object with your user name and container name. If you get a 403, the keys are wrong or the header is malformed. Do not bake these keys into images or commit them.
Step 2 — Create an agent group. Groups are the unit an agent scan targets:
LAB_GROUP_ID=$(tio POST /scanners/null/agent-groups \
  -d '{"name":"lab-linux"}' | jq -r '.id')
echo "lab agent group id: ${LAB_GROUP_ID}"
Expected: a numeric group id. Verify it exists:
tio GET /scanners/null/agent-groups | jq -r '.groups[] | [.id, .name] | @tsv'
Step 3 — Get the linking key. The linking key lives in the UI at Settings → Sensors → Linked Agents → (linking key shown at top). Copy it. (It is a single account-wide value; it is not your API key.)
export LINK_KEY="<paste-linking-key-from-UI>"
Step 4 — Install and link the Nessus Agent on your lab VM. SSH to the VM. On Debian/Ubuntu:
# download + install (Ubuntu example; use the current package for your distro)
curl -sSL -o /tmp/nessusagent.deb \
  "https://www.tenable.com/downloads/api/v2/pages/nessus-agents/files/NessusAgent-latest-ubuntu1604_amd64.deb"
sudo dpkg -i /tmp/nessusagent.deb || sudo apt-get -f install -y

# link to Tenable.io and join the lab group
sudo /opt/nessus_agent/sbin/nessuscli agent link \
  --key="${LINK_KEY}" \
  --groups=lab-linux \
  --cloud \
  --name="$(hostname)"

sudo systemctl enable --now nessusagent
The --cloud flag points the agent at sensor.cloud.tenable.com (not an on-prem manager); --groups joins at link time so it is scan-eligible immediately. Verify locally:
sudo /opt/nessus_agent/sbin/nessuscli agent status
# expect: "Link status: Connected to cloud.tenable.com:443"
#         "Agent is registered to a manager."
Step 5 — Confirm the agent appears in the console. Back on your workstation:
tio GET "/scanners/null/agents?limit=100" \
  | jq -r '.agents[] | [.name, .status, .platform] | @tsv'
Expected: your hostname with status on (it may briefly show init). If it never appears, check outbound 443 from the VM to sensor.cloud.tenable.com.
Step 6 — Build and launch an agent scan. Find the Advanced Agent Scan template, then create a scan bound to the lab group and launch it once:
TEMPLATE=$(tio GET /editor/scan/templates \
  | jq -r '.templates[] | select(.name=="agent_advanced") | .uuid')
echo "template uuid: ${TEMPLATE}"

SCAN_ID=$(tio POST /scans -d '{
  "uuid":"'"${TEMPLATE}"'",
  "settings":{
    "name":"lab-agent-scan",
    "enabled":true,
    "agent_group_id":['"${LAB_GROUP_ID}"'],
    "scan_time_window":60
  }
}' | jq -r '.scan.id')
echo "scan id: ${SCAN_ID}"

# launch a one-off run now to seed results
tio POST /scans/${SCAN_ID}/launch | jq
Expected: a scan_uuid in the launch response. The agent runs on its own clock within the 60-minute window — give it a few minutes.
Step 7 — Watch the scan and pull VPR-sorted findings. Check status, then query the workbench:
# scan status
tio GET /scans/${SCAN_ID} | jq -r '.info | {status, name, timestamp}'

# top findings across the estate, sorted by VPR (once results land)
tio POST /workbenches/vulnerabilities -d '{
  "filters":[{"filter":"severity","quality":"gte","value":"medium"}],
  "sort":[{"order":"desc","property":"vpr_score"}]
}' | jq -r '.vulnerabilities[:15][]
  | [(.vpr_score // "n/a"|tostring), .plugin_name, (.count|tostring)] | @tsv'
Expected: rows of VPR<TAB>plugin_name<TAB>count. On a fresh agent you will see real local findings (missing patches, outdated packages) — proof that agent scanning gives credentialed depth with zero network credentials.
Validation checklist — what each step proved:
| Step | What you did | What it proves |
|---|---|---|
| 1 | Minted API keys, smoke-tested /session |
API auth works; keys ≠ linking key |
| 2 | Created an agent group | Groups are the scan-targeting unit |
| 4 | Linked a real agent | Outbound-only enrolment, local auth |
| 5 | Saw the agent on in console |
Coverage is visible and verifiable |
| 6 | Built + launched an agent scan | Scan binds template → group, no creds |
| 7 | Pulled VPR-sorted findings | Credentialed depth + risk scoring flow |
Teardown — remove everything so nothing keeps polling or holding state:
# 1) disable + delete the scan
tio PUT  /scans/${SCAN_ID} -d '{"settings":{"enabled":false}}'
tio DELETE /scans/${SCAN_ID}

# 2) on the lab VM: unlink + remove the agent
sudo /opt/nessus_agent/sbin/nessuscli agent unlink
sudo apt-get remove --purge nessus-agent -y   # or: sudo yum remove NessusAgent

# 3) delete the agent group
tio DELETE /scanners/null/agent-groups/${LAB_GROUP_ID}

# 4) (optional) delete the API keys in the UI: Settings → My Account → API Keys
If you also wired connectors during a broader test, delete each to stop inventory pulls, then revoke cloud access at the source (destroy the AWS role / terraform destroy, az ad app delete --id "$APP_ID", gcloud iam service-accounts delete ...), and finally delete the API keys so an orphaned credential cannot be replayed.
Common mistakes & troubleshooting
The failure modes you will actually hit, with the exact confirm step and fix. Scan the table, then read the detail for the ones that bite hardest.
| # | Symptom | Root cause | Confirm | Fix |
|---|---|---|---|---|
| 1 | Agent shows Connected locally but last_connect never advances in console |
Outbound 443 to sensor.cloud.tenable.com filtered |
nessuscli agent status = Connected, but console last_connect stale |
Open egress / set --proxy-host; re-check |
| 2 | agent link fails with 403 or “invalid key” |
Used the API key as the linking key (or vice versa) | Compare: linking key is one account-wide value under Sensors; API key is per-user | Use the linking key from Settings → Sensors |
| 3 | Connector never syncs; last_sync_status error |
IAM role/secret wrong, external ID mismatch, or over-scoped and denied | tio GET /settings/connectors shows the error |
Fix trust/external ID; use SecurityAudit/Reader/viewer |
| 4 | Cloud assets show but no CVE findings on them | Expected — connectors inventory, they don’t scan | Asset has cloud source but no agent/scan data | Deploy an agent or a credentialed network scan |
| 5 | Autoscaled instances perpetually flagged no-agent | Instances boot/die before an Ansible run | Connector shows them; agent list doesn’t | Self-link from user-data in the golden image |
| 6 | Golden-image clones collide / share identity | Agent linked at bake time (clones share UUID) | Multiple hosts, one agent entry flapping | Bake the package; run agent link on first boot |
| 7 | Network scan returns shallow “potential” findings only | Scan ran uncredentialed | Scan policy has no/failed credentials | Add managed credentials (SSH/WinRM/SNMP/DB) |
| 8 | Team patching CVSS 10s but breaches persist | Prioritising by CVSS, not VPR | Findings sorted by cvss not vpr_score |
Sort/ticket on vpr_score; keep CVSS for compliance |
| 9 | Slow/asleep hosts missed by the scan | scan_time_window too tight for the fleet |
Some agents’ last_scanned predates the run |
Raise window to 90–180 min |
| 10 | Findings on terminated instances linger | Connector not aging out; or no connector for that account | Instance state terminated in cloud, still in Tenable |
Ensure connector covers the account; set age-out |
| 11 | Dynamic-tag scans/tickets miss hosts | Cloud tagging inconsistent (env=prod vs Environment=production) |
Tag rule matches fewer assets than expected | Normalise cloud tags; broaden the rule with OR |
| 12 | Scan trips alarms during a change freeze | No exclusion window set | Scan ran against frozen/fragile targets | Add an exclusion window for the freeze/target |
| 13 | License count higher than live asset count | Ghost/terminated assets still licensed | Reconcile Tenable count vs cloud console | Age out stale assets; exclude short-lived CI hosts |
| 14 | Linked scanner can’t reach internal targets | Scanner in a subnet with no route to the targets | Scan results empty; scanner can’t ping | Place scanner in a subnet that routes to targets |
1. Agent connected locally but never uploads. The agent links fine but egress to sensor.cloud.tenable.com:443 is filtered, so results never reach the console. Confirm: nessuscli agent status shows Connected, but the console’s last_connect for that agent never advances. Fix: open the egress allow-list (or configure a proxy: nessuscli agent supports --proxy-host/--proxy-port), then confirm last_connect advances.
2. Linking key vs API key confusion. The account-wide linking key joins agents; the per-user API key drives REST calls. They are not interchangeable and swapping them fails — often a silent 403 on link. Confirm: the linking key is the single value under Settings → Sensors → Linked Agents; the API key is the pair you generated under My Account. Fix: use the linking key for agent link --key=.
4. Connectors inventory; they don’t assess. New users expect a connector to scan the cloud and are surprised there are no CVEs on connector-discovered assets. Confirm: the asset has an AWS/Azure/GCP source but no agent or scan data. Fix: a connector only tells you the host exists — put an agent on it (or run a credentialed network scan) to actually assess it. Agentless CVE assessment is a separate Tenable Cloud Security capability.
8. Treating VPR like CVSS. The most consequential program mistake: patching by CVSS burns the team on theoretical highs while an actively-exploited medium sits open. Confirm: your workbench/exports sort by cvss or raw severity, not vpr_score. Fix: sort and ticket on VPR; a CVSS 7.5 under mass-exploitation (VPR 9.x) outranks a CVSS 9.8 with no exploit (VPR 6.x). Keep CVSS as the compliance baseline, not the work queue.
Best practices
- One agent group per environment. So a prod scan never sweeps a dev host. Groups are free; scope generously.
- Self-enrol ephemeral hosts from the golden image. Bake the package, run
agent linkon first boot from user-data — never bake the linked state (clones collide). Autoscaled hosts that rely on a later Ansible run are perpetual coverage gaps. - Sort and ticket on VPR, keep CVSS for compliance. VPR is your patch queue; CVSS is your audit baseline. Never let the team burn on non-exploited CVSS 10s.
- Keep connector IAM strictly read-only.
SecurityAudit/Reader/roles/viewer— nothing broader. Scope each external-ID trust to a single connector so a leaked ARN is useless alone. - Drive scans, reports and tickets from dynamic tags, not hand-maintained lists. Tag once by rule; every future asset auto-classifies. This is what makes the program scale.
- Fix your cloud tagging first. Dynamic tags are only as good as
env/owner/scopetag hygiene — normalise it or tickets misroute and scans miss hosts. - Credential every network scan. Uncredentialed scans produce shallow “potential” findings; credentialed scans read the truth. Use managed credentials (one rotation point), key-based SSH, SNMPv3.
- Size the scan window to the fleet’s check-in spread. 90–180 minutes for large agent fleets so slow or asleep hosts still run.
- Age out terminated assets. Let connectors retire ghosts so you neither pay for them nor chase stale findings. Reconcile the licensed count monthly.
- Set exclusion windows for change freezes and fragile devices. An exclusion is safer than pausing the whole scan — but track excluded hosts so they don’t become blind spots.
- Close the loop into ServiceNow with an owner-routed queue and an SLA clock. Findings without an owner and a deadline don’t get fixed; the ticket trail is the audit evidence.
- Alert on coverage, not just findings. A
has_agent=falsetag feeding a daily-shrinking metric catches blind spots before an auditor does.
Security notes
- Guard the linking key like a shared credential. Anyone with it can link a rogue agent to your container. Source it from a secrets manager on each host; never a plaintext var in an Ansible repo, a CI variable block, or an image layer. Rotate it if exposed.
- API keys are full-power and per-user. They drive every REST call. Store them in HashiCorp Vault (or your platform secret store) and have runners read them at job start — never bake into images or commit. Scope users to least-privilege roles in Tenable rather than everyone being Administrator.
- Connector IAM is read-only, always.
SecurityAudit/Reader/roles/viewerare sufficient for inventory. ResistAdministratorAccess/Owner— anything more is an audit finding, and the connector never needs write. The external-ID condition on the AWS trust is mandatory, per-connector. - The agent model is itself a security win. No inbound ports, no scan engine holding host credentials, and no secrets crossing your network — authentication happens locally on each host. This is a smaller attack surface than a credentialed network scanner reaching into every host.
- Federate console access to SSO. Put Tenable.io behind Okta or Microsoft Entra ID over SAML, enforce conditional access and MFA, so console access follows central identity policy rather than local Tenable passwords. See Configure Duo MFA with Device Trust for the MFA layer pattern.
- Rotate the Azure client secret and GCP key on policy cadence. Both are long-lived by default; short leases and scheduled rotation from a secrets manager keep a leaked one from being replayable. The AWS assume-role model needs no rotation (temporary credentials), which is why it’s preferred where available.
- Treat findings data as sensitive. A full vulnerability export is a map of your weaknesses. Restrict who can export, encrypt exports at rest, and don’t leave chunk files on disk (the lab teardown deletes them for a reason).
Cost & sizing
Tenable.io licenses per asset under management, so cost tracks the inventory the connectors discover, not scan frequency — there is no penalty for scanning daily instead of weekly, which makes continuous authenticated scanning effectively free once an asset is licensed. The whole cost discipline is therefore about keeping the asset count honest, not about throttling scans.
What drives the bill and how to control it:
| Cost driver | What it is | Lever to control it |
|---|---|---|
| Licensed asset count | Per-asset license (the dominant cost) | Age out terminated instances; exclude short-lived CI hosts where policy allows |
| Ghost/stale assets | Terminated hosts still counted | Ensure connectors see termination; set age-out to match fleet lifecycle |
| Scan frequency | (Not billed) | Scan as often as you like — daily costs the same as quarterly |
| Agent compute | Host CPU while scanning | Negligible — agent idle until its window; distributed load |
| Connector API calls | Read-only inventory pulls | Sit inside every provider’s free inventory-read tier |
| Add-on modules | e.g. Tenable Cloud Security (agentless CNAPP), Web App Scanning | Additive license — only if you need agentless assessment / app scanning |
Sizing guidance:
| Estate size | Approach | Watch-out |
|---|---|---|
| < 100 assets | Free evaluation for PoC; small paid tier for prod | Don’t over-buy; start with agents on owned hosts |
| Few hundred to low thousands | Standard per-asset license; connectors + agents | Keep the count honest — this is where ghosts inflate cost |
| Tens of thousands | Enterprise license; scanner groups for network segments | Distribute scanners; automate age-out; monthly reconciliation |
| Heavy ephemeral fleet | License a headroom band; aggressive age-out | Short-lived CI hosts can double your count if not excluded |
The single biggest cost mistake is letting the asset count drift with terminated ghosts — reconcile the Tenable licensed count against the cloud console monthly, and let connectors age out anything the provider reports terminated. Agent compute and connector API calls are effectively free (idle agents, free-tier inventory reads), so the only real lever is asset hygiene.
Interview & exam questions
1. What are the three sensor types in Tenable.io and when do you use each? Nessus Agents (on hosts you own, for credentialed from-inside depth with no network credentials), Nessus scanners (network engines — cloud scanners for the perimeter, linked scanners for internal subnets — for devices you can’t agent and for discovery/credentialed network scans), and cloud connectors (read-only API inventory sync from AWS/Azure/GCP for reconciliation and tagging). Agents for owned hosts, scanners for the unagentable, connectors for the inventory truth.
2. Why does an agent scan need no credentials while a network scan does? A Nessus Agent runs locally as a privileged service, so its “authentication” is the host’s own context — it reads packages, registry and config directly. A network scan reaches into the host over SSH/WinRM/SMB and must supply credentials, which are stored and traverse the network. The agent trades away reach (only its own host) for zero credential handling.
3. Difference between the linking key and the API key? The linking key is a single account-wide secret an agent presents at enrolment to join your container; the API key pair is per-user and authenticates REST calls. They are not interchangeable — using one for the other typically fails with a 403. Guard both in a secrets manager.
4. What is VPR and how does it differ from CVSS? CVSS is a static, theoretical severity from a vulnerability’s intrinsic properties. VPR (Vulnerability Priority Rating, 0.1–10) blends CVSS with dynamic threat intelligence — exploit availability, active exploitation, threat-feed activity, age — to score how dangerous a finding is right now. You ticket on VPR (a CVSS 7.5 under mass-exploitation can outrank a CVSS 9.8 with no exploit); you keep CVSS as the compliance baseline.
5. What does a cloud connector do, and what does it not do? It syncs read-only asset inventory (instances, tags, lifecycle state) from a cloud account so Tenable can reconcile “what should exist” against “what’s reporting an agent,” flag coverage gaps, and age out terminated hosts. It does not scan for CVEs — it inventories only; assessment requires an agent or a credentialed network scan (or the separate agentless CNAPP capability).
6. How do you ensure autoscaled instances are scanned? They must self-enrol from the golden image: bake the agent package into the AMI and run agent link --groups=<env> from cloud-init/user-data on first boot (never link at bake time, or clones share an identity). An instance that relies on a later config-management run boots and dies before it’s ever scanned, showing up as a perpetual coverage gap in the connector.
7. Why keep connector IAM read-only, and how is the AWS trust scoped? The connector only reads inventory, so SecurityAudit/Reader/roles/viewer are sufficient; anything broader is an audit finding waiting to happen. The AWS connector uses assume-role with an external ID condition per connector, so a leaked role ARN is useless without the matching external ID — and temporary credentials mean nothing to rotate.
8. What are dynamic tags and why do they matter? A dynamic tag is a saved rule (e.g. operating_system contains Windows AND aws:tag:env = prod) that auto-applies to any matching asset now and in future. They let scans, reports and ServiceNow queues self-populate from live metadata instead of hand-maintained lists — the mechanism that makes the program scale as the connector discovers new assets.
9. An uncredentialed network scan returns mostly “potential” findings. Why, and what’s the fix? Without credentials the scanner only sees ports and banners and infers vulnerabilities probabilistically — high false-positive, missing all local vulns. Add managed credentials (SSH key / WinRM / SNMPv3 / read-only DB) so it logs in and reads actual package/patch/config state; findings jump in both accuracy and volume.
10. How do you keep Tenable.io licensing costs honest? License is per-asset, so scan frequency is free but ghost assets inflate the bill. Age out terminated instances (ensure connectors see termination), exclude short-lived CI/build hosts where policy allows, and reconcile the licensed count against the cloud console monthly. Agent compute and connector API calls are effectively free.
11. What’s the role of exclusion windows and recast/accept rules? Exclusion windows make a scan skip a target/time (change freezes, fragile devices) — safer than pausing the whole scan, but excluded hosts are unscanned so track them. Recast changes a finding’s severity for your context; accept hides a confirmed false-positive or business-accepted risk — both should be documented and time-boxed, never used to bury real risk.
12. Where does Tenable fit alongside a CSPM tool like Wiz or Falcon Cloud Security? They are complementary: CSPM finds misconfigurations and exposure paths (public buckets, over-permissive IAM), Tenable supplies authenticated in-host CVE detail. Correlating them gives true attack-path priority — an exploitable CVE on a host that CSPM shows is internet-facing with an over-permissive role is a top ticket. See the Well-Architected Security Pillar deep dive for the layering.
These map to security certifications and role interviews — vulnerability management program design (SSCP/CISSP domains), cloud security (CCSP), and vendor-specific Tenable credentials. A compact mapping:
| Question theme | Relevant to |
|---|---|
| Sensor selection, agent vs network | Tenable admin / VM program design |
| VPR vs CVSS prioritisation | CISSP/CCSP risk domains; SOC lead |
| Connector IAM least-privilege | Cloud security engineer; auditor |
| Dynamic tags & remediation loop | Security automation; SecOps |
| Licensing & asset hygiene | Security program / FinOps overlap |
Quick check
- You need CVE depth on a Linux server you own, without storing or transmitting any host credentials. Which sensor, and why does it need no credentials?
- A brand-new autoscaled instance shows up in the AWS connector but never in the agent list. What’s the most likely cause and the fix?
- Your team is patching CVSS 10s but keeps getting breached through lower-CVSS bugs. What’s the fix in one sentence?
- True or false: a cloud connector scans your instances for vulnerabilities.
agent linkreturns a 403 “invalid key.” What did you most likely paste, and what should you paste instead?
Answers
- A Nessus Agent — it runs locally as a privileged service, so its authentication is the host’s own context; it reads packages/registry/config directly and uploads results outbound, so no credentials are stored or cross the network.
- The instance boots and dies before a config-management run can install the agent. Fix: self-enrol from the golden image — bake the agent package into the AMI and run
agent link --groups=<env>from user-data on first boot (link on first boot, not at bake time). - Sort and ticket on VPR, not CVSS — VPR re-weights by real-world exploit activity, so an actively-exploited CVSS 7.5 outranks a theoretical CVSS 9.8.
- False. A connector syncs read-only inventory (what exists, its tags/state); it finds no CVEs. Assessment needs an agent or a credentialed network scan.
- You most likely pasted your API key (per-user, for REST calls). Paste the linking key instead — the single account-wide value under Settings → Sensors → Linked Agents.
Glossary
- Tenable.io / Tenable Vulnerability Management — the SaaS platform that stores, scores and workflows vulnerability data fed from sensors.
- Sensor — a source of scan/inventory data: a Nessus Agent, a Nessus scanner, or a cloud connector.
- Nessus Agent — a lightweight local process that scans its host from the inside (credentialed by context) and uploads results outbound over 443.
- Nessus scanner — a network-reachable scan engine (Tenable cloud scanners, or a linked scanner you deploy) that scans targets over the wire.
- Cloud connector — a read-only API integration that syncs asset inventory from AWS/Azure/GCP; it inventories, it does not assess.
- Agent group — a named set of agents; the unit an agent scan targets.
- Linking key — a single account-wide secret an agent presents at enrolment to join your container.
- API key — a per-user
accessKey/secretKeypair that authenticates REST calls; distinct from the linking key. - Scan policy — a reusable set of plugin, authentication and timing settings that defines how a scan runs.
- Template — a Tenable-provided starting policy (e.g.
agent_advanced,advanced,discovery,compliance) you clone and tune. - Plugin — a single vulnerability or compliance check; the detection unit fed by Tenable’s plugin feed.
- Credentialed scan — a scan that authenticates into the target (agent context, or supplied SSH/WinRM/SNMP/DB creds) to read local state, giving depth and accuracy.
- VPR (Vulnerability Priority Rating) — a 0.1–10 score blending CVSS with real-world threat intelligence; the score you prioritise remediation by.
- CVSS — a static, theoretical severity score from a vulnerability’s intrinsic properties; the compliance baseline.
- Asset — a de-duplicated host record that findings attach to, identified across scans by a stable fingerprint.
- Tag (static / dynamic) — a key/value label; static applied by hand, dynamic applied by a rule that auto-matches assets now and in future.
scan_time_window— the minutes agents have to check in and run a scan on their own clock; sized to the fleet’s check-in spread.- Recast / accept rule — rules that re-severity a finding (recast) or hide an accepted-risk/false-positive finding (accept).
- Exclusion window — a time/target a scan must skip (change freezes, fragile hosts).
- External ID — a per-connector secret in the AWS assume-role trust that prevents a leaked role ARN from being used alone.
Next steps
You can now stand up authenticated scanning across a mixed estate, reconcile it against cloud inventory, prioritise by VPR, and close the loop into tickets. Build outward:
- Next: Roll Out Wiz CSPM Across a Multi-Account AWS Organization — pair authenticated CVE depth with agentless posture and exposure-path detection for true attack-path priority.
- Related: Configure CrowdStrike Falcon Cloud Security (CSPM) on AWS — cross-reference EDR sensor inventory with your agent coverage to catch partial-coverage hosts.
- Related: Automate ServiceNow Change Requests from CI/CD — wire the remediation loop so high-VPR findings become owned, SLA-tracked change requests.
- Related: Set Up External Secrets Operator with Vault — the secrets discipline for the linking key, API keys and connector credentials this guide depends on.
- Related: Security Incident Response Runbooks, Tabletops & Cloud Forensics — where a scan finding that becomes an incident goes next.
- Related: Well-Architected Security Pillar Deep Dive — the framework that positions vulnerability management alongside posture, identity and detection.