A SIEM is only as good as the questions you ask it. Defender XDR’s advantage over a raw log lake is that endpoint, identity, email, and cloud-app telemetry are already normalized into one schema and pre-correlated into incidents. Advanced hunting is where you turn that schema into detection engineering: write a cross-domain KQL query that follows an attacker across the kill chain, promote it to a scheduled custom detection that takes its own response actions, and let automatic attack disruption contain the worst-case scenarios faster than any human SOC can. This guide is the workflow I run with platform and security teams to get from “interesting query” to “rule that isolates a host at 02:00 without paging anyone.”
Everything here assumes Defender for Endpoint Plan 2 (included in Microsoft 365 E5 / E5 Security). Advanced hunting and custom detections do not exist on Plan 1.
In a nutshell
Picture a modern security operations center as an air-traffic-control tower with four separate radar feeds — one watching laptops and servers, one watching sign-ins and Active Directory, one watching email, one watching SaaS apps. On their own, each feed shows blips: a blocked phishing email here, a PowerShell process there, a sign-in from a new country. Individually, none is alarming enough to wake anyone. The attacker is counting on exactly that — staying under each feed’s threshold while stitching the blips into a breach.
Defender XDR is the fusion center that overlays all four radars onto one screen. It takes the raw signals from Defender for Endpoint, Defender for Identity, Defender for Office 365, and Defender for Cloud Apps, normalizes them into a single query language, and — this is the point — automatically stitches related blips into ONE incident with a timeline: this email was opened by this user on this device, which then ran this script and reached out to this IP. One story instead of four disconnected alerts.
This lesson is about three things you do on top of that fusion center. Advanced hunting is asking your own questions across all four feeds at once, in a query language called KQL. Custom detection rules are your best questions, saved and scheduled so they raise alerts and even take action — isolate the device, disable the user — without a human watching. And automatic attack disruption is Microsoft’s own machine-learning layer that, for the worst scenarios (ransomware spreading, an inbox hijacked for fraud), pulls the emergency brake in real time, mid-attack, faster than any analyst could.
If custom detections are the alarms you wire yourself, attack disruption is the sprinkler system that fires on its own once the building is already burning.
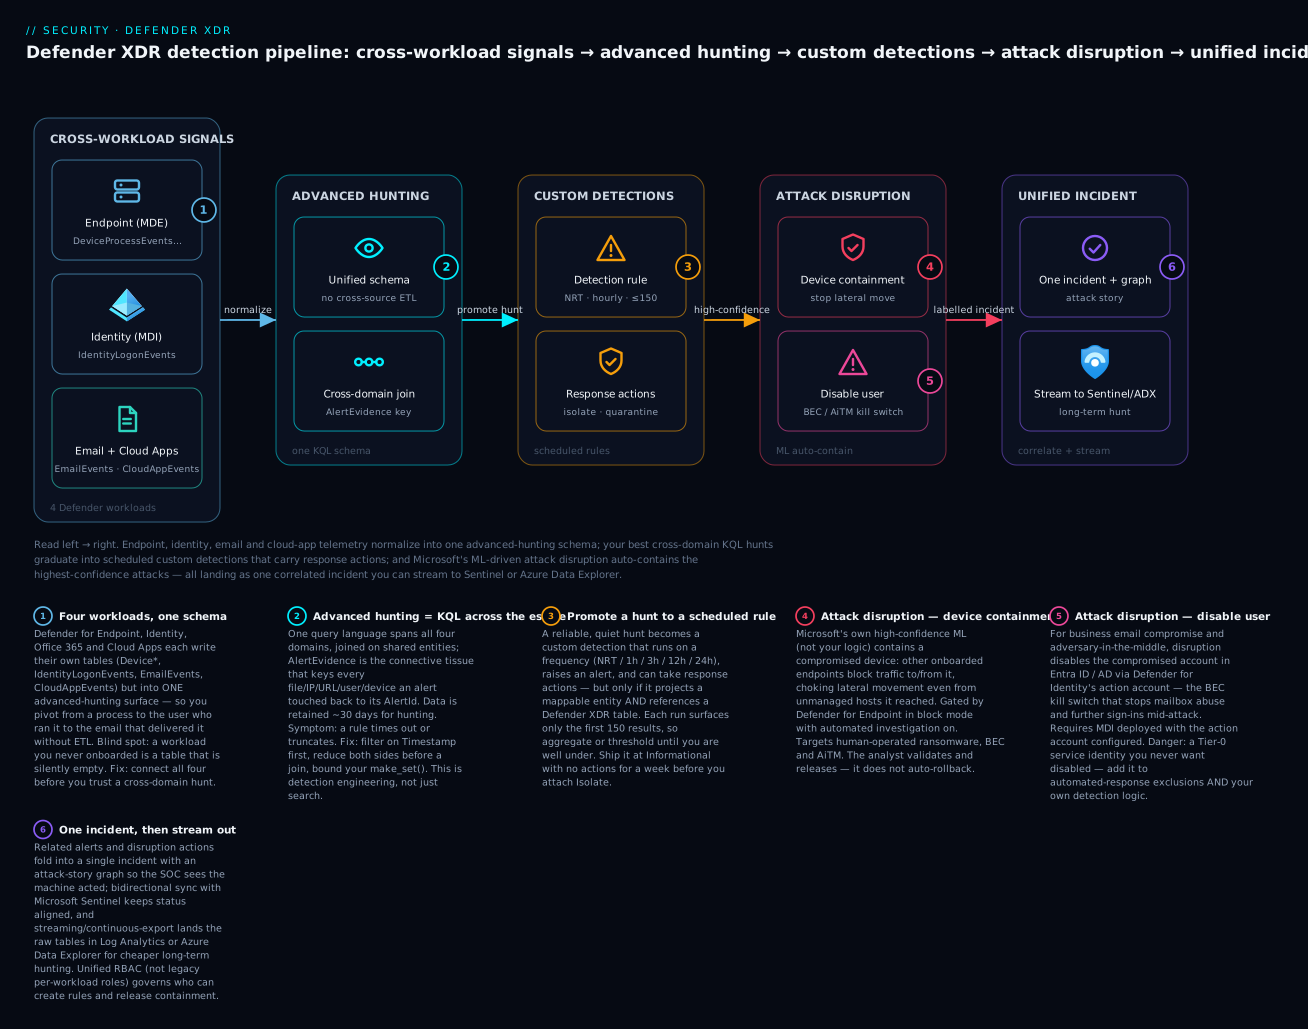
The pipeline reads left to right: telemetry from the four Defender workloads normalizes into one advanced-hunting schema, your best hunts graduate into scheduled custom detections that carry response actions, and Microsoft’s ML-driven attack disruption auto-contains the highest-confidence attacks — everything landing as one correlated incident you can stream to Sentinel or Azure Data Explorer.
Level: Advanced · Time: ~37 min
Prerequisites. You should be comfortable reading basic KQL (where, summarize, project) and know that the Defender XDR portal exists. It helps to have worked through Defender for Endpoint onboarding, Defender for Identity, and Microsoft Sentinel first — this lesson sits on top of all three. Everything here needs Defender for Endpoint Plan 2 (Microsoft 365 E5 / E5 Security); none of it exists on Plan 1.
After this lesson you will be able to:
- Read the unified advanced-hunting schema and know which table each workload writes to.
- Write a cross-domain KQL hunt that follows an attacker from email to endpoint to identity in one query.
- Tune a hunt so it runs inside the detection-rule quota (under 150 results, inside the time limit).
- Promote a reliable hunt to a scheduled custom detection with mapped entities and response actions.
- Enable and safely scope automatic attack disruption, including Tier-0 exclusions.
- Set AIR automation levels per device group and reason about the blast radius of auto-response.
1. The unified advanced hunting schema
The single biggest reason to hunt in Defender XDR rather than bare Sentinel is that the workloads share a schema. You pivot from a process to the user who ran it to the email that delivered the payload to the SaaS app they then logged into, all without join-ing across disparate log sources. The tables you will live in:
| Domain | Core tables | Backed by |
|---|---|---|
| Device | DeviceProcessEvents, DeviceNetworkEvents, DeviceFileEvents, DeviceLogonEvents, DeviceRegistryEvents |
Defender for Endpoint |
| Identity | IdentityLogonEvents, IdentityDirectoryEvents, IdentityInfo, IdentityQueryEvents |
Defender for Identity |
EmailEvents, EmailAttachmentInfo, EmailUrlInfo, EmailPostDeliveryEvents, UrlClickEvents |
Defender for Office 365 | |
| Cloud apps | CloudAppEvents, OAuthAppInfo |
Defender for Cloud Apps |
| Correlation | AlertInfo, AlertEvidence |
All workloads (the join key) |
IdentityLogonEvents is the one people misread: it carries both on-prem AD auth (from Defender for Identity sensors) and sign-ins to Microsoft online services seen via Defender for Cloud Apps. The AlertEvidence table is the connective tissue. It lists every file, IP, URL, user, device, and mailbox that a Defender alert touched, keyed by AlertId, which lets you start from a known-bad alert and fan out to everything related.
Open the hunting console at security.microsoft.com -> Hunting -> Advanced hunting. A first orientation query — what’s actually flowing, and at what volume:
union withsource=TableName DeviceProcessEvents, IdentityLogonEvents, EmailEvents, CloudAppEvents
| where Timestamp > ago(1h)
| summarize Events = count() by TableName
| sort by Events desc
That row count tells you which tables are cheap to scan and which need tight filters — CloudAppEvents and DeviceProcessEvents are usually your highest-volume tables and the ones that will time a query out if you are sloppy.
2. Writing cross-domain correlation queries
A single-table query is a search. A detection follows the kill chain. The pattern that delivers the most value: deliver (email) -> execute (device) -> persist/move (identity). Here is a hunt for a phishing-delivered payload that actually ran, correlating EmailEvents to DeviceProcessEvents through the recipient’s account.
let lookback = 3d;
// Stage 1: malicious or junked inbound mail
let suspiciousMail =
    EmailEvents
    | where Timestamp > ago(lookback)
    | where EmailDirection == "Inbound"
    | where ThreatTypes has_any ("Malware", "Phish")
        or DeliveryAction == "Blocked"
    | project MailTime = Timestamp, RecipientEmailAddress, SenderFromAddress,
              NetworkMessageId, Subject;
// Stage 2: process execution by those recipients shortly after delivery
DeviceProcessEvents
| where Timestamp > ago(lookback)
| where InitiatingProcessFileName in~ ("winword.exe", "excel.exe", "outlook.exe")
| where FileName in~ ("powershell.exe", "cmd.exe", "wscript.exe", "mshta.exe", "rundll32.exe")
| project ProcTime = Timestamp, DeviceName, AccountUpn,
          FileName, ProcessCommandLine, InitiatingProcessFileName
| join kind=inner suspiciousMail on $left.AccountUpn == $right.RecipientEmailAddress
| where ProcTime between (MailTime .. (MailTime + 1h))
| project ProcTime, MailTime, DeviceName, AccountUpn, SenderFromAddress,
          Subject, InitiatingProcessFileName, FileName, ProcessCommandLine
| sort by ProcTime desc
The signal is the temporal join: an Office app spawning a scripting engine within an hour of a flagged email to the same user. Neither half is conclusive alone; together they are a high-fidelity “the user opened the lure and it executed.”
A second example — impossible-travel-style credential abuse correlated with on-host activity — leans on the identity tables:
let window = 1d;
IdentityLogonEvents
| where Timestamp > ago(window)
| where LogonType == "Interactive" or Protocol == "OAuth2"
| where isnotempty(IPAddress) and isnotempty(AccountUpn)
| summarize Countries = dcount(Location), LocationSet = make_set(Location, 10),
            IPs = make_set(IPAddress, 10), arg_min(Timestamp, Location)
          by AccountUpn, bin(Timestamp, 1h)
| where Countries >= 2
When you find something, do not rebuild context by hand. Select a row and use Go hunt to pivot every entity (account, device, IP) into a fresh query, or Link to incident to attach the result rows as evidence on an existing incident.
3. Tuning queries for performance
Custom detections inherit the performance of the query behind them, and a rule that times out simply does not run. Three rules of thumb that keep hunts fast and within quota.
Filter on Timestamp first, and keep the window honest. The lookback in your query should match the rule’s run frequency. A rule that runs hourly should look back ~1 hour (plus a small overlap buffer), not 7 days — re-scanning a week every hour is wasted quota and duplicate alerts.
Filter before you join, and put the smaller, more-selective table on the left. KQL evaluates the left side of an inner join first. Reduce both sides with where and project before joining so you are not shuffling fat rows.
Aggregate with summarize and cap your sets. make_set() and make_list() accept a max-size argument — use it. Unbounded sets on high-cardinality columns blow up memory.
DeviceNetworkEvents
| where Timestamp > ago(1h)                                  // 1. time filter first
| where RemotePort in (443, 8443)                            // 2. cheap filters next
| where isnotempty(RemoteUrl)
| summarize ConnCount = count(),
            Hosts = make_set(DeviceName, 50)                 // 3. bounded set
          by RemoteUrl, bin(Timestamp, 10m)
| where ConnCount > 100                                      // 4. threshold last
Two hard limits to design around. A custom detection only ever surfaces the first 150 results per run, so a noisy query silently truncates — aggregate or threshold until each run returns well under that. And the rule’s lookback cannot exceed 30 days. Validate timing with summarize count() by bin(Timestamp, 1h) to confirm your window actually contains the events you expect before you schedule anything.
4. Promoting hunts to custom detection rules
Once a query is reliable and quiet, promote it. From the advanced hunting editor, click Create detection rule. Two non-negotiable requirements:
- The query must
projectan entity column the platform can act on and an alert-mapping column — typicallyTimestamp, plus one or more ofDeviceId,AccountObjectId/AccountSid,RecipientEmailAddress,FileName+SHA1. No mappable entity, no rule. - The query must reference at least one Defender XDR table for automated response actions to be available. Pure-Sentinel-only queries can alert but cannot isolate a device.
Frequency options and what they cost:
| Frequency | Lookback used | Use for |
|---|---|---|
| Continuous (NRT) | streaming, every few minutes | Highest-severity, single-table detections |
| Every hour | last 1 hour | Most production rules |
| Every 3 / 12 / 24 hours | matching window | Low-urgency, broad-sweep hunts |
Near-real-time has constraints (no multi-table join in NRT; one event table), so reserve it for tight single-table logic. Then wire response actions — this is the payoff. For our phishing-execution rule, isolate the device and collect forensics:
Create detection rule
  Alert:    Title: "Office app spawned script engine after flagged email"
            Severity: High   Category: Execution
            MITRE techniques: T1566 (Phishing), T1059 (Command and Scripting Interpreter)
  Impacted entities:
            Device:  DeviceId
            Mailbox: RecipientEmailAddress
  Actions on devices:
            [x] Isolate device (Full)
            [x] Collect investigation package
            [x] Run antivirus scan
  Actions on users:
            [x] Mark user as compromised   (Defender for Identity)
  Frequency: Every hour
Available response actions, by entity:
- Device: isolate (full or selective), collect investigation package, run AV scan, restrict app execution.
- File: quarantine / block file (by
SHA1) across the fleet. - User: mark as compromised, force sign-out, disable user (with Defender for Identity).
- Email: move to junk, delete (soft/hard), via the
NetworkMessageId+RecipientEmailAddresspair.
Start every new rule with no automated actions, severity Informational, running for a week. Read the alert volume, tune the false positives out, then attach Isolate. A rule that auto-isolates on a bad assumption is an outage you wrote yourself.
5. Configuring automatic attack disruption
Custom detections are your logic. Automatic attack disruption is Microsoft’s — a built-in capability that correlates millions of signals across endpoint, identity, email, and SaaS into a single high-confidence incident, identifies the assets the attacker controls, and contains them in real time, independent of your AIR settings. It targets the scenarios where minutes matter: human-operated ransomware, business email compromise (BEC), and adversary-in-the-middle (AiTM).
You do not write the detections; you enable the org-wide response surface and let them fire. The two automated actions it takes:
- Device containment — Defender for Endpoint blocks inbound/outbound traffic to a compromised device from other onboarded devices, choking lateral movement even from unmanaged-but-reached hosts.
- Disable user — Defender for Identity suspends a compromised account in Entra ID / AD to stop lateral movement, mailbox abuse, and further sign-ins. This is the BEC kill switch.
Prerequisites that actually gate it: Defender for Endpoint devices in block mode with automated investigation enabled, Defender for Identity deployed with the action account configured, and the relevant workloads (Office 365, Cloud Apps) connected. Confirm and tune in Settings -> Microsoft Defender XDR -> Automatic attack disruption, where you can scope automated response exclusions for sensitive assets (a domain controller you never want auto-contained, a service account you cannot afford to disable).
Disrupted incidents are labelled so the SOC can see the machine acted:
Incident title: BEC financial fraud attack launched from a compromised account (attack disruption)
Status:         Active
Tags:           Attack disruption
Actions taken:  User <upn> disabled (Defender for Identity)
                Device <hostname> contained (Defender for Endpoint)
When an action lands, the analyst’s job is to validate and release (undo containment / re-enable the user) once remediated — the platform does not auto-rollback.
6. Managing AIR and approval levels
Automated investigation and remediation (AIR) is the layer between “alert raised” and “human triages.” When an alert fires, AIR launches an investigation, walks the related entities, reaches verdicts (Malicious / Suspicious / No threat), and proposes remediation. Whether those remediations execute automatically depends on the device group’s automation level, set in Settings -> Endpoints -> Device groups.
| Automation level | Behavior |
|---|---|
| Full | Remediate automatically, no approval — recommended by Microsoft |
| Semi (require approval for all folders) | Every remediation waits for an analyst |
| Semi (core folders) | Auto-remediate non-core; approve actions in OS folders |
| No automated response | Investigate only; remediation is manual |
The mature posture is Full automation on standard workstation groups (Microsoft’s data shows it remediates more threats with no increase in false-positive harm) and Semi (core folders) on servers and Tier-0 device groups where you want eyes on anything touching system32. Track and approve pending actions in the Action center (security.microsoft.com -> Actions & submissions -> Action center), which is also where you bulk-undo if a custom detection or AIR over-reaches.
7. A reusable hunting library mapped to MITRE ATT&CK
Detection engineering scales only if hunts are version-controlled, tagged to technique, and reviewable — not pasted into the portal and forgotten. Keep them in Git as .kql files with a metadata header, and map every one to ATT&CK so you can reason about coverage instead of counting rules.
detections/
  T1110.003-password-spray-identitylogon.kql
  T1566.001-phish-attachment-exec.kql
  T1486-ransomware-mass-file-rename.kql
  T1098.005-oauth-consent-grant-abuse.kql
A lightweight, machine-readable header on each file:
// name: Password spray against on-prem AD
// mitre: T1110.003
// tactic: CredentialAccess
// severity: Medium
// frequency: 1h
// entities: AccountSid, IPAddress
// version: 3
IdentityLogonEvents
| where Timestamp > ago(1h)
| where ActionType == "LogonFailed"
| summarize FailedAccounts = dcount(AccountUpn),
            Accounts = make_set(AccountUpn, 25)
          by IPAddress, bin(Timestamp, 1h)
| where FailedAccounts >= 10        // one source, many accounts == spray
Sync the library with the Defender XDR custom detection API (under the microsoft.graph.security endpoints) so a CI pipeline is the source of truth and the portal is just the runtime — review in PRs, deploy on merge.
Going deeper
Everything above is the operator’s workflow. This section is the mental model of what the platform is doing underneath — the parts that matter when you scale detection engineering past a handful of rules, or have to explain to an auditor why the machine disabled a VP’s account at 02:00.
One portal, and where Sentinel now lives
The “XDR” in Defender XDR is the promise that four products behave as one. In the unified portal at security.microsoft.com, Defender for Endpoint (MDE), Defender for Identity (MDI), Defender for Office 365 (MDO), and Defender for Cloud Apps (MDCA) stop being four consoles and become one incident queue, one hunting surface, and one settings tree. Microsoft has gone further and brought Microsoft Sentinel into the same portal — once you onboard a workspace, Sentinel’s analytics, hunting, and SOAR run alongside XDR’s, and incidents from both sides merge. The practical consequence for a hunter: SecurityAlert / SigninLogs (Sentinel, Log Analytics) and DeviceProcessEvents / EmailEvents (XDR, advanced hunting) become queryable from adjacent surfaces, and in the unified experience the Sentinel tables are hunted in the same editor. Two engines, one pane of glass.
Schema internals: latency, retention, and NRT
Advanced-hunting tables are not the same store as Sentinel’s Log Analytics tables, even when they carry similar data. Key numbers to design around:
- Retention is ~30 days in advanced hunting. That is also why a custom-detection lookback cannot exceed 30 days — there is nothing older to scan. If you need year-long retention for threat hunting or compliance, you stream to Sentinel or Azure Data Explorer (below), where you set your own retention.
- Ingestion latency varies by workload. Endpoint events are typically visible within a couple of minutes; email and cloud-app events can lag more. A near-real-time (NRT) rule that joined across workloads would race that latency, which is exactly why NRT is single-table only — the platform cannot guarantee two tables are populated in lockstep at second granularity.
- The 150-result cap and the time budget are per run, not per day. A rule is a query the platform runs on your behalf on a schedule; if that query would return 3,000 rows, you see 150 and the rest vanish silently. This is the single most common reason a detection “misses” — it did fire, you just never saw the row.
The join engine and the AlertEvidence graph
Cross-domain hunting rests on two mechanisms. The first is ordinary KQL join on a shared entity — an account UPN, a device ID, a SHA1, a NetworkMessageId. The second, more powerful one is AlertEvidence: every Defender alert explodes into rows in AlertEvidence, one per entity it touched (file, IP, URL, user, device, mailbox, registry key), all keyed by AlertId. That table is what lets you start from a single known-bad alert and fan out to everything related without knowing in advance which table the related activity lives in. Under the hood it is also what the incident attack-story graph is drawn from — the graph you see in an incident is AlertEvidence plus correlation, rendered.
Custom detection internals
A custom detection rule is a saved KQL query plus three pieces of metadata the platform enforces:
- Entity mapping. Your
projectmust expose columns the platform recognizes as actionable entities (DeviceId,AccountObjectId/AccountSid,RecipientEmailAddress,SHA1, …) plus aTimestampand aReportIdwhere required. No mappable entity means the rule can alert but cannot act — there is no device to isolate if the row does not name one. - At least one Defender XDR table. Response actions are wired to XDR’s action plane; a query that reads only Sentinel/Log-Analytics tables can raise an alert, but the Isolate/Disable buttons are greyed out.
- Impact + MITRE metadata. Severity, category, and technique IDs are not cosmetic — they drive incident correlation and how the alert is weighted when Microsoft’s engine groups it with others.
Frequency and lookback are coupled: an hourly rule scans the last hour, a 24-hour rule the last day. Deliberately over-scanning (“look back 7 days every hour to be safe”) re-alerts on the same events every run and burns quota — the anti-pattern the performance section warns against.
Attack disruption internals — why it can be trusted to auto-act
Automatic attack disruption is a different animal from your custom detections and from AIR. It runs on Microsoft’s own high-confidence detections, fed by signals across the whole tenant and, at cloud scale, cross-tenant threat intelligence — the confidence bar is set so the false-positive rate is low enough to justify acting without an analyst. It targets a deliberately narrow set of high-velocity scenarios (human-operated ransomware, BEC, AiTM) where the cost of waiting for triage is total. Two things make it independent of your settings:
- It fires regardless of your AIR automation level. You can have every device group on “No automated response” and disruption will still contain a device — it is an org-wide response surface, not a per-group AIR action.
- Its two actions have hard prerequisites: device containment needs MDE devices in block mode with automated investigation enabled; disable-user needs MDI deployed with its action account (an account with the right to disable identities) configured. Miss the action account and the disable-user capability is simply unavailable — the platform cannot reach into AD/Entra to flip the account.
Because it can be aggressive, the escape hatch is automated response exclusions (Settings -> Microsoft Defender XDR -> Automatic attack disruption): domain controllers, Tier-0 service accounts, and shared mailboxes you can never afford to auto-disable. And it never auto-rolls-back — a contained device stays contained until an analyst with the right role releases it.
Incident correlation and the attack graph
Incidents are the unit of work, not alerts. Microsoft’s correlation engine groups alerts across all workloads into one incident when they share entities and timing, producing the attack-story graph and a single severity. This is why entity mapping on your custom rules matters beyond response actions: a well-mapped custom alert joins the right incident instead of floating alone, so an analyst sees your detection in context next to the MDE and MDI alerts for the same intrusion.
Streaming to Sentinel and Azure Data Explorer
Two export paths, two purposes:
- Bidirectional sync with Microsoft Sentinel. Connect the Defender XDR connector and incidents sync both ways — close it in one, it closes in the other — and the advanced-hunting tables land in Log Analytics for correlation with non-Microsoft sources. This is the path when Sentinel is your system of record.
- Streaming API -> Event Hub / Storage / Azure Data Explorer (ADX). For high-volume tables you want to keep far longer than 30 days at a fraction of Log Analytics cost, the streaming API (event streaming) exports raw events. ADX is the same engine that backs advanced hunting, so your KQL ports almost verbatim — teams commonly keep 1–2 years of
DeviceNetworkEventsin ADX for long-range threat hunting the 30-day window cannot reach.
Unified RBAC — who can create a rule or release containment
The legacy model gave each workload its own roles (MDE roles, MDO roles, MDI groups). Microsoft Defender XDR Unified RBAC replaces that with one permission model across all workloads, assigned in Settings -> Microsoft Defender XDR -> Permissions and roles. It matters here because the ability to create a custom detection with response actions, to approve AIR actions in the Action center, and to release a disruption containment are all distinct permissions. A common production split: a detection-engineering role that can author and manage rules, a SOC-analyst role that can triage and release containment, and a tightly held role that can change attack-disruption exclusions. Get this wrong in the direction the enterprise scenario below shows — an analyst who can see a disrupted incident but not re-enable the identity — and your mean-time-to-recover is gated on an escalation, not on the tooling.
Verify
Confirm each layer is actually live before you trust it.
- Hunt runs and scopes correctly. Run the query in the console; confirm it returns rows and each run is < 150 results and < 10s.
EmailEvents
| where Timestamp > ago(1h)
| summarize EventCount = count() by bin(Timestamp, 10m)
- The custom detection exists and last-ran cleanly.
Settings -> Detection rules(orHunting -> Custom detection rules) shows your rule with a recent Last run time and Succeeded status, not “Failed”. - Response actions are attached. Open the rule -> Actions tab and confirm the device/user actions you intended are listed.
- Attack disruption is enabled.
Settings -> Microsoft Defender XDR -> Automatic attack disruptionshows the capability on, and your exclusions (DCs, critical service accounts) are present. - AIR automation level is what you think.
Settings -> Endpoints -> Device groups— confirm prod workstation groups are Full and Tier-0 groups are Semi (core folders). - Action center reflects reality.
Actions & submissions -> Action center -> Historylists recent automated actions; nothing is stuck Pending that should have auto-approved.
Enterprise scenario
A retail platform team running Microsoft 365 E5 across ~14,000 endpoints turned on a custom detection for AiTM session-cookie reuse — sign-in from a new ASN immediately followed by a high-value mailbox rule creation — and wired it to Disable user with Full automation on every device group. The detection was sound. The blast radius was not: on the second night it fired on a shared finance service mailbox during a legitimate quarter-close batch run from a new datacenter egress IP, disabled the account, and broke an automated payments reconciliation job feeding SAP. The on-call SOC analyst could see the disrupted incident but did not have rights to re-enable the identity, so recovery waited on an identity admin escalation — about 40 minutes of failed jobs.
The constraint: they needed aggressive auto-response for real users but could not let it touch a small set of Tier-0 service identities or shared mailboxes. The fix was two-layered. First, they scoped the custom detection to exclude service accounts by filtering on an Entra group, so the rule never raised an actionable alert for those identities. Second, they added those same accounts to the automated response exclusions under automatic attack disruption, so even Microsoft’s built-in BEC disruption would not disable them — defense in depth against both their logic and Microsoft’s.
// Exclude Tier-0 / service identities by Entra group membership before alerting
let excluded = IdentityInfo
    | where Timestamp > ago(1d)
    | where GroupMembership has "SG-NoAutoContain"     // managed Entra group
    | distinct AccountUpn;
IdentityLogonEvents
| where Timestamp > ago(1h)
| where Protocol == "OAuth2" and isnotempty(IPAddress)
| where AccountUpn !in~ (excluded)                     // never auto-disable these
| summarize ASNs = dcount(ISP), arg_min(Timestamp, IPAddress) by AccountUpn, bin(Timestamp, 1h)
| where ASNs >= 2
The lesson the team baked into their standard: automated response and exclusion lists are the same design decision. Every rule that can disable a user or isolate a device ships with an explicit, Entra-group-driven exclusion of Tier-0 assets, reviewed in the same PR as the detection logic. Aggressive automation is safe only when its boundaries are as deliberate as its triggers.
Practice challenges
Work these in order — each builds on the last. They are written to run in the advanced-hunting console; where a challenge would create or change a rule, the solution describes the exact fields rather than claiming a live run. Solutions are representative and assume Defender for Endpoint Plan 2 with all four workloads connected.
1. (Beginner) Orient yourself in the schema. Write a query that shows how many events landed in DeviceProcessEvents, IdentityLogonEvents, EmailEvents, and CloudAppEvents in the last hour, highest first. Which is your highest-volume table?
<details> <summary>Solution</summary>
union withsource=TableName DeviceProcessEvents, IdentityLogonEvents, EmailEvents, CloudAppEvents
| where Timestamp > ago(1h)
| summarize Events = count() by TableName
| sort by Events desc
CloudAppEvents and DeviceProcessEvents are usually the largest. Why: knowing which tables are expensive tells you where a sloppy filter will time a rule out.
</details>
2. (Beginner -> Intermediate) Single-domain detection: password spray. Using only IdentityLogonEvents, find any source IP that failed logons against 10 or more distinct accounts in a one-hour bin over the last day.
<details> <summary>Solution</summary>
IdentityLogonEvents
| where Timestamp > ago(1d)
| where ActionType == "LogonFailed"
| summarize FailedAccounts = dcount(AccountUpn),
            Accounts = make_set(AccountUpn, 25)
          by IPAddress, bin(Timestamp, 1h)
| where FailedAccounts >= 10
Why: one source, many accounts, all failing is the classic spray signature — and bounding make_set to 25 keeps the query inside quota.
</details>
3. (Intermediate) Cross-domain join. Correlate a flagged inbound email to a scripting engine spawned by an Office app on the recipient’s device within one hour of delivery. (Hint: join EmailEvents to DeviceProcessEvents on the account.)
<details> <summary>Solution</summary>
The Stage-1 / Stage-2 pattern from section 2: filter EmailEvents to inbound Malware/Phish and project RecipientEmailAddress + MailTime; filter DeviceProcessEvents to Office-app parents spawning powershell.exe/cmd.exe/wscript.exe/mshta.exe/rundll32.exe; join kind=inner on AccountUpn == RecipientEmailAddress and keep rows where ProcTime between (MailTime .. (MailTime + 1h)). Why: neither half is conclusive alone; the temporal join is what turns two weak signals into one high-fidelity “the lure ran.”
</details>
4. (Intermediate -> Advanced) Make it rule-ready. Take any hunt and make it pass the two hard requirements for a custom detection, and guarantee it stays under the per-run result cap. What must the query expose, and what is that cap?
<details> <summary>Solution</summary>
project at least one mappable entity plus Timestamp (and ReportId where the wizard asks) — e.g. DeviceId, AccountObjectId/AccountSid, RecipientEmailAddress, or SHA1 — and reference at least one Defender XDR table so response actions are available. Aggregate/threshold so each run returns well under the 150-result cap. Why: no mappable entity means the rule can alert but not act; over 150 results and the rule silently truncates.
</details>
5. (Advanced) Promote to a scheduled detection with response. Describe the Create-detection-rule configuration for the phishing-execution hunt: alert metadata, impacted entities, device/user actions, and frequency. What is the safe rollout order?
<details> <summary>Solution</summary>
Title + Severity High + Category Execution + MITRE T1566/T1059; impacted entities Device=DeviceId, Mailbox=RecipientEmailAddress; actions Isolate device (Full) + Collect investigation package + Run AV scan, and Mark user as compromised (MDI); Frequency Every hour to match a ~1h lookback. Roll out at Informational with no automated actions for a week, tune false positives, then attach Isolate. Why: a rule that auto-isolates on a bad assumption is a self-inflicted outage — earn the automation with a week of quiet runs.
</details>
6. (Advanced) Design the Tier-0 exclusion. You want aggressive auto-response for real users but must never disable a set of Tier-0 service identities. Show the two-layer defense.
<details> <summary>Solution</summary>
Layer 1 — exclude them in your detection logic by Entra group so the rule never raises an actionable alert for them:
let excluded = IdentityInfo
    | where Timestamp > ago(1d)
    | where GroupMembership has "SG-NoAutoContain"
    | distinct AccountUpn;
IdentityLogonEvents
| where Timestamp > ago(1h)
| where Protocol == "OAuth2" and isnotempty(IPAddress)
| where AccountUpn !in~ (excluded)
| summarize ASNs = dcount(ISP), arg_min(Timestamp, IPAddress) by AccountUpn, bin(Timestamp, 1h)
| where ASNs >= 2
Layer 2 — add the same accounts to automated response exclusions under Settings -> Microsoft Defender XDR -> Automatic attack disruption, so even Microsoft’s built-in BEC disruption will not disable them. Why: automated response and its exclusion list are the same design decision — defense in depth against both your logic and Microsoft’s.
</details>
Common beginner mistakes
“Advanced hunting and Sentinel hunting are the same thing.” They overlap but are not identical. Advanced hunting queries the Defender XDR schema (DeviceProcessEvents, EmailEvents, …) with ~30-day retention and can wire directly to response actions. Sentinel hunting queries Log Analytics tables (SecurityAlert, SigninLogs, custom logs) with your chosen retention and no native device-isolate. The right model: hunt in XDR when you want cross-workload correlation and response; hunt in Sentinel when you need non-Microsoft sources or long retention. The unified portal lets you do both, but the tables and capabilities differ.
“My custom detection will show me every match.” It will not — each run surfaces only the first 150 results. A noisy query does not error; it quietly drops rows 151+. Beginners conclude the detection “missed” when it actually fired and truncated. Right model: a detection is a signal generator, not a report. Aggregate and threshold until each run returns a handful of high-fidelity rows; if you need the full list, that is a hunt, not a rule.
“I’ll set the lookback to 7 days to be safe.” A long lookback on a frequent rule re-scans the same events every run, generating duplicate alerts and burning query quota — and it cannot exceed 30 days anyway, because that is all the retention there is. Right model: the lookback matches the frequency (an hourly rule looks back ~1 hour plus a small overlap buffer). Wider is not safer; it is noisier and slower.
“Attack disruption is just AIR with a nicer name.” They are different layers. AIR investigates an alert and remediates within a device group’s automation level. Automatic attack disruption is Microsoft’s own tenant-wide, high-confidence ML that contains devices and disables users regardless of your AIR settings, for a narrow set of high-velocity attacks. You can have AIR set to “No automated response” everywhere and disruption will still act. Right model: AIR is your tunable automation; disruption is a separate, Microsoft-owned emergency brake you enable and scope, not tune rule-by-rule.
“The query looks right, so I’ll turn on Isolate immediately.” The fastest way to write your own outage. A rule that auto-isolates or auto-disables on a subtly wrong assumption takes real users offline — the enterprise scenario in this lesson is exactly that story. Right model: every new response-taking rule runs at Informational with no actions for a week, you read the alert volume and tune false positives, and only then attach containment.
“Response actions work on any query I write.” Only if the query both projects a mappable entity and references at least one Defender XDR table. A tidy query over Sentinel-only tables can raise an alert, but the Isolate/Disable options are greyed out; and a query that never projects a DeviceId has nothing to isolate. Right model: design the project list for the action, not just the reader — the entity columns are what the response plane acts on.
“Aggressive automation is the goal; exclusions are an afterthought.” Backwards. On a large estate, the accounts and devices you must never auto-contain — domain controllers, Tier-0 service identities, shared mailboxes — are exactly the ones an aggressive rule will eventually hit during legitimate batch activity. Right model: automated response and its exclusion list are one design decision, shipped together, reviewed in the same PR. Draw the boundaries as deliberately as the triggers.
Glossary
- Defender XDR — Microsoft’s extended detection and response platform that unifies Defender for Endpoint, Identity, Office 365, and Cloud Apps (and, in the same portal, Microsoft Sentinel) into one incident queue, one hunting schema, and one settings tree at
security.microsoft.com. - Advanced hunting — the query-based investigation surface where you run KQL across the unified schema to search all four workloads at once. Retains ~30 days of data.
- KQL (Kusto Query Language) — the read-only, pipe-based query language (
| where,| summarize,| project,| join) used across advanced hunting, Sentinel, and Azure Data Explorer. - Unified schema — the shared set of tables (
DeviceProcessEvents,IdentityLogonEvents,EmailEvents,CloudAppEvents,AlertInfo,AlertEvidence, …) that lets you pivot across workloads without cross-source ETL. - AlertEvidence — the table that lists every entity (file, IP, URL, user, device, mailbox) an alert touched, keyed by
AlertId; the connective tissue for fanning out from a known-bad alert and the source of the incident attack graph. - Custom detection rule — a saved advanced-hunting query set to run on a schedule; it raises alerts and can take response actions when it projects a mappable entity and references a Defender XDR table.
- Response action — an automated action a rule (or AIR / disruption) takes on an entity: isolate a device, run AV scan, quarantine a file by SHA1, mark a user compromised, disable a user, soft/hard-delete an email.
- Entity mapping — declaring which projected columns are actionable entities (
DeviceId,AccountObjectId,RecipientEmailAddress,SHA1) so the platform can correlate the alert into an incident and act on it. - NRT (near-real-time) — a rule frequency that runs every few minutes over a single table (no multi-table join), reserved for high-severity, tight single-table logic.
- Automatic attack disruption — Microsoft’s tenant-wide, high-confidence ML capability that auto-contains devices and disables users mid-attack for ransomware, BEC, and AiTM, independent of your AIR settings.
- Device containment — a disruption/response action where other onboarded endpoints block traffic to and from a compromised device, choking lateral movement even from unmanaged hosts.
- Disable user — a disruption action that suspends a compromised account in Entra ID / AD via Defender for Identity’s action account; the BEC kill switch.
- AIR (Automated Investigation and Remediation) — the layer that investigates an alert, reaches verdicts, and proposes or executes remediation according to a device group’s automation level.
- Automation level — the per-device-group setting (Full / Semi variants / No automated response) that decides whether AIR remediations execute automatically or wait for analyst approval.
- Incident — the unit of SOC work: a correlated group of alerts across workloads sharing entities and timing, rendered as an attack-story graph with one severity.
- Action center — the portal view (
Actions & submissions -> Action center) listing pending and completed automated actions, and where you bulk-undo an over-reaching rule or AIR. - MITRE ATT&CK — the public taxonomy of adversary tactics and techniques (e.g., T1566 Phishing, T1059 scripting) you tag rules to so you can reason about detection coverage.
- Block mode / action account — prerequisites for attack disruption: MDE devices configured in block mode with automated investigation on, and an MDI action account with rights to disable identities.
- Streaming API / ADX — the export path that ships raw advanced-hunting events to Event Hub, Storage, or Azure Data Explorer for retention and hunting beyond the 30-day window; ADX runs the same KQL engine.
- Unified RBAC — Microsoft Defender XDR’s single permission model across all workloads, governing who can author rules, approve AIR actions, and release attack-disruption containment.
- AiTM (adversary-in-the-middle) — a phishing technique that proxies the sign-in to steal the session cookie, bypassing MFA; one of the scenarios attack disruption targets.