In a nutshell
Building servers one at a time from an install ISO is like hand-carving every chair in a furniture store — each one comes out a little different, and a year later no two match. Golden images flip that around. You carve one perfect chair, take a precise mould of it, and then press out every future chair from that mould. Every copy is identical, and when you want to improve the design you change the mould, not the chairs already on the floor.
That is exactly what Packer and Terraform do together. Packer is the mould-maker: it boots one throwaway VM, installs and hardens an OS, bakes in your security and monitoring agents, and freezes the result into a versioned template — the golden image. Terraform is the press: it clones that one template into as many running VMs as you need, across as many clusters as you have, each customised with its own name and IP but otherwise byte-identical. Bake once, deploy many.
Why a beginner should care: this is how professional platform teams kill drift — the slow divergence where every hand-built server ends up subtly different, and un-auditable, until an audit finds the one that never got patched. Instead of fixing a hundred servers, you fix one image and re-stamp. A server stops being a hand-tuned pet and becomes a build artifact you can version, scan, and roll back — exactly like application code.
Level: Intermediate · Time: ~30 min
Before this lesson you should be comfortable on a Linux shell, have met Terraform’s provider / resource / plan / apply model, and know what a virtual machine and a VM template are. You do not need prior Packer experience. (The exact tool versions and vCenter privileges are listed under Prerequisites, just below.)
After this lesson you will be able to:
- Explain the bake-once / deploy-many model and why golden images stop configuration drift at the source.
- Write a Packer HCL2 template that builds an Ubuntu image with the
vsphere-isobuilder and publishes it to a vCenter content library. - Bake CIS hardening and security/observability agents into an image with shell (or Ansible) provisioners.
- Clone that template into a whole cluster of customised VMs with Terraform’s
vsphere_virtual_machineresource. - Version images, roll a bad image back, and keep vCenter credentials out of your artifacts and state.
- Tell a full clone from a linked clone, and
vsphere-isofromvsphere-clone, and pick the right one for the job.
A regional insurer runs three vSphere clusters across two datacentres — production in Mumbai, DR in Pune — and the platform team has a chronic problem: every VM the app teams ask for is hand-built from an ISO, which means each one drifts. One has an old OpenSSH, another never got the CIS partitioning, a third is missing the CrowdStrike sensor the SOC mandates, and nobody can say which is which until an audit finds it. The fix the team commits to is the one this guide walks through end to end: bake a single hardened “golden” VM template once with Packer, version it, and stamp out every cluster’s VMs from that template with Terraform — so a server is a build artifact, not a snowflake. By the end you will have a reproducible ubuntu-2204-hardened template in vCenter and a Terraform module that provisions a three-node cluster from it in minutes, with the same image in production and DR.
This is an Intermediate, infrastructure-focused guide. It assumes you are comfortable on a Linux shell and have seen Terraform before, but it does not assume you have used Packer’s vSphere builder or the vSphere Terraform provider in anger.
Prerequisites
- vCenter 7.0u3 or 8.0, with a cluster that has DRS enabled, a shared datastore, and a port group you can reach. You need a vSphere account (ideally a dedicated service account, e.g.
svc-packer@vsphere.local) with privileges to create/clone VMs, manage content libraries, and mark templates. - Packer 1.10+ and the
packer-plugin-vsphere(thevsphere-isoandvsphere-clonebuilders). - Terraform 1.7+ and the
hashicorp/vsphereprovider (~> 2.7). - A Linux build host or CI runner that can reach vCenter on 443 and serve files to the booting VM over HTTP (Packer’s built-in HTTP server, or an existing Akamai-fronted mirror for the cloud-init/preseed payload).
- An Ubuntu 22.04 LTS server ISO uploaded to a vCenter datastore (or reachable via URL).
- HashiCorp Vault reachable for secrets, and an OIDC identity provider — Okta federated to Microsoft Entra ID — for human and pipeline auth (covered in step 2).
- Network egress from the freshly-booted VM to your package mirror and to the CrowdStrike Falcon, Wiz, and Dynatrace agent download endpoints.
Target topology
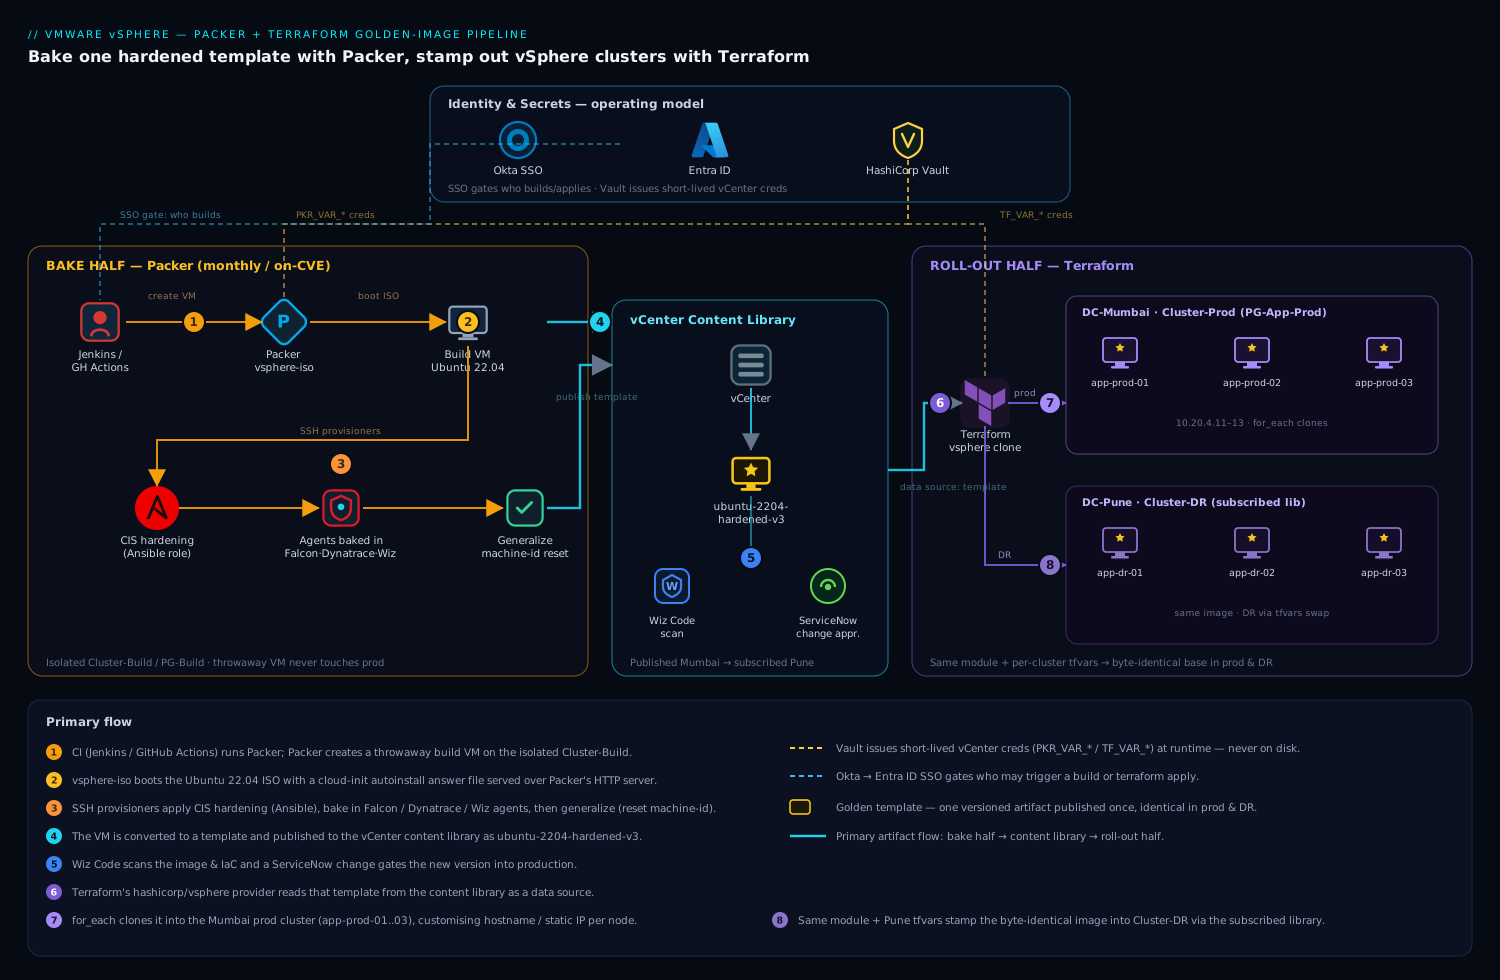
The pipeline has two clean halves that meet at the vCenter content library, and keeping them separate in your head is the key to operating this well.
The bake half runs on a schedule (monthly, or on a CVE alert). A CI job on Jenkins or GitHub Actions runs Packer’s vsphere-iso builder against vCenter: it creates a throwaway VM, boots the Ubuntu ISO with an automated install answer file, runs hardening and agent-install provisioners over SSH, shuts the VM down, and converts it to a template published into a content library. That published template — call it ubuntu-2204-hardened-v<n> — is the only artifact that leaves this half.
The roll-out half is Terraform. The hashicorp/vsphere provider clones that content-library template into N VMs across one or more clusters, customises hostname/IP/identity per VM, and registers them. App teams consume a thin Terraform module; they never see an ISO. Because both halves point at the same versioned template, production in Mumbai and DR in Pune run a byte-identical base image — which is the whole point.
Around those two halves sit the operating-model tools: Vault issues the short-lived vCenter and join credentials both Packer and Terraform need; Okta → Entra ID gates who can trigger a build or apply; Wiz / Wiz Code scans the Packer template (and the Terraform plan) for misconfigurations before it ships; CrowdStrike Falcon and Dynatrace agents are baked into the golden image so every cloned VM is observed and protected from first boot; and ServiceNow holds the change ticket that gates a new image version into production.
1. Lay out the repository and pin tool versions
Keep the bake and the roll-out in one repo but separate directories. Pin every plugin — a floating Packer or provider version is exactly how “reproducible” quietly breaks.
vsphere-golden/
├── packer/
│   ├── ubuntu-2204.pkr.hcl
│   ├── variables.pkr.hcl
│   └── http/
│       └── user-data            # cloud-init autoinstall answer file
│       └── meta-data            # (empty, required by cloud-init)
├── scripts/
│   ├── 10-cis-hardening.sh
│   ├── 20-install-agents.sh
│   └── 90-cleanup.sh
└── terraform/
    ├── main.tf
    ├── variables.tf
    └── clusters.auto.tfvars
Declare the Packer plugin and required version so packer init resolves it deterministically:
# packer/variables.pkr.hcl
packer {
  required_version = ">= 1.10.0"
  required_plugins {
    vsphere = {
      source  = "github.com/hashicorp/vsphere"
      version = "~> 1.4"
    }
  }
}
Initialise once:
cd packer
packer init .
2. Wire identity and secrets (Okta/Entra + Vault)
Never put the vCenter password in a .pkrvars.hcl or terraform.tfvars. Two layers protect it.
Human and pipeline access is gated by Okta as the workforce IdP, federated to Microsoft Entra ID. Engineers and the Jenkins/GitHub Actions service principal authenticate through Okta SSO with conditional access; the resulting Entra token is what authorises who may run a build or a terraform apply. The pipeline itself never holds a long-lived vCenter credential.
The credentials themselves come from HashiCorp Vault. Store the vCenter service-account password as a static or (better) a dynamic secret, and have the CI job read it at runtime so it lives only in process memory:
# Pipeline authenticates to Vault using its Entra/JWT identity, not a static token
export VAULT_ADDR="https://vault.kloudvin.internal:8200"
vault login -method=oidc role=ci-packer >/dev/null

# Pull the vCenter creds into env vars Packer/Terraform read
export PKR_VAR_vsphere_password="$(vault kv get -field=password secret/vsphere/svc-packer)"
export TF_VAR_vsphere_password="$PKR_VAR_vsphere_password"
export PKR_VAR_vsphere_username="svc-packer@vsphere.local"
Packer and Terraform both pick up PKR_VAR_* / TF_VAR_* automatically, so the secret never touches disk. Rotate the Vault lease and the password rotates everywhere.
3. Author the autoinstall answer file
The golden image starts from an unattended OS install. For Ubuntu 22.04, that is a cloud-init autoinstall user-data served over Packer’s HTTP server. This file decides the partition layout — and a CIS-compliant layout (separate /var, /var/log, /var/log/audit, /home, /tmp with nodev,nosuid,noexec) is far easier to bake here than to retrofit later.
# packer/http/user-data
#cloud-config
autoinstall:
  version: 1
  locale: en_US.UTF-8
  keyboard: { layout: us }
  identity:
    hostname: golden-build
    username: ansible
    # hash generated with: mkpasswd -m sha-512  (placeholder swapped in by Packer)
    password: "${SSH_PASSWORD_HASH}"
  ssh:
    install-server: true
    allow-pw: true
  storage:
    config:
      - { type: disk, id: disk0, ptable: gpt, wipe: superblock-recursive, grub_device: true }
      - { type: partition, id: boot, device: disk0, size: 1G, flag: boot }
      - { type: partition, id: root, device: disk0, size: 12G }
      - { type: partition, id: var,  device: disk0, size: 8G }
      - { type: partition, id: varlog, device: disk0, size: 6G }
      - { type: partition, id: audit, device: disk0, size: 4G }
      - { type: format, id: fs-root, volume: root, fstype: ext4 }
      - { type: mount, id: m-root, device: fs-root, path: / }
      - { type: format, id: fs-var, volume: var, fstype: ext4 }
      - { type: mount, id: m-var, device: fs-var, path: /var, options: "nodev" }
      - { type: format, id: fs-varlog, volume: varlog, fstype: ext4 }
      - { type: mount, id: m-varlog, device: fs-varlog, path: /var/log, options: "nodev,nosuid,noexec" }
  packages: [open-vm-tools, openssh-server, curl, jq, chrony]
  late-commands:
    # passwordless sudo for the build user so Packer provisioners can harden the box
    - echo 'ansible ALL=(ALL) NOPASSWD:ALL' > /target/etc/sudoers.d/ansible
The empty meta-data file must exist alongside it or cloud-init refuses to start.
4. Write the Packer template (the vsphere-iso builder)
This is the heart of the bake. The vsphere-iso source talks to vCenter, creates a VM, mounts the ISO, and hands the boot command that tells the installer to fetch the autoinstall file from Packer’s HTTP server.
# packer/ubuntu-2204.pkr.hcl
variable "vsphere_server"   { default = "vcenter.kloudvin.internal" }
variable "vsphere_username" {}
variable "vsphere_password" { sensitive = true }
variable "image_version"    { default = "v3" }

source "vsphere-iso" "ubuntu" {
  vcenter_server      = var.vsphere_server
  username            = var.vsphere_username
  password            = var.vsphere_password
  insecure_connection = false                 # use a real vCenter cert in prod

  # Where the throwaway build VM lives
  datacenter   = "DC-Mumbai"
  cluster      = "Cluster-Build"
  datastore    = "vsanDatastore"
  folder       = "templates/build"

  # Hardware
  guest_os_type = "ubuntu64Guest"
  CPUs          = 2
  RAM           = 4096
  disk_controller_type = ["pvscsi"]
  storage{
    disk_size = 40960
    disk_thin_provisioned = true
  }
  network_adapters {
    network      = "PG-Build"
    network_card = "vmxnet3"
  }

  # Boot the ISO and point the installer at the autoinstall payload
  iso_paths    = ["[isos] ubuntu/ubuntu-22.04.4-live-server-amd64.iso"]
  http_directory = "http"
  boot_wait    = "5s"
  boot_command = [
    "c<wait>",
    "linux /casper/vmlinuz --- autoinstall ",
    "ds=nocloud-net\\;s=http://{{ .HTTPIP }}:{{ .HTTPPort }}/<enter>",
    "initrd /casper/initrd<enter>",
    "boot<enter>"
  ]

  # How Packer connects after install to run provisioners
  communicator     = "ssh"
  ssh_username     = "ansible"
  ssh_password     = "${SSH_PASSWORD}"
  ssh_timeout      = "30m"
  ssh_handshake_attempts = 100

  shutdown_command = "sudo shutdown -P now"

  # >>> The output: convert to template AND publish to a content library <<<
  convert_to_template = true
  content_library_destination {
    library     = "golden-images"
    name        = "ubuntu-2204-hardened-${var.image_version}"
    ovf         = true
    destroy     = true   # replace an existing same-name item
  }
}

build {
  name    = "ubuntu-2204-hardened"
  sources = ["source.vsphere-iso.ubuntu"]

  # 1) CIS hardening
  provisioner "shell" {
    execute_command = "echo '${var.vsphere_password}' | {{ .Vars }} sudo -S -E bash '{{ .Path }}'"
    script          = "../scripts/10-cis-hardening.sh"
  }
  # 2) Security + observability agents baked in
  provisioner "shell" { script = "../scripts/20-install-agents.sh" }
  # 3) Generalize / cleanup so every clone is unique
  provisioner "shell" { script = "../scripts/90-cleanup.sh" }
}
Two design choices matter here. First, content_library_destination (not just convert_to_template) is what makes the image distributable to other vCenters — a content library can be published and subscribed across your Mumbai and Pune vCenters, so DR gets the same artifact automatically. Second, the build VM lives on a dedicated Cluster-Build/PG-Build, isolated from production traffic while it boots an un-hardened OS.
5. Bake hardening and agents into the image
The provisioner scripts are where a server stops being generic and becomes yours. Keep them small and idempotent.
scripts/10-cis-hardening.sh applies the controls your auditor checks — using the Ubuntu CIS Ansible role if you have Ansible available, or raw commands otherwise:
#!/usr/bin/env bash
set -euo pipefail
export DEBIAN_FRONTEND=noninteractive

# Option A: drive the CIS role with Ansible (recommended — declarative, auditable)
apt-get update && apt-get install -y ansible
ansible-galaxy install ansible-lockdown.ubuntu2204_cis
ansible-pull -U https://git.kloudvin.internal/platform/cis-baseline.git \
             -i localhost, --connection=local hardening.yml

# Option B equivalents if you are not using the role:
systemctl disable --now rpcbind || true          # kill unused services
sed -i 's/^#\?PermitRootLogin.*/PermitRootLogin no/' /etc/ssh/sshd_config
sed -i 's/^#\?PasswordAuthentication.*/PasswordAuthentication no/' /etc/ssh/sshd_config
auditctl -e 1 || true
echo "kernel.randomize_va_space = 2" > /etc/sysctl.d/60-hardening.conf
scripts/20-install-agents.sh bakes in the three agents the operating model mandates, so every cloned VM is protected and observed from its first boot — not days later when someone remembers:
#!/usr/bin/env bash
set -euo pipefail

# CrowdStrike Falcon — endpoint detection & response for the SOC.
# CID is non-secret-ish but pull it from Vault to avoid baking it in clear.
FALCON_CID="$(curl -s --header "X-Vault-Token: $VAULT_TOKEN" \
  "$VAULT_ADDR/v1/secret/data/falcon" | jq -r .data.data.cid)"
curl -sL https://mirror.kloudvin.internal/falcon/falcon-sensor.deb -o /tmp/falcon.deb
dpkg -i /tmp/falcon.deb
/opt/CrowdStrike/falconctl -s --cid="$FALCON_CID"
# NOTE: do NOT start/AID-register here — let it register on first real boot, not on the template

# Dynatrace OneAgent — full-stack observability, traces & host metrics.
wget -O /tmp/oneagent.sh "https://dynatrace.kloudvin.internal/installer/agent/unix/latest"
sh /tmp/oneagent.sh --set-infra-only=false --set-app-log-content-access=true

# Wiz runtime sensor (optional) — runtime threat + drift on the running guest.
curl -sL https://mirror.kloudvin.internal/wiz/wizsensor.deb -o /tmp/wiz.deb && dpkg -i /tmp/wiz.deb
scripts/90-cleanup.sh generalises the image — the single most-skipped step that causes the worst clone-time bugs (duplicate machine-ids, duplicate SSH host keys, every VM claiming the same DHCP lease):
#!/usr/bin/env bash
set -euo pipefail
apt-get clean && rm -rf /var/lib/apt/lists/*
# Truncate machine-id so cloud-init regenerates a unique one per clone
truncate -s 0 /etc/machine-id && rm -f /var/lib/dbus/machine-id
ln -s /etc/machine-id /var/lib/dbus/machine-id
rm -f /etc/ssh/ssh_host_*          # regenerated on first boot
cloud-init clean --logs            # reset cloud-init so customization runs fresh
rm -f /home/ansible/.bash_history /root/.bash_history
6. Build the golden image
With identity exported (step 2) and the template authored, the build is one command. Run it from CI on a schedule so the image stays current with patches and CVE fixes.
cd packer
SSH_PASSWORD='ChangeMe-FromVault'        # pulled from Vault in CI, not literal
packer validate -var "image_version=v3" .
packer build  -var "image_version=v3" -on-error=cleanup .
A clean run ends with the content-library item published:
==> vsphere-iso.ubuntu: Clear boot order...
==> vsphere-iso.ubuntu: Power on VM...
==> vsphere-iso.ubuntu: Waiting for SSH to become available...
==> vsphere-iso.ubuntu: Running hardening + agent provisioners...
==> vsphere-iso.ubuntu: Shutting down VM...
==> vsphere-iso.ubuntu: Creating content library item ubuntu-2204-hardened-v3...
Build 'ubuntu-2204-hardened' finished after 21 minutes.
Gate before promotion. Before this version is allowed into production, Wiz Code scans the image build (and the IaC) for misconfigurations and exposed secrets, and a ServiceNow change request records the new v3 image and its CVE-fix justification. Only an approved change flips production Terraform to the new template version.
7. Roll out clusters with Terraform
Now the easy half. Terraform’s hashicorp/vsphere provider clones the content-library template into real VMs. Define the provider and a data source for the template:
# terraform/main.tf
terraform {
  required_providers {
    vsphere = { source = "hashicorp/vsphere", version = "~> 2.7" }
  }
}

provider "vsphere" {
  vsphere_server       = var.vsphere_server
  user                 = var.vsphere_username
  password             = var.vsphere_password      # from TF_VAR via Vault
  allow_unverified_ssl = false
}

# Look up where to place the VMs
data "vsphere_datacenter"     "dc"   { name = var.datacenter }
data "vsphere_compute_cluster" "cl"  {
  name = var.cluster
  datacenter_id = data.vsphere_datacenter.dc.id
}
data "vsphere_datastore"      "ds"   {
  name = var.datastore
  datacenter_id = data.vsphere_datacenter.dc.id
}
data "vsphere_network"        "net"  {
  name          = var.port_group
  datacenter_id = data.vsphere_datacenter.dc.id
}

# The golden image, by name, from the content library
data "vsphere_content_library"      "lib" { name = "golden-images" }
data "vsphere_content_library_item" "tpl" {
  name       = var.template_name          # e.g. "ubuntu-2204-hardened-v3"
  type       = "ovf"
  library_id = data.vsphere_content_library.lib.id
}
Then stamp out the cluster with a for_each over a map of nodes, customising each clone’s hostname and static IP:
# terraform/main.tf (continued)
resource "vsphere_virtual_machine" "node" {
  for_each = var.nodes                       # map: { "app-01" = "10.20.4.11", ... }

  name             = each.key
  resource_pool_id = data.vsphere_compute_cluster.cl.resource_pool_id
  datastore_id     = data.vsphere_datastore.ds.id
  num_cpus         = 4
  memory           = 8192
  guest_id         = "ubuntu64Guest"
  firmware         = "efi"

  network_interface{
    network_id = data.vsphere_network.net.id
    adapter_type = "vmxnet3"
  }
  disk{
    label = "disk0"
    size = 40
    thin_provisioned = true
  }

  clone {
    template_uuid = data.vsphere_content_library_item.tpl.id
    customize {
      linux_options{
        host_name = each.key
        domain = "kloudvin.internal"
      }
      network_interface {
        ipv4_address = each.value
        ipv4_netmask = 24
      }
      ipv4_gateway    = var.gateway
      dns_server_list = ["10.20.0.10", "10.20.0.11"]
    }
  }

  lifecycle { ignore_changes = [clone] }     # don't re-clone on later image bumps
}
Drive it with per-cluster tfvars so the same module serves Mumbai prod and Pune DR — only the variables change:
# terraform/clusters.auto.tfvars
datacenter    = "DC-Mumbai"
cluster       = "Cluster-Prod"
datastore     = "vsanDatastore"
port_group    = "PG-App-Prod"
gateway       = "10.20.4.1"
template_name = "ubuntu-2204-hardened-v3"
nodes = {
  "app-prod-01" = "10.20.4.11"
  "app-prod-02" = "10.20.4.12"
  "app-prod-03" = "10.20.4.13"
}
Apply through the same Okta/Entra-gated pipeline:
cd terraform
terraform init
terraform plan  -out tfplan          # Wiz Code scans this plan in CI
terraform apply tfplan
Three identical, hardened, agent-equipped VMs come up in a few minutes. Point the tfvars at DC-Pune/Cluster-DR and the same image lands in DR.
Validation
Prove the image and the roll-out actually did what you intended — do not trust the green build alone.
# 1) The template exists in the content library
govc library.ls "golden-images/ubuntu-2204-hardened-v3"

# 2) Terraform converged with the expected count
terraform state list | grep vsphere_virtual_machine | wc -l   # -> 3

# 3) Every node is reachable and uniquely identified (no duplicate machine-id)
for ip in 10.20.4.11 10.20.4.12 10.20.4.13; do
  ssh ansible@$ip 'hostname; cat /etc/machine-id'
done

# 4) Hardening actually applied (spot-check a CIS control)
ssh ansible@10.20.4.11 'sshd -T | grep -E "permitrootlogin|passwordauthentication"'
# expect: permitrootlogin no / passwordauthentication no

# 5) Agents are live, not just installed
ssh ansible@10.20.4.11 'sudo /opt/CrowdStrike/falconctl -g --aid'   # AID present = registered
ssh ansible@10.20.4.11 'systemctl is-active oneagent'              # active = Dynatrace reporting
Confirm in vCenter that each VM shows VMware Tools running (proves open-vm-tools baked in correctly and guest customization completed), and confirm the host appears in the Dynatrace tenant and the CrowdStrike console. A node that is up but missing from both is the failure you most want to catch here.
Rollback and teardown
Two different rollbacks — image-level and infrastructure-level — and you need both.
Roll back a bad image version. Because the template is versioned and ignore_changes = [clone] keeps existing VMs pinned, reverting is just pointing tfvars back at the previous good version for new builds:
template_name = "ubuntu-2204-hardened-v2" # was v3
Existing VMs are untouched; only freshly-provisioned ones use v2. Delete the bad content-library item once nothing references it:
govc library.rm "golden-images/ubuntu-2204-hardened-v3"
Tear down a cluster’s VMs. Terraform owns them, so destroy is clean and scoped to the tfvars in play:
cd terraform
terraform plan  -destroy -out destroy.plan
terraform apply destroy.plan
If a single node is wedged, remove just it: terraform destroy -target='vsphere_virtual_machine.node["app-prod-03"]'. Always run the -destroy plan first — it is the only thing standing between you and accidentally deleting the wrong cluster’s VMs because a tfvars pointed at the wrong datacenter.
Common pitfalls
- Forgetting to generalise (step 5). If you skip the
machine-id/SSH-host-key reset, every clone shares an identity: duplicate DHCP leases, SSH host-key warnings, and Dynatrace/CrowdStrike collapsing many hosts into one. Always truncatemachine-idand removessh_host_*before the template is sealed. - Boot command drift between Ubuntu point releases. The
vmlinuz/initrdpaths and the autoinstall kernel args change between ISO builds. Pin the exact ISO, and when you bump it, re-test theboot_commandinteractively before trusting CI. - HTTP server unreachable from the build VM. Packer serves the autoinstall file on an ephemeral port; if
PG-Buildcannot route back to the Packer host (firewall, wrong VLAN), the install hangs at “waiting for cloud-init.” Usehttp_bind_address/http_port_minto pin a reachable port and open it. - Provisioning against the production cluster. Build VMs are un-hardened while they boot. Keep
cluster/networkin the Packer source pointed at an isolated build cluster, never prod. convert_to_templatewithout a content library. A plain template is stuck in one vCenter. For multi-datacentre DR, you must publish to a content library and subscribe it in the paired vCenter, or your “identical DR image” is a manual copy that drifts.- Terraform re-cloning on image bumps. Without
lifecycle { ignore_changes = [clone] }, bumpingtemplate_namemakes Terraform want to destroy and recreate every running VM. Pin it, and treat image upgrades as a deliberate blue/green roll, not an in-place apply.
Security notes
The image is your security baseline, so harden at bake time, not after deploy. Bake CIS controls, CrowdStrike Falcon (EDR for the SOC), and the Wiz runtime sensor into the template so coverage is universal and immediate — there is no window where a fresh VM is unprotected. Keep every credential out of the artifacts: vCenter and agent secrets come from HashiCorp Vault at runtime; the only people and pipelines that can build or apply are gated by Okta → Entra ID SSO with conditional access. Run Wiz Code against both the Packer build and the Terraform plan in CI so a misconfiguration or a leaked key is caught before the image or the VMs exist, and route a new image version through a ServiceNow change approval so production promotion is auditable. Use a real vCenter TLS certificate (insecure_connection = false, allow_unverified_ssl = false) — skipping verification “just to get it working” is how a build host ends up talking to a spoofed vCenter.
Cost notes
The economics of golden images are mostly about time reclaimed and drift avoided, but a few levers keep the infrastructure cheap too. Thin-provision both the template disk and the clones (disk_thin_provisioned = true) so a 40 GB image only consumes what it uses — across dozens of clones on vSAN that is large. Run the bake on a small build cluster sized for one VM at a time, not on expensive production hosts. Schedule image rebuilds monthly plus on-CVE, not nightly, so you patch promptly without burning CI minutes and vCenter cycles on rebuilds nothing changed. And the biggest saving is indirect: because every VM is identical and observed by Dynatrace from first boot, you size the cluster on real utilisation instead of padding for the unknown drift of hand-built snowflakes — and you stop paying engineers to debug machines that should never have differed.
Going deeper
The seven steps above get a working pipeline. This section is the “why it is built that way” — the internals a platform engineer needs to operate golden images at scale, reason about failures, and defend the design in review.
How a Packer HCL2 template is wired: source + build
A Packer HCL2 configuration is two kinds of top-level block, and understanding the split is most of the battle:
- A
sourceblock declares a builder and its configuration — the reusable “what machine do I make and where.” In this lesson that issource "vsphere-iso" "ubuntu". A source on its own does nothing; it is a definition. - A
buildblock references one or more sources (sources = ["source.vsphere-iso.ubuntu"]) and then lists the provisioners (what to run inside the machine) and post-processors (what to do with the artifact afterwards). This is the “actually do it” block.
The third piece is the packer {} block with required_plugins. Since Packer 1.7, builders live in plugins that are versioned and released independently of Packer core — vsphere-iso and vsphere-clone both ship in github.com/hashicorp/vsphere. packer init reads required_plugins and downloads the matching plugin binary into ~/.config/packer/plugins, exactly the way terraform init fetches providers. That is why the lesson pins version = "~> 1.4" and runs packer init . before anything else: a floating plugin is how a “reproducible” build quietly starts producing different images.
Two offline commands round out the loop and cost nothing to run in CI before you ever touch vCenter:
packer fmt -check .     # canonical formatting, like terraform fmt
packer validate .       # schema + variable validation (needs vars);
packer validate -syntax-only .   # HCL parse only, no vCenter, no vars
HCL2 has been the default template language since Packer 1.5; the old JSON template format still parses but is deprecated for new work — write HCL2. Inside it you get variable, locals, ${...} interpolation, and references like build.name and source.vsphere-iso.ubuntu.
vsphere-iso vs vsphere-clone: two builders, two starting points
The single most useful thing to understand about the vSphere plugin is that it ships two builders that differ only in what they start from:
vsphere-iso |
vsphere-clone |
|
|---|---|---|
| Starts from | an OS install ISO | an existing VM or template |
| Does a full OS install? | yes (unattended, via autoinstall) | no — the OS is already there |
| Typical time | ~15–25 min | ~3–6 min |
| Use it to | build the base golden image from scratch | layer on top of a base image |
| Key field | iso_paths, boot_command, http_directory |
template (the source VM/template name) |
This unlocks the layered-image pattern, which is how mature shops keep rebuilds cheap. You build ubuntu-2204-hardened from the ISO with vsphere-iso monthly (the expensive part). Then a separate, fast vsphere-clone build starts from that hardened base and adds an application layer — ubuntu-2204-nginx, ubuntu-2204-k8s-node — without ever reinstalling the OS:
source "vsphere-clone" "nginx" {
  vcenter_server = var.vsphere_server
  username       = var.vsphere_username
  password       = var.vsphere_password
  template       = "ubuntu-2204-hardened-v3"   # the base golden image
  datacenter     = "DC-Mumbai"
  cluster        = "Cluster-Build"
  datastore      = "vsanDatastore"
  communicator   = "ssh"
  ssh_username   = "ansible"
}
Rebuild the OS-and-hardening base on the slow monthly cadence; re-layer app images in minutes whenever the app changes. The base image is a dependency the layer inherits, so a CVE fix in the base propagates to every layer on the next rebuild.
Provisioners and post-processors: what runs, and what happens to the artifact
Provisioners run inside the booted build VM, after the OS is up and Packer’s communicator (SSH here) connects:
shell— inline commands or ascriptfile, as the lesson uses.execute_commandcontrols how it is invoked (the lesson pipes a sudo password);environment_vars,pause_before, andexpect_disconnect(for provisioners that reboot the box) are the fields you reach for next.file— upload a file or directory from the build host into the guest (configs, certs, a tarball).ansiblevsansible-local— the big one for hardening.ansibleruns the playbook from the build host over SSH (Ansible need not be on the guest);ansible-localcopies the playbook into the guest and runs it there (the guest needs Ansible, but the build host does not). The lesson’sansible-pullin10-cis-hardening.shis a third variant — the guest pulls and applies its own playbook.
Post-processors run after the build, on the produced artifact — they never touch the guest. The most useful for a golden-image pipeline is manifest, which writes a small JSON recording exactly what was built (name, UUID, timestamp). That file is how the Packer stage hands the freshly-built template name to the downstream Terraform stage in CI without hard-coding it:
build {
  # ... sources + provisioners ...
  post-processor "manifest" {
    output = "manifest.json"      # CI reads this to learn the new image name/UUID
  }
}
(For vSphere, “publish to the content library” is a builder feature — the content_library_destination block in the source — not a post-processor, because it happens as vCenter seals the template. The manifest post-processor is still what you emit for the pipeline to consume.)
The golden-image pipeline: immutable, versioned, CI-driven
The operating model is immutable infrastructure: you never SSH into a running golden VM to patch it. When something must change — a CVE, a new agent version, a config baseline update — you rebuild the image, bump its version, and re-stamp fresh VMs. Treat VM images exactly like container images: built once, tagged, immutable, and cheap to replace.
That makes versioning load-bearing. Use a monotonic tag (ubuntu-2204-hardened-v3) or a date stamp (ubuntu-2204-hardened-2026-06), never a silently-overwritten latest in production. Keep N-1 and N-2 published so a rollback is a one-line tfvars change (as in the Rollback section) rather than an emergency rebuild.
A production pipeline chains these stages, each gating the next:
packer init → packer fmt -check / validate → packer build → scan (Wiz Code / Trivy on the image + IaC) → publish to content library → change gate (ServiceNow) → promote → separate Terraform stage points at the approved version.
The Terraform stage is deliberately decoupled: it consumes an already-approved image version, so building an image and deploying it are two independently auditable events. Upgrading the fleet is then a blue/green image roll — stand up new VMs from v4, shift traffic, retire the v3 VMs — never an in-place mutation. This course covers the delivery side of that in Configure Spacelift stacks, policies & drift.
The vsphere Terraform provider: the objects you clone into
The roll-out half is a small, predictable set of provider objects. The data sources locate where the VM goes and what it is cloned from; the resource creates it:
| Object | Kind | What it gives you |
|---|---|---|
vsphere_datacenter |
data | the datacenter id everything else hangs off |
vsphere_compute_cluster |
data | resource_pool_id — placement into the cluster’s root pool; DRS then picks the host |
vsphere_datastore |
data | where the clone’s disks live |
vsphere_network |
data | the port group / network_id the NIC attaches to |
vsphere_content_library + ..._item |
data | the golden image, by name, portable across vCenters |
vsphere_virtual_machine |
resource | the actual VM, with a clone {} + customize {} block |
The clone {} block’s template_uuid says what to copy; the nested customize {} block runs guest customization — VMware’s mechanism for setting hostname, static IP, DNS, and (on Windows) SID/domain-join after the clone, through VMware Tools. This is why the autoinstall installs open-vm-tools: without the tools running in the guest, customize {} silently does nothing and every clone boots with the template’s hostname and no network. linux_options {} vs windows_options {} selects the guest family.
One subtlety worth internalising: you can clone from a plain VM template (via a vsphere_virtual_machine data source) or from a content-library item. Only the content-library path is portable across vCenters — which is the entire reason this design routes through a library rather than a bare template.
Content libraries: how the image reaches DR without a manual copy
A content library is a vCenter-managed store of OVF/OVA templates and ISOs. It comes in three flavours, and the distinction is what makes “identical prod and DR” true by construction:
- Local — templates stored in this vCenter only.
- Published — a local library exposed at a subscription URL for other vCenters to consume.
- Subscribed — points at a published library elsewhere and syncs its items (on-demand or immediately).
Publish golden-images in Mumbai; create a subscribed copy in Pune’s vCenter pointing at Mumbai’s publish URL with auto-sync on. When Packer publishes v4 to Mumbai, Pune’s library replicates it, and Pune’s Terraform — reading the same vsphere_content_library_item name — deploys a byte-identical image. DR cannot drift from prod because there is no manual copy step to get wrong. Libraries are backed by a datastore or NFS, so size the backing store for N image versions × image size.
Full clones vs linked clones
The clone {} block defaults to a full clone, and for golden-image servers that is almost always what you want. But it is worth knowing the alternative:
| Full clone | Linked clone | |
|---|---|---|
| Disks | independent copy of all disks | shares the base via a snapshot delta |
| Create time | slower (copies data) | near-instant |
| Footprint | full size per VM | tiny delta per VM |
| Depends on source? | no — self-contained | yes — pinned to the source snapshot |
| Read performance | native | can be slower (base + delta) |
| Good for | long-lived servers (this lesson) | large fleets of ephemeral VMs — VDI, CI runners |
A linked clone in the provider needs linked_clone = true in the clone {} block and the source must be a snapshot, not a bare template. For the insurer’s app clusters — long-lived, performance-sensitive — full clones are correct; the storage saving of linked clones is not worth coupling every VM’s fate to one source snapshot. Reach for linked clones only when you are spinning up and tearing down hundreds of short-lived VMs where create-speed and footprint dominate.
Drift between image versions
“Drift” means two different things here, and golden images address them differently:
- Config drift on a running VM — someone SSHes in and changes a box, so it no longer matches its image. This is the disease golden images are designed to cure: you don’t reconcile the box, you re-stamp it from the image (cattle, not pets). This course’s Terraform drift detection & reconciliation lesson goes deep on detecting the Terraform-managed slice of this.
- Version skew across the fleet — after a partial roll, half your VMs are on
v2and half onv3. To detect it you must record which image each VM was born from. Stamp that onto every VM at clone time — viaextra_config, a vSphere tag, or acustom_attribute— then query the fleet for the spread:
resource "vsphere_virtual_machine" "node" {
  # ... as in step 7 ...
  extra_config = {
    "guestinfo.image.version" = var.template_name   # e.g. ubuntu-2204-hardened-v3
  }
}
Note the deliberate trade-off in lifecycle { ignore_changes = [clone] }: it tells Terraform to stop tracking the clone source, so a template bump does not force a destroy/recreate. That is what makes existing VMs stable across image bumps — but it also means Terraform will not tell you a VM is on an old image. The born-from-version tag above is how you get that visibility back.
Secrets for vCenter (and the agents)
The vCenter service-account password, the Vault token, the Falcon CID, and the Dynatrace enrolment token are all secrets, and none of them belong in a file. The lesson’s pattern — inject via PKR_VAR_* / TF_VAR_* from Vault at runtime — is the right default, but two nuances matter:
sensitive = trueis not encryption. Marking a Terraform variablesensitiveonly masks it inplan/CLI output. Terraform state still stores it in cleartext, so you must also encrypt the backend (or use HCP Terraform / SOPS) and lock down who can read state. A password in a public state file is a breach even ifsensitive = true.- Prefer dynamic over static. A Vault dynamic secret with a short lease beats a long-lived static password — the credential the pipeline holds expires on its own, so a leaked CI log ages out. Rotate the lease and the password rotates everywhere that reads it.
For the identity side (Okta → Entra, OIDC login to Vault) and the full secrets-delivery pattern, see Secrets in IaC: Vault dynamic credentials & pipelines. For pinning the provider and plugin versions this whole design depends on, see Terraform providers deep dive: versions, aliases & the lock file.
Practice challenges
Work these in order — they climb from “read the config” to “design a safe upgrade.” Each has a worked solution; try it before you open it.
<details> <summary><strong>1. Beginner — install the vSphere plugin.</strong> Pin the Packer vSphere plugin to <code>~> 1.4</code> and run the command that actually downloads it. Which file, which block, which command?</summary>
Add the required_plugins block to packer/variables.pkr.hcl (already present in the lesson) and run packer init:
packer {
  required_plugins {
    vsphere = {
      source  = "github.com/hashicorp/vsphere"
      version = "~> 1.4"
    }
  }
}
cd packer && packer init .
Why: since Packer 1.7 builders live in plugins, not core. packer init is the only command that reads required_plugins and fetches the binary — without it, vsphere-iso is an unknown builder.
</details>
<details> <summary><strong>2. Beginner — check the template with no vCenter.</strong> You are on a laptop with no vCenter reachable. How do you confirm the template is well-formed and canonically formatted before you push?</summary>
packer fmt -check .          # fails if formatting is off
packer validate -syntax-only .   # parses HCL without contacting vCenter or needing vars
Why: fmt -check and validate -syntax-only are fully offline. Plain packer validate also checks variables and can reach vCenter, so it needs creds; -syntax-only catches the HCL mistakes without any of that.
</details>
<details> <summary><strong>3. Intermediate — layer an app image cheaply.</strong> You need an nginx image on top of the hardened base, but a 20-minute OS reinstall every time nginx changes is wasteful. Which builder do you switch to, and what one field changes the starting point?</summary>
Switch from vsphere-iso to vsphere-clone and set template to the base image:
source "vsphere-clone" "nginx" {
  template     = "ubuntu-2204-hardened-v3"   # start from the base, not an ISO
  # vcenter_server / username / password / cluster / datastore / communicator ...
}
build {
  sources = ["source.vsphere-clone.nginx"]
  provisioner "shell" { inline = ["sudo apt-get update && sudo apt-get install -y nginx"] }
}
Why: vsphere-clone starts from an existing template, so the OS install is skipped entirely. You rebuild the expensive base monthly and re-layer nginx in minutes — the layered-image pattern.
</details>
<details> <summary><strong>4. Intermediate — record each VM’s image version.</strong> After a partial roll you can’t tell which VMs are on <code>v3</code> vs <code>v2</code>. Make every Terraform-provisioned VM record the image it was born from.</summary>
Stamp the version onto the VM at clone time (any of extra_config, a vSphere tag, or a custom attribute works — extra_config is simplest):
resource "vsphere_virtual_machine" "node" {
  # ... clone/customize as in step 7 ...
  extra_config = {
    "guestinfo.image.version" = var.template_name   # ubuntu-2204-hardened-v3
  }
}
Query later with govc vm.info -e app-prod-01 | grep image.version.
Why: ignore_changes = [clone] deliberately makes Terraform stop tracking the clone source, so it will not warn you about version skew. A born-from-version stamp is the only reliable way to audit the spread and find stragglers to re-stamp.
</details>
<details> <summary><strong>5. Advanced — make the image reach DR automatically.</strong> Pune’s vCenter can’t see Mumbai’s <code>golden-images</code> library. Without hand-copying an OVF, how does <code>v3</code> land in Pune so the same tfvars deploy there?</summary>
Use a published → subscribed content library:
- In Mumbai, mark the
golden-imageslibrary Published (it exposes a subscription URL). - In Pune’s vCenter, create a Subscribed library pointing at that URL, with automatic sync enabled.
- Pune’s Terraform reads the same
vsphere_content_library_itemname (ubuntu-2204-hardened-v3) — no code change, just a differentdatacenter/clustertfvars.
Why: a published/subscribed library replicates the artifact by construction. There is no manual copy step, so the DR image cannot silently drift from prod — the whole reason the design routes through a library instead of a bare template. </details>
<details> <summary><strong>6. Advanced — upgrade v3 → v4 without recreating running VMs.</strong> You bump <code>template_name</code> to <code>v4</code> and <code>terraform plan</code> wants to destroy and recreate all three nodes. Explain why, and give the two-part fix for a safe adoption.</summary>
Why the plan does that: changing template_name changes the clone {} block, and a VM’s clone source is not mutable in place — so Terraform’s only way to reconcile is destroy + recreate.
The two-part fix:
- Keep
lifecycle { ignore_changes = [clone] }so existingv3VMs stay pinned and untouched by the bump. - Adopt
v4as new VMs — add new keys to thenodesmap (or a parallel instance group), let them come up, shift traffic, then remove the old keys. A blue/green image roll.
Why: golden-image upgrades are immutable replacements, not in-place edits. You add fresh VMs from the new image and retire the old ones, so a bad v4 never takes down a running node — you just don’t cut over to it.
</details>
Common beginner mistakes
These are misconceptions about the model, distinct from the operational traps in Common pitfalls above. Fixing the mental model prevents whole classes of the pitfalls.
-
“A golden image is basically a snapshot/backup.” No. A snapshot is a point-in-time delta of one specific running VM, kept to roll that VM back. A golden image is a generalised, identity-stripped template meant to be cloned into many new VMs. Right model: image = the mould you press copies from; snapshot = the undo button on one machine.
-
“When a CVE lands I’ll just SSH in and patch the running VMs.” That reintroduces exactly the drift golden images exist to eliminate — now some boxes are patched and some are not, and none match any image. Right model: patch the image, bump the version, re-stamp. Immutable infrastructure means you replace machines, you don’t edit them. Cattle, not pets.
-
“Packer and Terraform overlap — I only really need one.” They are two non-overlapping halves. Packer builds an artifact (the image) and then exits — it has no state and manages no running infrastructure. Terraform provisions and tracks running infrastructure from that artifact — but it will not install an OS or harden a box. Right model: Packer = build-time (make the image); Terraform = deploy-time (run VMs from it).
-
“
sensitive = truemeans my password is safe.” It only masks the value inplan/CLI output. Terraform state still stores it in cleartext, so an unencrypted or world-readable state file leaks it regardless. Right model: mark itsensitiveand encrypt/lock down state and source the secret from Vault at runtime — three controls, not one. -
“Golden images mean nothing gets configured at deploy time.” The image is the common baseline; per-VM identity — hostname, static IP, joined identity, app config, secrets — still has to be applied at clone time (guest
customize {}) and first boot (cloud-init). Right model: bake the common 90% into the image; inject the specific 10% per clone. An image with no customization step gives you a cluster of identical hostnames and no network. -
“Bigger image = more baked in = better.” Over-baking (app code, per-environment config, secrets, sprawling tools) makes the image brittle, slow to rebuild, and welded to one use case. Right model: bake the OS, hardening, and universal agents into a lean base; add app-specifics with a fast
vsphere-clonelayer or config management. Keep the base general so every team can build on it.
Glossary
- Golden image — a hardened, generalised, versioned VM template built once and cloned into many running VMs. The unit of “bake once, deploy many.”
- Immutable infrastructure — the practice of replacing servers (re-stamping from a new image) instead of modifying running ones. Rebuild, don’t patch-in-place.
- Drift — divergence from intended state. Config drift = a running VM changed out-of-band; version skew = different VMs running different image versions.
- Packer — HashiCorp’s tool for building machine images. Boots a throwaway VM, provisions it, and seals it into a template/image. Has no state and manages nothing after it exits.
- HCL2 — HashiCorp Configuration Language v2, the default (since Packer 1.5 / all modern Terraform) template language: blocks, variables,
${...}interpolation. sourceblock — a Packer builder definition: what machine to make and where. Inert until abuildreferences it.buildblock — references sources and lists the provisioners and post-processors to run. The “do it” block.- Builder — the plugin that actually creates the machine.
vsphere-isobuilds from an OS ISO;vsphere-clonebuilds from an existing VM/template. - Provisioner — a step that runs inside the build VM (
shell,file,ansible/ansible-local) to install and configure software. - Post-processor — a step that runs after the build, on the produced artifact (e.g.
manifest,checksum,shell-local). Never touches the guest. packer init— readsrequired_pluginsand downloads the plugin binaries. The equivalent ofterraform initfor Packer.- Autoinstall / cloud-init — Ubuntu’s unattended-install mechanism. The
user-datafile answers the installer’s questions (partitioning, user, packages); the emptymeta-datafile must sit beside it. - CIS benchmark / hardening — the Center for Internet Security’s configuration baselines; “hardening” is applying them (SSH policy, partition mount options, auditd, sysctls).
- Generalise — strip machine-specific identity (machine-id, SSH host keys) before sealing a template so each clone regenerates a unique identity. The single most-skipped step.
- Template (VM template) — a VM marked non-runnable and used only as a clone source. Lives in one vCenter unless published via a content library.
- Content library — a vCenter store of OVF templates/ISOs. Local, Published (exposed to other vCenters), or Subscribed (syncing from a published one). Makes images portable to DR.
- Clone — a copy of a template into a new VM. A full clone is independent; a linked clone shares the base disk via a snapshot delta and is tiny but source-dependent.
- Guest customization /
customize {}— VMware’s post-clone step (via VMware Tools /open-vm-tools) that sets hostname, IP, DNS, domain-join. Silently no-ops if the tools aren’t in the image. open-vm-tools/ VMware Tools — the in-guest agent VMware uses for customization, graceful shutdown, and reporting. Guest customization depends on it.- vCenter / ESXi — vCenter is the management plane for a fleet of ESXi hypervisor hosts. Packer and the Terraform provider talk to vCenter, not to hosts directly.
- DRS — Distributed Resource Scheduler; picks which ESXi host in a cluster runs a VM. You place into the cluster’s resource pool and DRS does the rest.
- Datastore / vSAN — where VM disks live. vSAN is VMware’s software-defined storage pooling local host disks; thin provisioning saves space across many clones.
- Port group — a named network on a vSwitch/distributed switch; the
vsphere_networka VM’s NIC attaches to. - Resource pool / compute cluster — a cluster groups ESXi hosts;
vsphere_compute_clustergives Terraform theresource_pool_idused for placement. - Data source (Terraform) — a read-only lookup of existing infrastructure (
vsphere_datacenter,vsphere_datastore,vsphere_content_library_item) used to feed a resource. for_each— Terraform meta-argument that creates one instance per map/set entry — here, one VM per node in thenodesmap.lifecycle { ignore_changes = [...] }— tells Terraform to stop reconciling the named attributes, so a template bump doesn’t destroy/recreate pinned VMs. A deliberate trade-off against version visibility.- Blue/green image roll — upgrading by standing up new VMs from the new image, shifting traffic, then retiring the old — instead of mutating running VMs.
PKR_VAR_/TF_VAR_— environment-variable prefixes Packer and Terraform read automatically, used to inject secrets from Vault without writing them to disk.- Vault / dynamic secret — HashiCorp’s secrets manager; a dynamic secret is generated on demand with a short lease so it expires on its own, beating a static password.
- OIDC / SSO / conditional access — the identity layer: Okta federated to Microsoft Entra ID authenticates who may build or apply; the pipeline holds no long-lived vCenter credential.
- EDR / OneAgent / runtime sensor — the baked-in agents: CrowdStrike Falcon (endpoint detection & response for the SOC), Dynatrace OneAgent (full-stack observability), Wiz (runtime threat/drift). Baked in so coverage is universal from first boot.
govc— the VMware CLI (from thegovmomiGo SDK) used here to verify library items, VM inventory, and custom attributes outside Terraform.- OVF / OVA — the open packaging format for a VM (OVF = descriptor + disks; OVA = a single tarball). Content-library templates are stored as OVF.